
Using chatbots with Front Chat
Overview
Front chatbots are a powerful tool to ensure your team is focused on answering the most important conversations. Chatbots can help you gather information about a customer’s inquiry. From there, the chatbot can either directly resolve the inquiry, or can pass it along to an agent to handle.
Take a Front Academy course here to learn more about leveraging chatbots to achieve your goals.
Have questions? Ask them in our AMA in Front Community!
When to use chatbots
Collecting information about a chat visitor’s request
Use chatbots to collect more information about a topic, product, or issue your chat visitors are reaching out on before your team hops into the chat. You can also collect contact details using the chatbot.
Deflecting commonly asked questions from your team
Chatbots are a great tool for directly responding to commonly asked questions to ensure your team can remain focused on those complex issues that require a human touch.
Qualifying sales leads
Use chatbots to collect contact and account information to qualify leads passing through your website.
Prerequisites
You must have Front company admin access OR the default workspace admin role to create and edit chatbots.
Creating a chatbot
You will need to have a Front Chat channel set up in order to use chatbots. Instructions for configuring a Front Chat channel can be found here.
Step 1
Click the gear icon, then select the workspace you'd like to create a chatbot in.
Step 2
Click Bots and engagement in the left menu.
Step 3
In the Chatbots tab, click Create chatbot.
Step 4
Enter a name for your chatbot and select the Front Chat channel that will be connected to this chatbot. You can also optionally provide a description for the chatbot.
Step 5
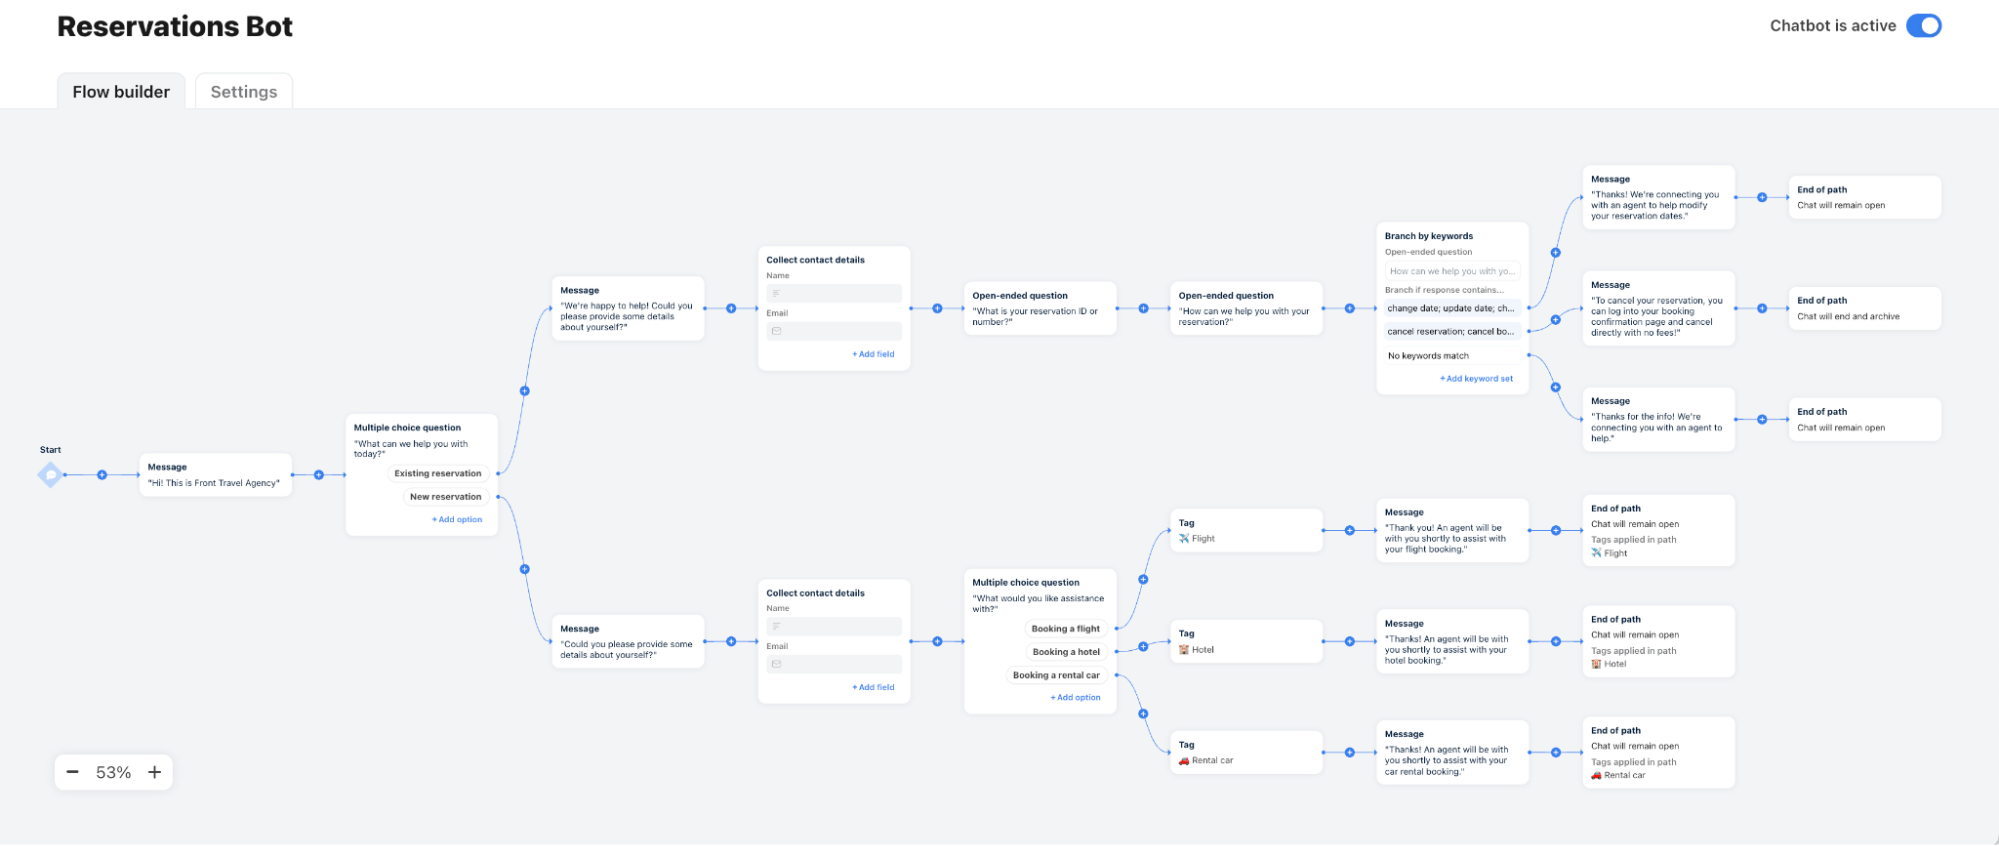
After clicking Continue, you can now build your chatbot flow in the visual bot flow builder. Click on the (+) plus icon within any arrow linking chatbot steps to add a new step to your flow.
Step 6
To save changes to your chatbot, click the Save as draft button.
Step 7
Once you’re finished configuring your chatbot flow, click the Publish button. Once active, the chatbot will be visible in the chat widget on your website.
Chatbot step types
There are three different categories of step types you can use in your chatbot flow.
Visitor-facing steps: Visitor-facing steps allow you to send messages / collect information from your chat visitor, and will be interactions that are visible in the chat window on your website.
Internal-facing steps: Internal-facing steps are actions that affect the structure of your chatbot flow (i.e., any paths that are created) and will also impact any attributes on the conversation that’s created in Front once the chatbot flow ends (i.e., tags).
Third-party action: Third-party action steps allow the chatbot to automatically fetch and display data from your third-party systems.
Step name | Step type | Step description | Limitations |
AI Answers | Visitor-facing | Enable your chatbot to clarify and respond automatically to visitors based on your support content. See this article to learn more. | This is a legacy feature. AI Answers is no longer available for purchase. |
Collect inputs | Visitor-facing | Allows the chatbot to ask visitors for specific details. e.g. Asking for an order number. Data collected from this step is not stored in Front, but is included in chat transcripts. This step is used to collect details for the “Send app request” step, or can be used with dynamic variables in the chatbot flow. | Only accepts simple text or numbers. |
Collect contact details | Visitor-facing | Collect contact fields such as name, email, phone number, and custom contact fields from the chat visitor. If an existing contact matches the information provided, the conversation will be associated with that contact. Otherwise, a new contact will be created with the information provided. | Maximum of 3 contact fields in the collect contact details step. |
Open-ended question | Visitor-facing | Ask an open-ended question that you’d like chat visitors to respond to. Unlike Message, chat visitors are able to respond to open-ended questions. | Character limit of 5,000 |
Message | Visitor-facing | Configure a message that you’d like to send to chat visitors from your bot. You can include image and PDF attachments. | Character limit of 5,000 |
Multiple choice question | Visitor-facing | Configure a question with pre-set answer options. Chat visitors can only respond by selecting one of the multiple-choice options. | Maximum of 8 multiple-choice options. |
Branch by online hours | Internal-facing | Branch your chatbot flow into different paths based on your team's online hours. Set up specific flows if a message is received during or outside online hours. | See this article |
Branch by visitor data | Internal-facing | Use dynamic variables to branch your chatbot flows based on visitor website data or contact data stored in Front. See this article to learn more. | See this article |
Branch by keywords | Internal-facing | Branch your chatbot flow into different paths based on keywords identified in a chat visitor’s response to an open-ended question. You can set a priority order for the different keywords. If a chat visitor’s message matches multiple keywords, the chatbot flow will follow the first keyword path it matches based on the priority you set. | Maximum of 40 characters for a single keyword. Maximum of 60 keywords per path. This step can only be added if there’s an open-ended question step earlier in the path. Keywords are not case-sensitive. |
Tag | Internal-facing | Add a tag to the resulting chat conversation for different paths in your chatbot flow. | Maximum of 10 tags per tag step. |
Branch by verified user | Internal-facing | Branch your chatbot flow into different paths using custom contact field data collected outside of the chatbot flow. e.g. Contact data added to Front manually, via CSV import, CRM sync.
| Your Front Chat channel must have the verified users setting set up to use this step. |
Send app request | Third-party action | Uses details from the “Collect inputs” step to look up information in a third-party system, then displays it to the chat visitor. e.g. Order tracking to view current status. | Requires an app request to be set up first. Can only fetch the types of data supported by the connected system. Does not support POST requests - typically associated with creating/modifying data. If something goes wrong (e.g. invalid ID), the error message depends on admin setup. |
End of path | Internal action | This step signifies the end of each path within the chatbot flow. It is automatically added to the end of a path every time a new bot path is created. For each end of path step, you can choose one of these options:
| For the "Create follow-up conversation via email and end visitor chat" option, you must have a "Collect contact details" step earlier in the same branch AND set Email as a required field. |
Saved flows
Saved flows make it much easier to quickly build and manage your chatbot flow. If you have a series of steps used multiple times throughout your chatbot flow, consider creating a saved flow with these steps instead.
You can build your saved flow once and add it anywhere you want in your main flow. Any edits you make to your saved flow will automatically apply wherever it appears in your chatbot.
This feature is available on the latest Professional plan or above.
Creating a saved flow
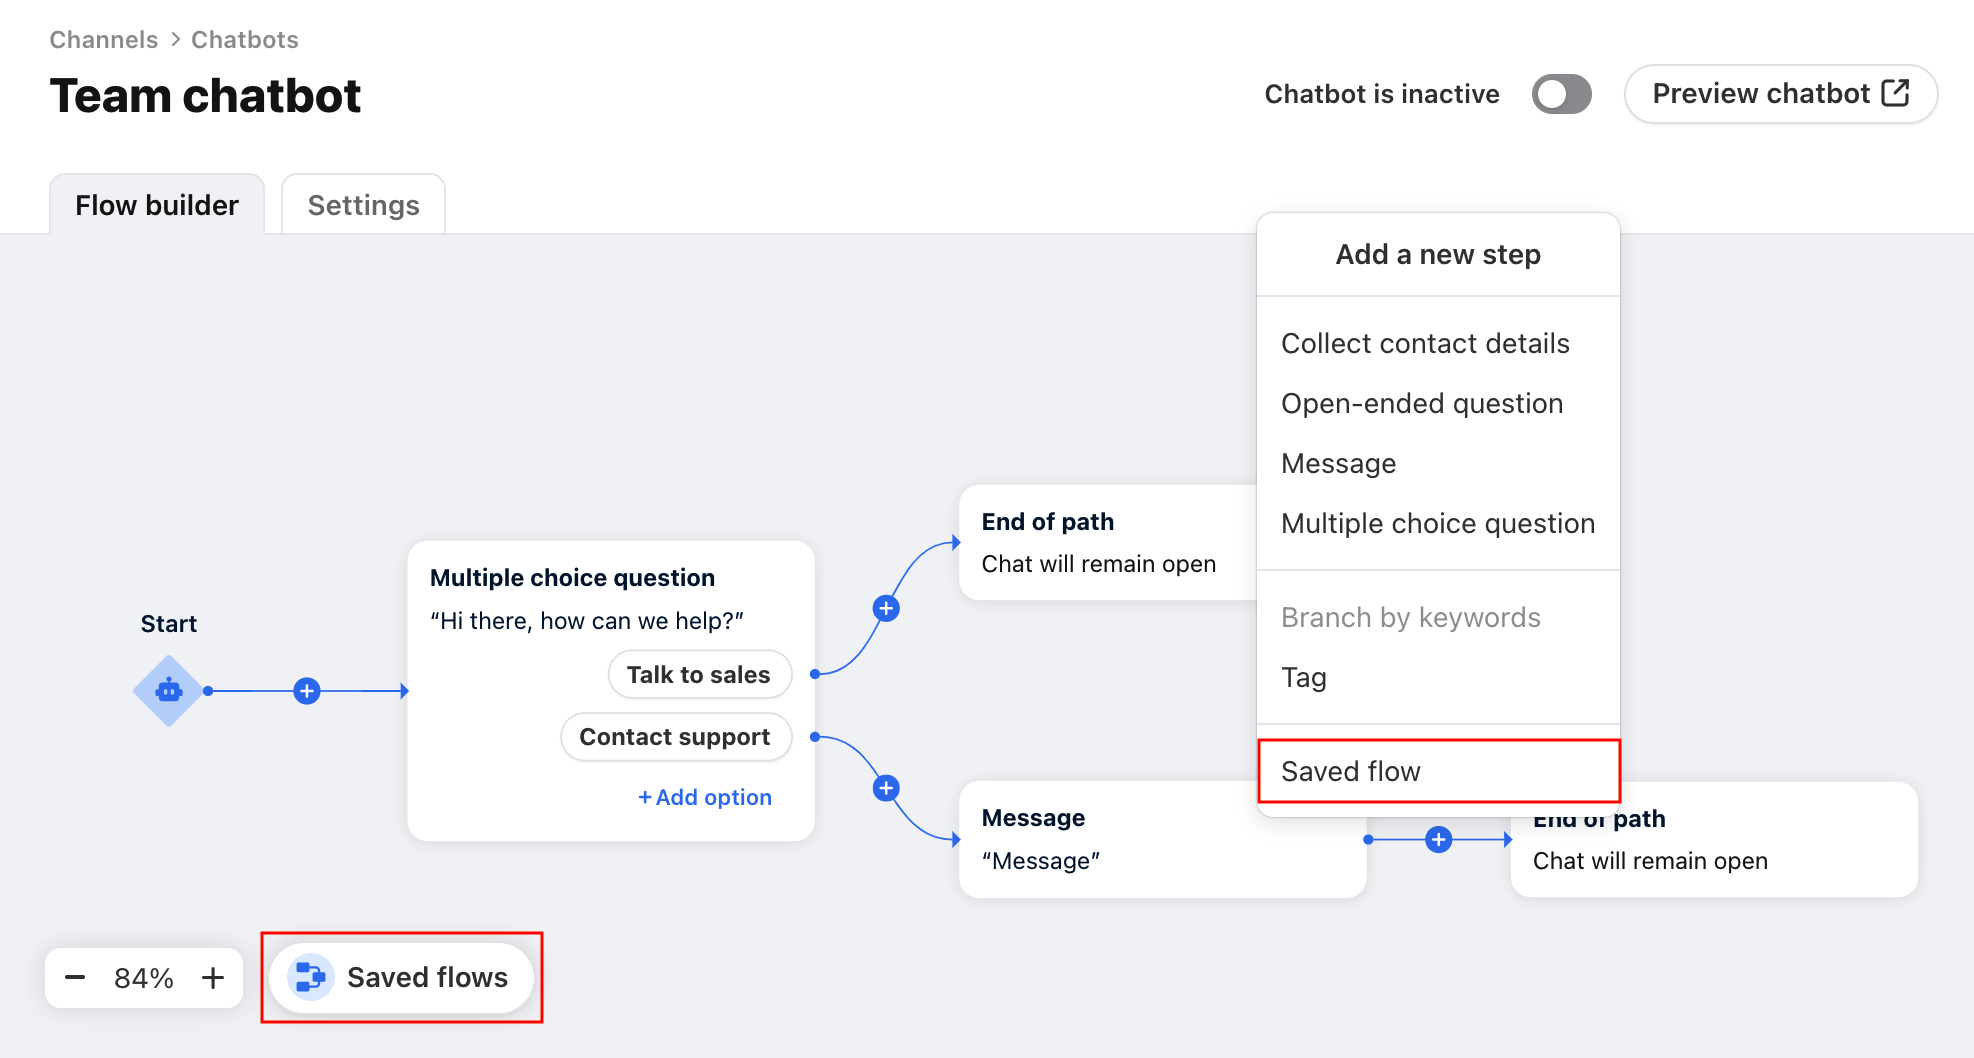
There are two ways to create a saved flow:
Click the Saved flow button on the bottom left of the chatbot flow builder, then click the (+) icon in the menu.
Select Saved flow in the “Add a new step” menu, then click the (+) icon in the resulting menu.
Editing a saved flow
You can edit a saved flow by clicking on the saved flow step in your chatbot flow and selecting Edit saved flow in the right sidebar, or by clicking on the saved flow you want to edit in the Saved flows button on the bottom left corner of the chatbot builder.
Important to know
Saved flows are currently chatbot-specific. You cannot use the same saved flow across multiple different chatbots.
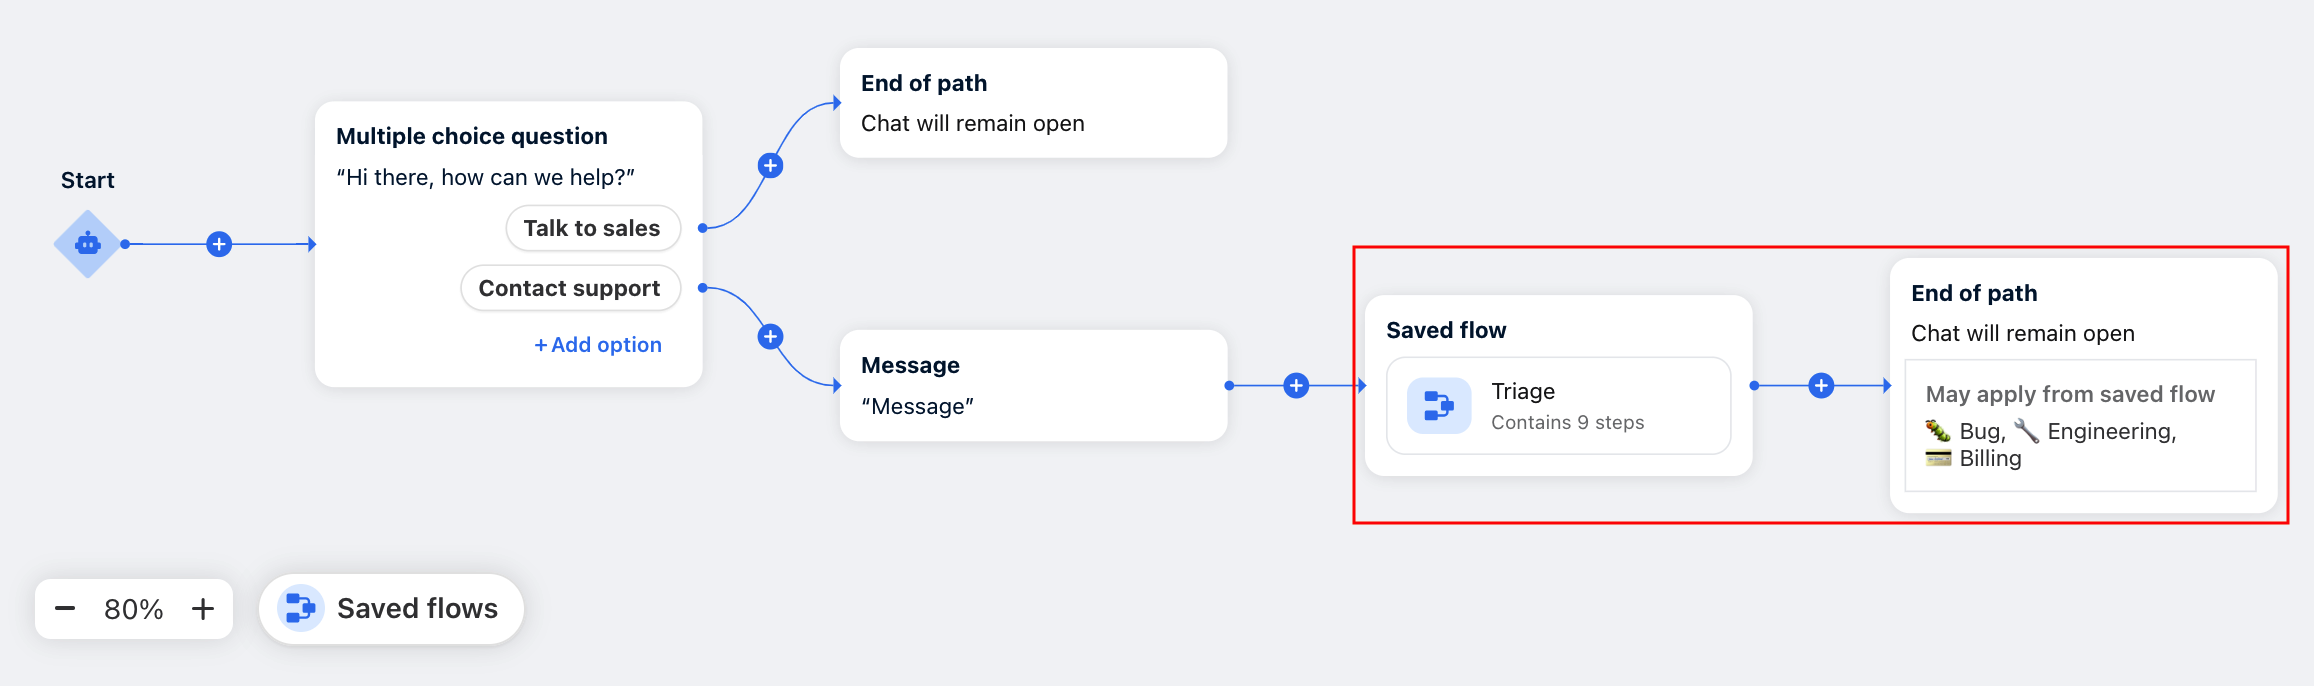
There can only be one path coming out of a saved flow. If your saved flow ends in multiple paths (for example, if you have a multiple-choice question in your saved flow), these paths will automatically merge into one path at the end of the saved flow. See screenshot below.
Chatbot settings
For each chatbot, you can adjust the following settings:
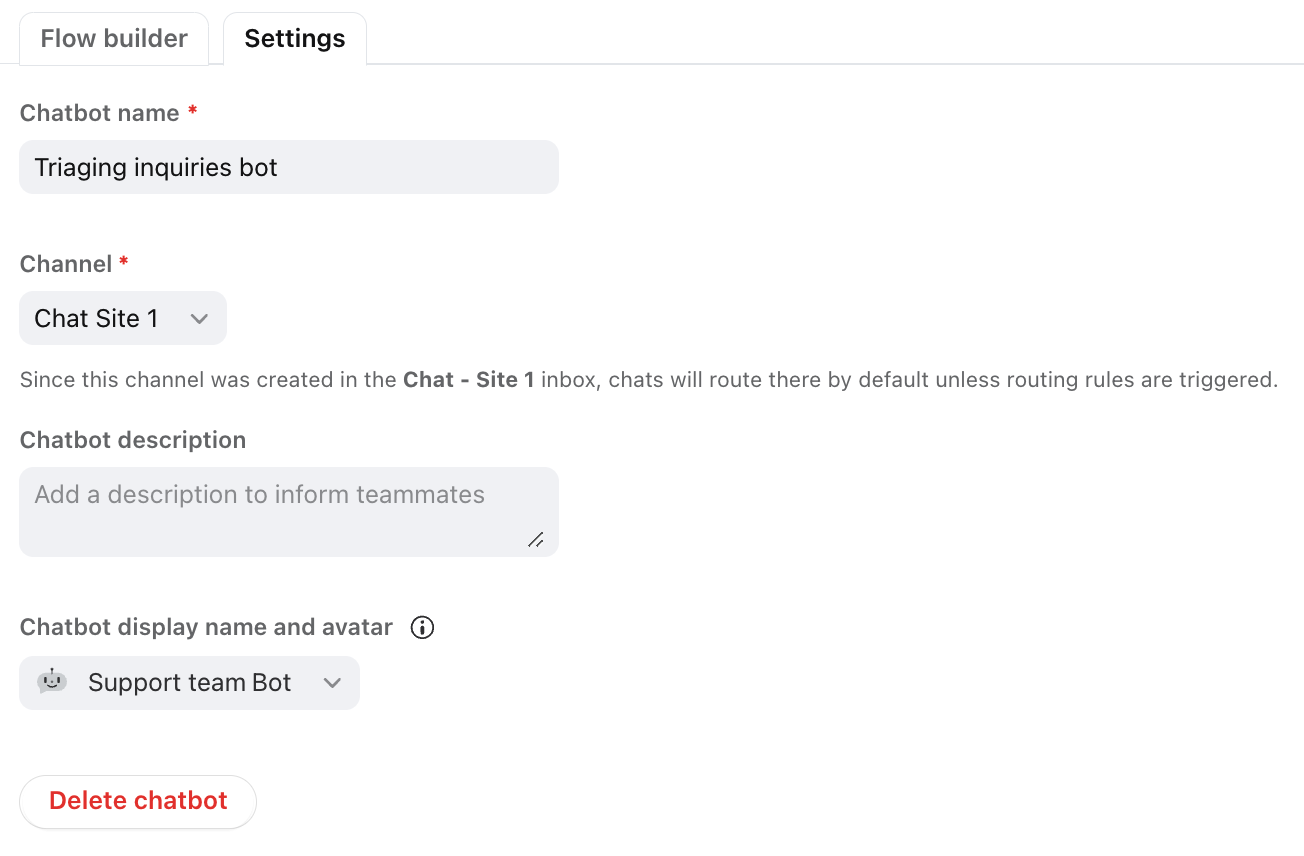
Chatbot name: Customize the name which will be used internally to label your chatbot. This name will not display in the chat widget on your website.
Channel: Select which Front Chat channel the chatbot will be associated with. You can only have one chatbot per Front Chat channel at this time. You can also select Unassign to disconnect the chatbot from a channel.
Chatbot description (optional): Enter a description for the chatbot.
Chatbot display name and avatar: Customize the name and avatar for the chatbot your customers see in the chat widget.
By default, the chatbot name will be displayed as your team name (configured in Front Chat channel settings) + “bot”, and your chatbot avatar will be the default chatbot icon.
We highly recommend choosing the default display option to make it clear to your chat visitors that they’re interacting with a chatbot, not a live human agent. Certain local regulations may require disclosure when your chat visitors are conversing with bots.
Passing a chatbot conversation to your chat agents
Use the options in the "End of path" step to control how your chatbot hands off chat conversations to your chat agents.
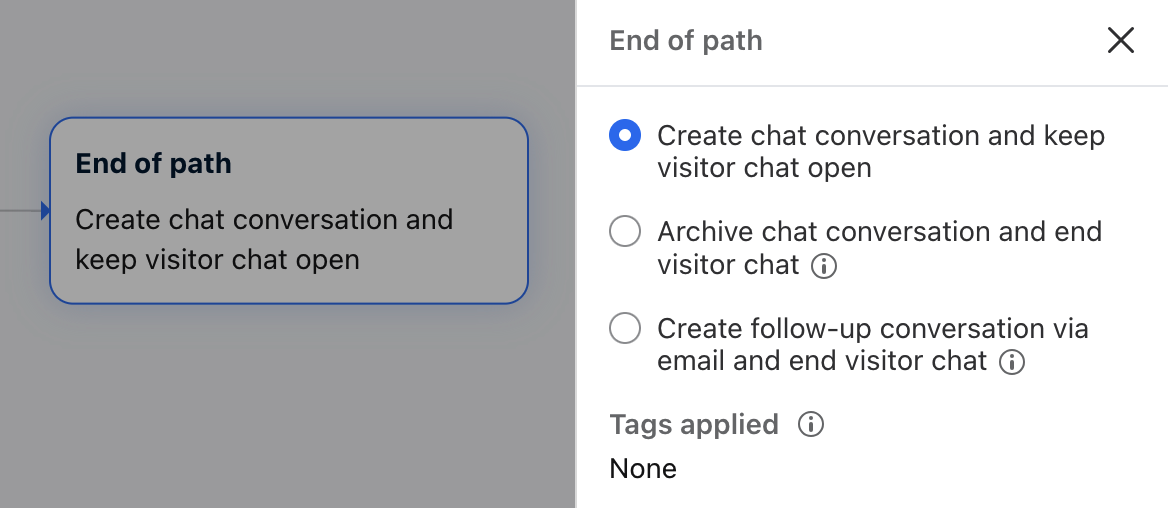
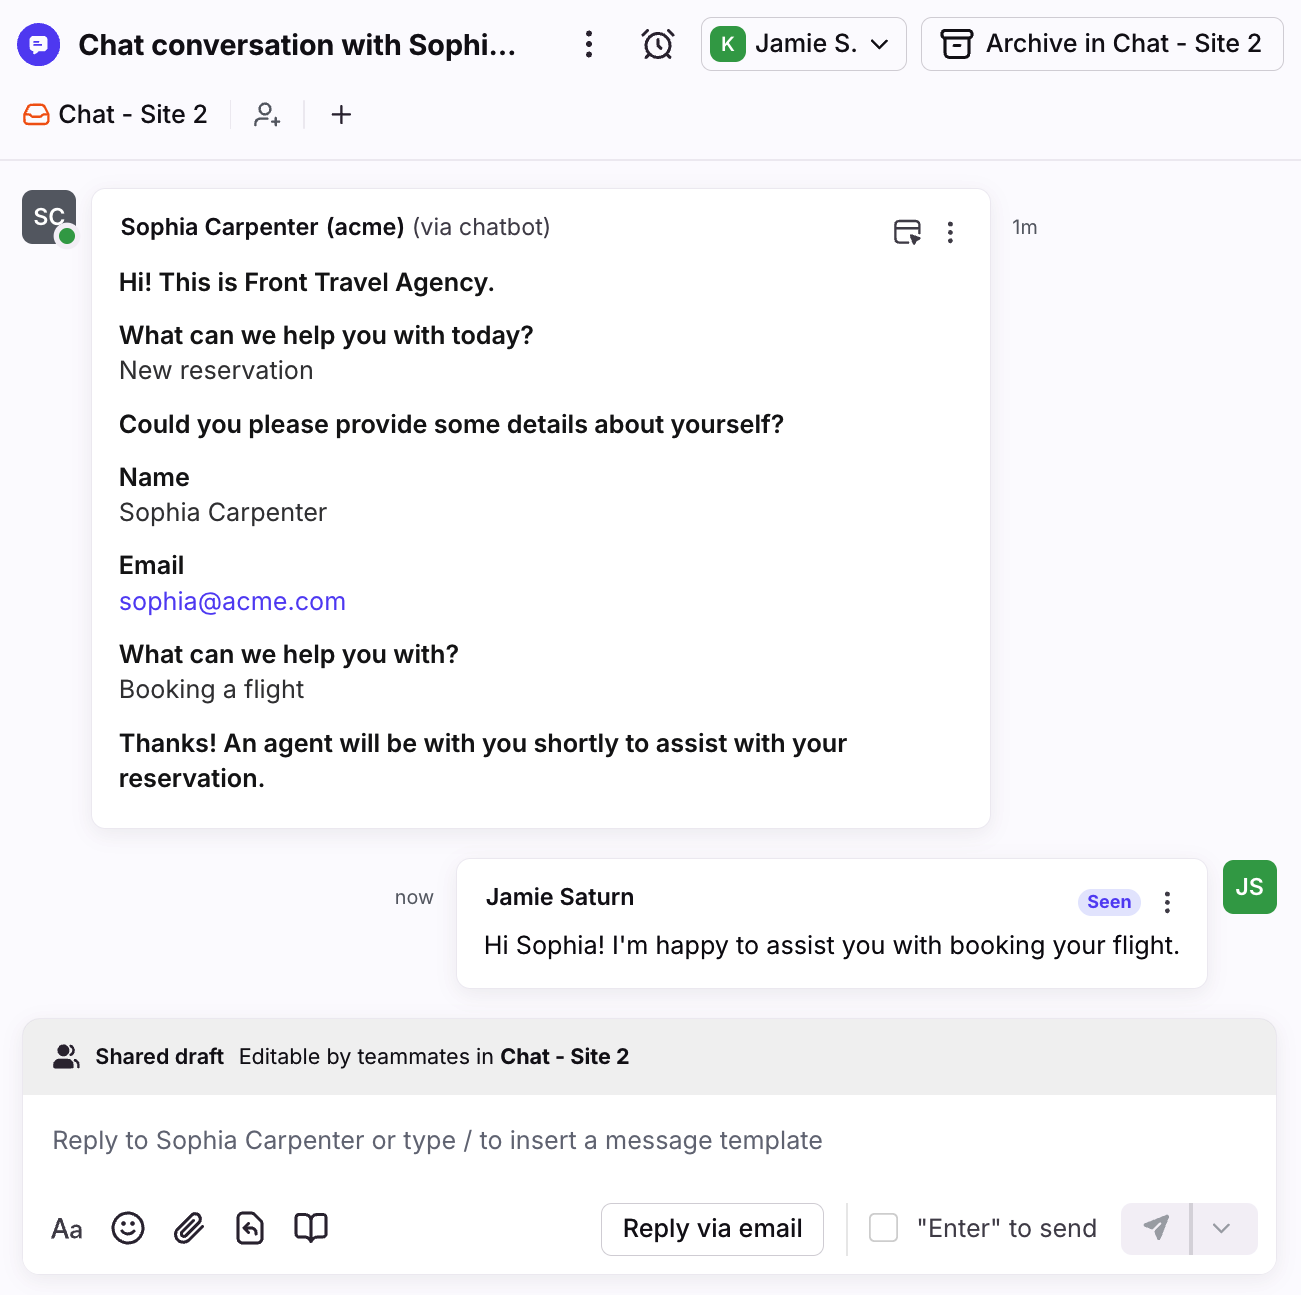
Option 1: Create chat conversation and keep visitor chat open
Use case: Automatically route chatbot conversations to your chat agents for immediate support.
After a chat visitor reaches the “End of path” step in your chatbot flow, a chat conversation will automatically be created within the default inbox configured for your Front Chat channel.
The conversation will be created with an “Open” status, so an agent can easily hop in and continue the chat thread.
The conversation will contain a transcript of the chatbot conversation, and will contain any tags you configured for that chatbot path.
Option 2: Archive chat conversation and end visitor chat
Use case: Automatically archive chat conversations that were resolved by your chatbot and don't need follow up.
After a chat visitor reaches the “End of path” step in your chatbot flow, a chat conversation will automatically be created in the default inbox configured for your Front Chat channel.
The conversation will be created with an “Archived” status and your team will not be notified or need to respond.
The conversation will contain a transcript of the chatbot conversation, and will contain any tags you configured for that chatbot path.
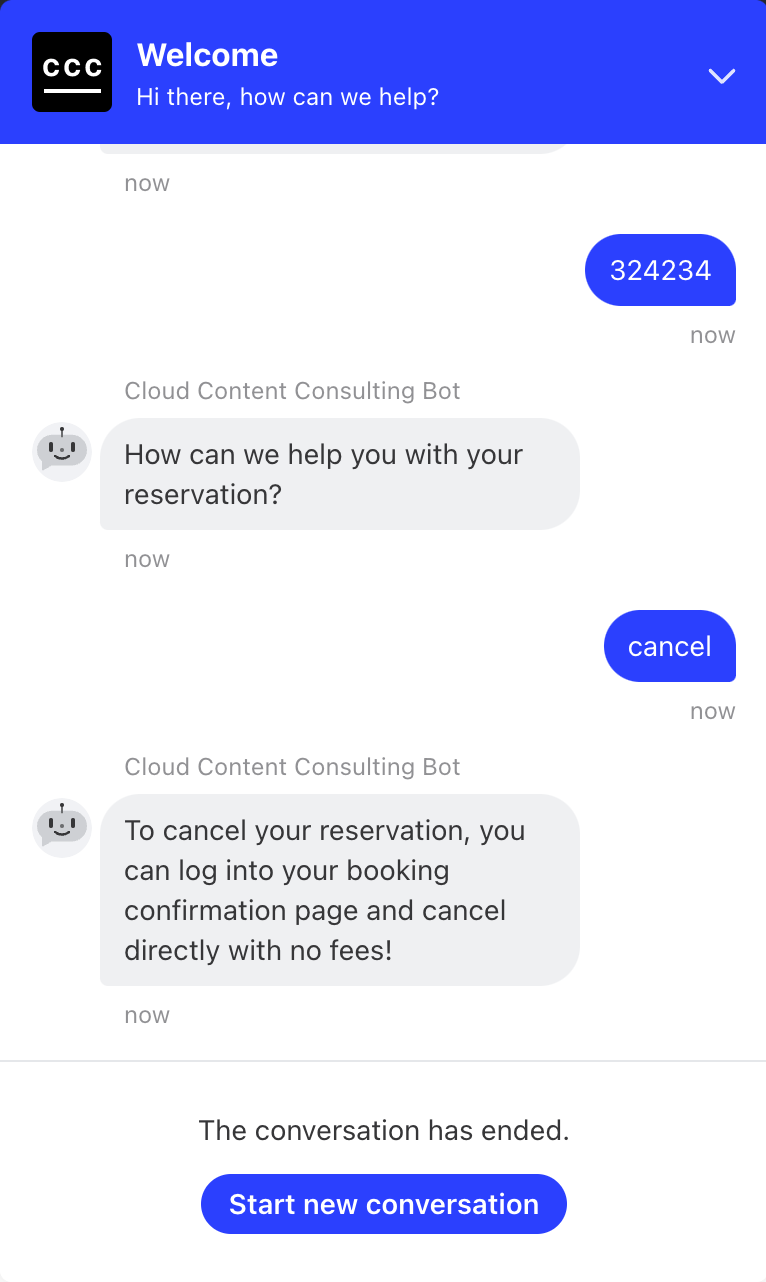
In the chat widget, the conversation will end and your chat visitor will be prompted to start a new conversation.
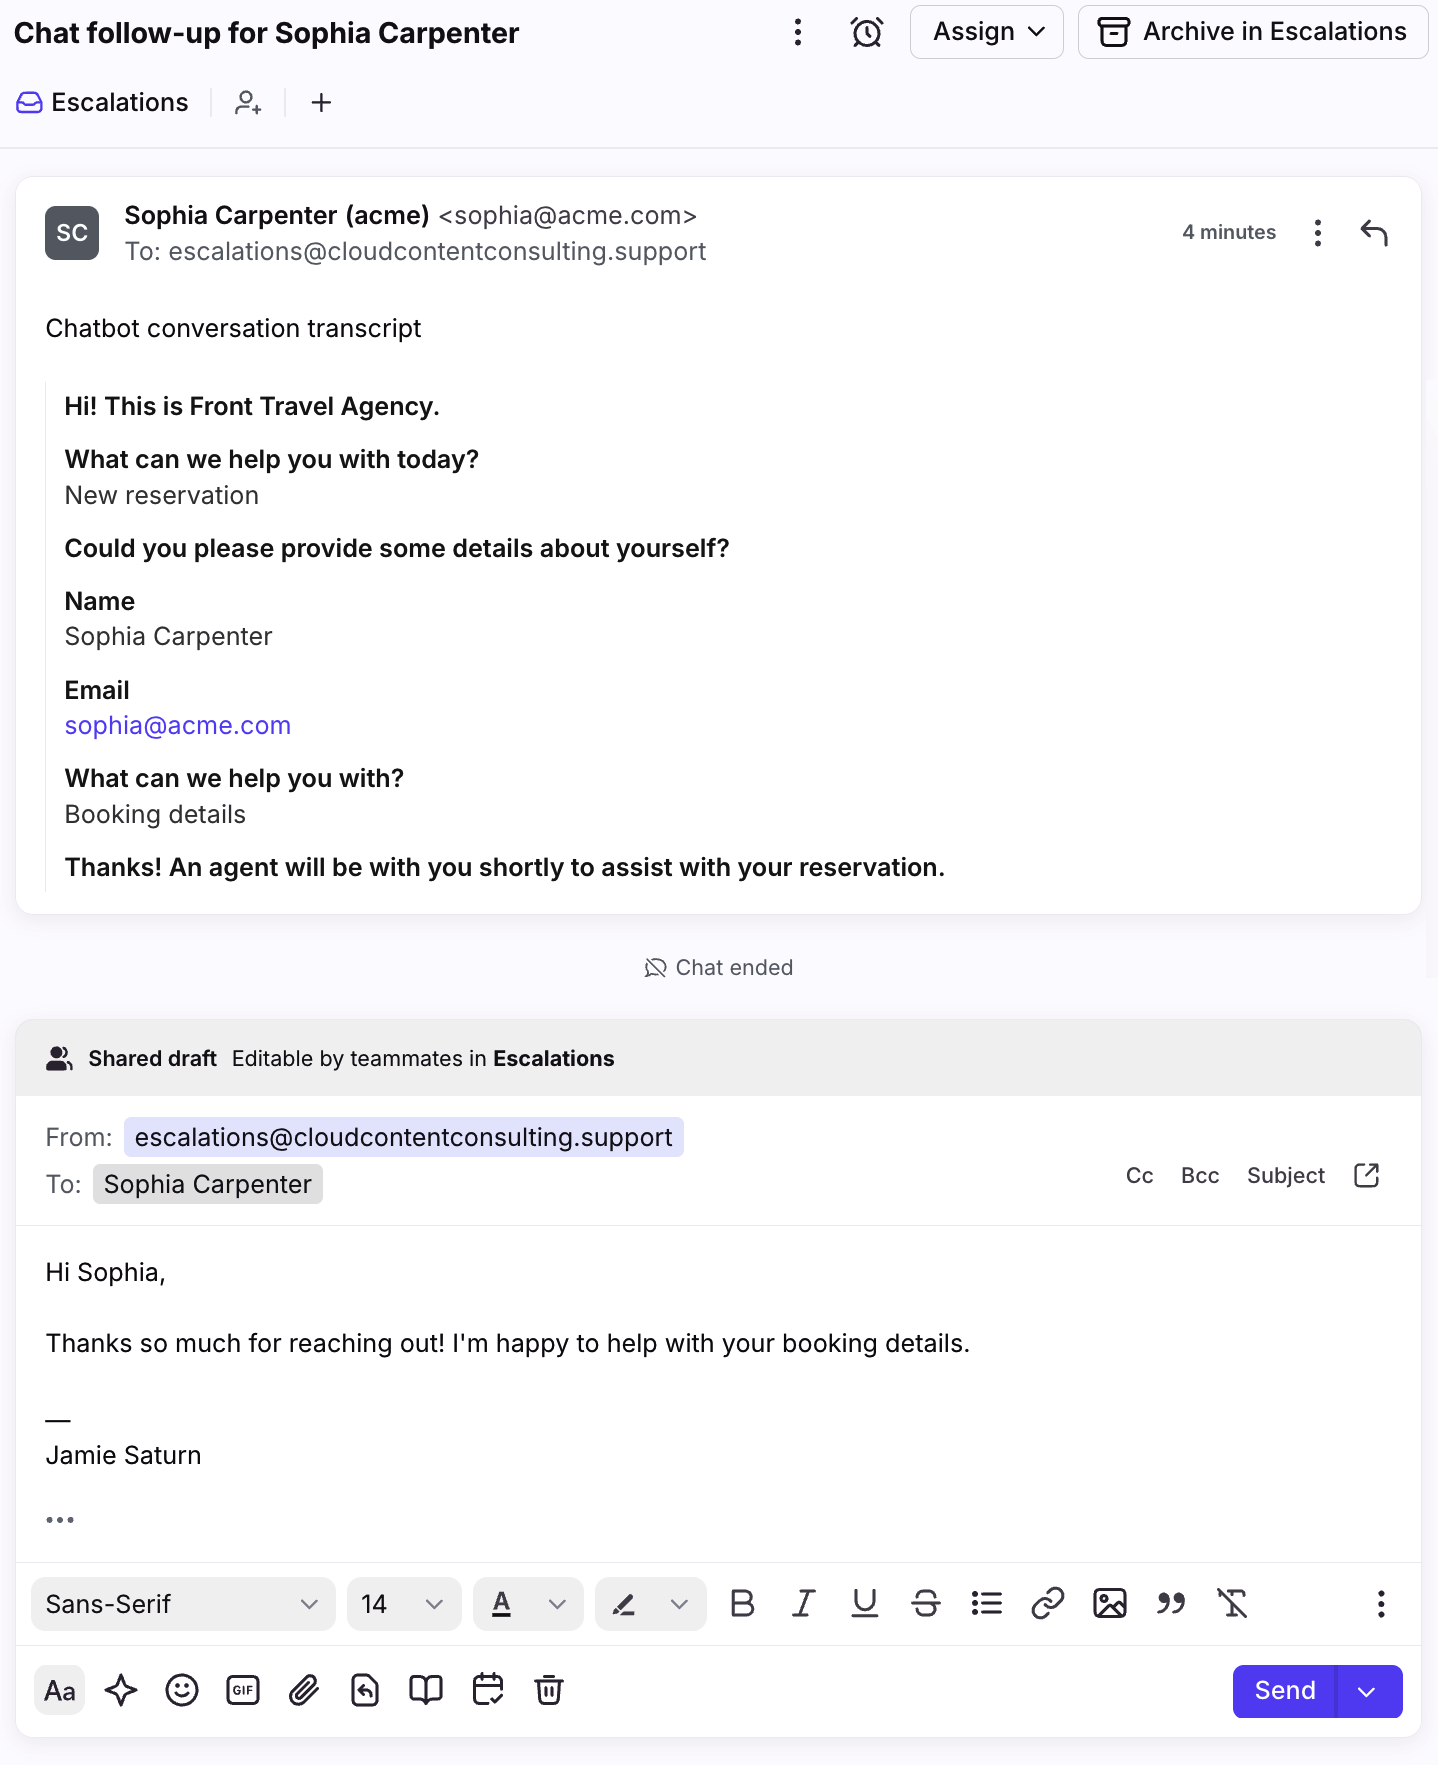
Option 3: Create follow-up conversation via email and end visitor chat
Use case: Automatically transition chatbot conversations to emails for your team to follow up when you're available.
After a chat visitor reaches the “End of path” step in your chatbot flow, an email conversation will be created in the inbox for the selected email channel in the chatbot step.
The conversation will be created with an “Open” status, so an agent can easily hop in and reply via email. No chat conversation will be created in the default chat inbox.
The conversation will contain a transcript of the chatbot conversation, and will contain any tags you configured for that chatbot path.
In the chat widget, the conversation will end and your chat visitor will be prompted to start a new conversation.
For the "Create follow-up conversation via email and end visitor chat" option, you must have a "Collect contact details" step earlier in the same branch AND set Email as a required field. Note: This functionality is not supported in Preview mode.
Important to know
Any inbox rules you have configured will apply to your chatbot conversation.
A chatbot flow will never start again after a conversation has been created within Front. It will only run for new chat conversations.
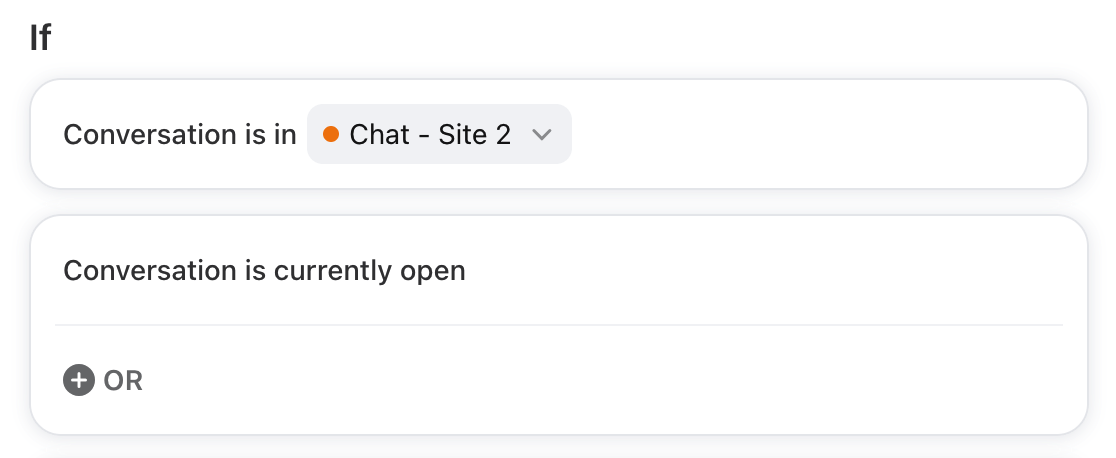
If your chatbot auto-archives the chat conversation, make sure you add the Conversation currently open condition to your assignment rule. This ensures that your inbox assignment rules won’t trigger and assign that conversation to your agents.
Analytics
Use the following reports to review your chatbot performance.
Chatbots report in Front Analytics: Track your overall chatbot performance or export your chatbot history.
Chatbot path analytics: Drill down and review traffic volume and drop-off rates for visitor steps in your chatbot flow.
FAQ
What does the chatbot flow look like for my customer on my website?
On your website, the chatbot flow will start when chat visitors open the chat widget. Customers will have to go through the entire flow before they can be connected to a live chat agent on your team.
What does my customer see in the chat widget when the chatbot auto-archives the conversation?
Your customer will see that the conversation has ended, and they will be asked to start a new conversation (which will restart the chatbot flow) if they have another inquiry.
Can my customer restart the chatbot flow?
Yes. Customers can restart the chatbot flow by clicking the restart icon on the top right of the widget. This makes it easier for customers to restart if they accidentally clicked the wrong option or went down the wrong path in the chatbot flow.
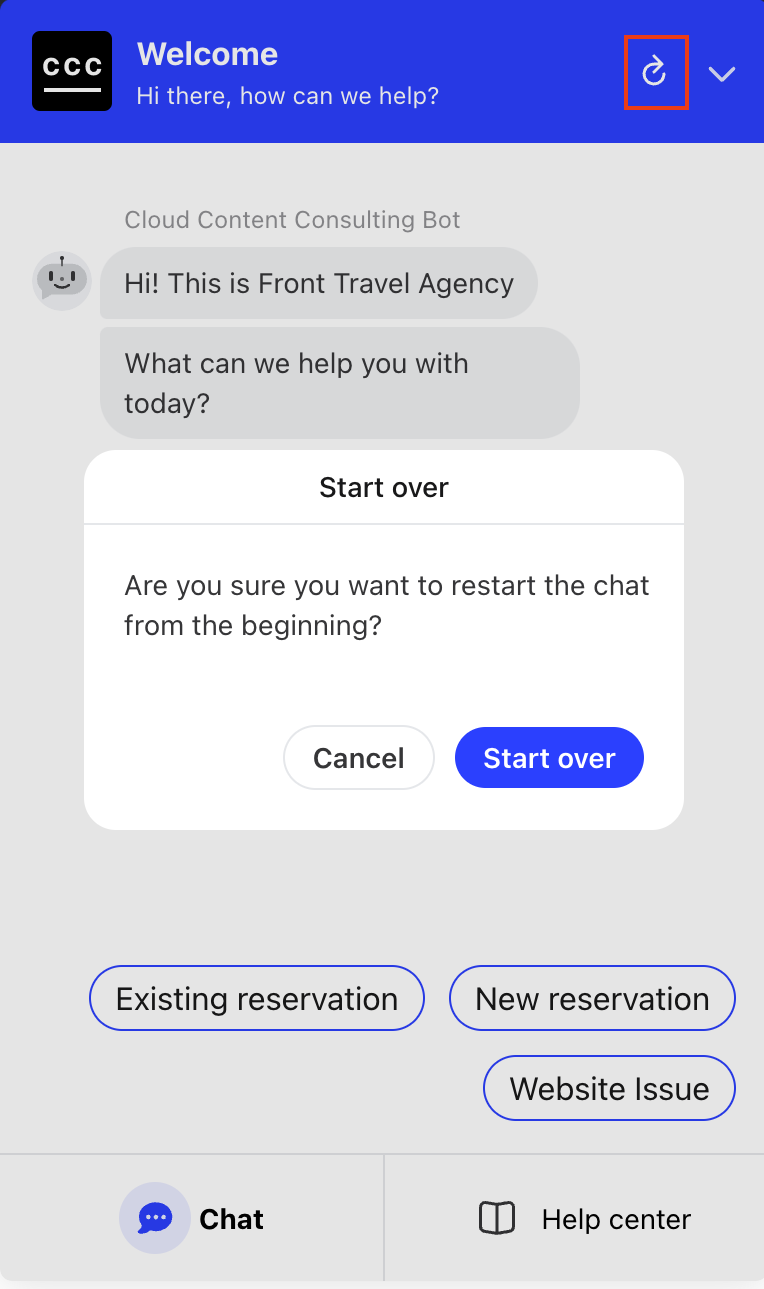
The chatbot restart icon is only present during the chatbot flow. Once the chatbot flow ends and your customer is connected to a chat agent, this icon will no longer be accessible and your customer will not be able to use this to restart the conversation. You can designate an amount of time a visitor must wait after the chat first started to see the Start new conversation button.
Are chatbots available on channels besides Front Chat?
No. Chatbots are only available for Front Chat at this time.
How many chatbots can I configure?
You can configure 1 chatbot for each Front Chat channel.
Is there a limit to the number of steps I can build for my chatbot?
Yes. You can add up to 700 steps in a chatbot.
Can I duplicate a chatbot?
Yes. Please contact our Support team and send us the name(s) of the chatbot(s) you'd like to duplicate.
Once your chatbot is duplicated, you can disconnect the channel from your old chatbot in your chatbot settings, then reassign the channel to the new chatbot.
Can I build rules based on chat visitor responses to my chatbot questions?
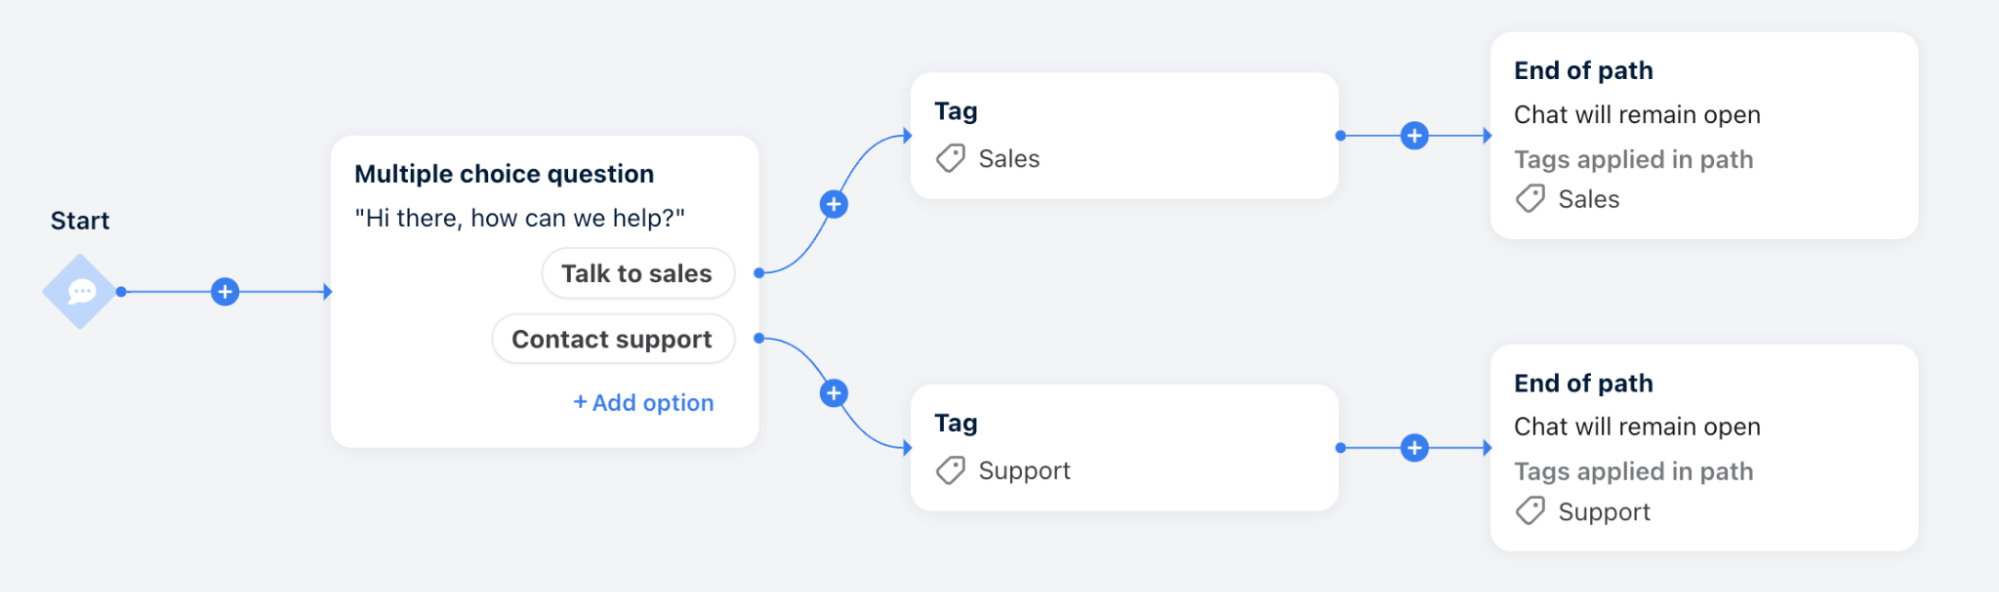
Yes you can build rules based on chat visitor responses to your chatbot questions by leveraging tags! You can add a tag anywhere in your chatbot flow (for example, right after each multiple choice option), and then you can build routing, assignment, and more rules that include that tag as a condition.
In the example below, you can configure a rule set to route the conversation to either the Support or Sales inbox by leveraging the “Support” or “Sales” tag in your routing rule.

How can my customers start a new chat conversation with me on my website?
See here.
What happened to my Welcome Message and Pre-Chat Form?
Any previous Welcome Message and Pre-Chat Forms you’ve configured have been automatically migrated to the chatbot experience. You can continue to make changes to these from within the chatbot builder.
Pricing
Chatbots are available on all plans. For the latest Starter plan, you must have Front Chat set as your company's channel type. See additional details about pricing of certain chatbot features below:
Saved flows: Professional plan or above
Chatbot analytics: Professional plan or above
Chatbot steps: See table below
Chatbot step | Plan availability |
AI Answers | This is a legacy feature. AI Answers is no longer available for purchase. |
Collect inputs | Available on latest Professional plan or above |
Collect contact details | Available on all plans, with restrictions below
|
Open-ended question | Available on all plans, with restrictions below
|
Message | Available on all plans, with restrictions below
|
Multiple choice question | Available on latest Professional plan or above |
Branch by online hours | Available on latest Professional plan or above |
Branch by visitor data | Available on latest Professional plan or above |
Branch by keywords | Available on latest Professional plan or above |
Tag | Available on latest Professional plan or above |
Branch by verified user | Available on latest Professional plan or above |
Send app request | Available on the latest Enterprise plan |