
How to create application requests
Overview
Application requests allow admins to build workflows that can retrieve data, send data, and take action in third-party systems.
Application requests are part of Front’s “Connectors” framework (composed of both application objects and application requests) - allowing you to configure how your third-party data is used in Front. See our developer documentation for additional details.
More resources:
Take a Front Academy course here to learn more about how Connectors work.
Have questions? Visit the community to:
View example videos demonstrating how to build app requests.
Join our Connectors group to learn of events or share insights with us.
How it works
If you want to set up automation for your agents to get information from or take action in a third-party, an application request can be used in a rule or macro to fetch, create, update, or delete third-party data.
This means that you may be able to cancel an order, update shipping information, change the status of a ticket, and more in other applications you work with from within the Front interface.
Request methods
GET, POST, PUT, and PATCH app requests can de dropped as nodes in the rule, macro, and chatbot flow builders, can be used within dynamic variables, and can be leveraged within rule and macro conditions,.
Important: Do not implement non-GET requests without evaluating the potential impacts on your external systems with a technical contact. While GET requests access external data in read-only fashion, POST, PUT, and PATCH requests can create, modify, or remove data from external systems. If you execute app requests in rules, macros, or chatbots, please ensure that you are familiar with the resulting actions of the app request. Remember that rules trigger automatically without confirmation, while macros and chatbots trigger based on team member or customer interactions that you may not have control over.DELETE app requests can only be used in rules and macros.
Part 1: Initial setup
You must be a Front company admin to create application requests.
Step 0 (create an app)
You can access your Developer settings by clicking the gear icon, then selecting the Developers tab from the left sidebar in your company settings.
Once in Developers settings, click the Create app button. You’ll be asked to provide a name for your app and a short description in the Settings tab. If you'd like to set an icon to be used for your application requests, you can also do so on the Settings tab.
Once you’ve created your app, click the Features tab. If you have existing application requests, you will see them in the list labeled as Requests. To create a new application request, click Add feature. From here, click App request.
Step 1
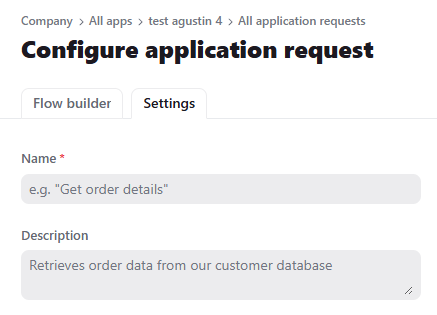
First, you will be asked to provide a name and a short description for your object.
Step 2
Next, you will need to define the input variables required to send the application request. Click Add input in the Flow builder to add your inputs.
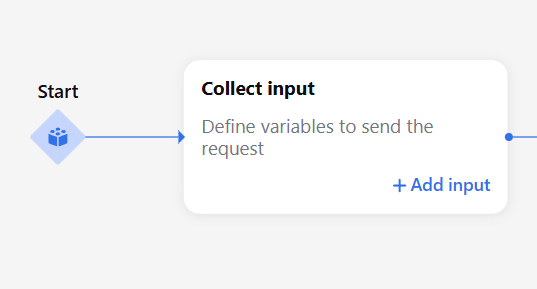
Consult the third-party API documentation to determine what inputs to use, or skip this step if you do not have required inputs. The inputs will be defined in the third-party API documentation for the action you are wanting to take in the external service. For example, these may be required request parameters for the API endpoint you're using in your application request, such as an ID or quantity. They may also be helpful filters, such as an email or date filter, that help narrow the list of results.
If you need to paginate through a list of results, refer to our Pagination section.
Step 3
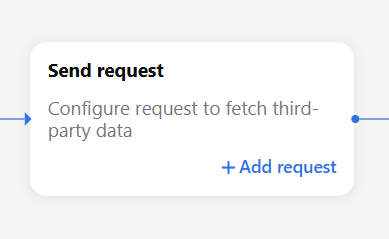
Next, you will need to tell the application object where to get data from or send an update to. Click Add request in the flow builder to do so.
Select the method of the request: GET, POST, PUT, PATCH, or DELETE.
Then select the URL. If you have already connected to a server, select it from the dropdown and skip ahead to Step 4 below. Otherwise, click New server.
Set the Origin field to the URL origin of your API. Don't worry about the particular API endpoint you'll be using yet — this field should just include the origin. For example, if the API endpoint you want to use is https://{your-development-store}.myshopify.com/admin/api/2024-07/orders/{order-id}/cancel.json, the origin would be https://{your-development-store}.myshopify.com/
Set the Authentication strategy used by your API. Today, API Key, Basic, Bearer, and OAuth2 authentication are supported. Depending on the strategy you select, you may be asked to provide additional configuration fields. Then, click Connect.
Step 4
Fill the path to complete the URL by entering the path of the API endpoint you want to use, with any relevant variables filled in using variables from the original text pattern of your application object. Tip: Click Manage variables to access the extracted properties from the input or previous requests for use in configuring your application request.
For example, let's imagine we wanted to use Shopify's Cancel an order endpoint: https://{your-development-store}.myshopify.com/admin/api/2024-07/orders/{order-id}/cancel.json
The order id would be pulled from the inputs defined in Step 2. Therefore, we’d configure the path as follows:
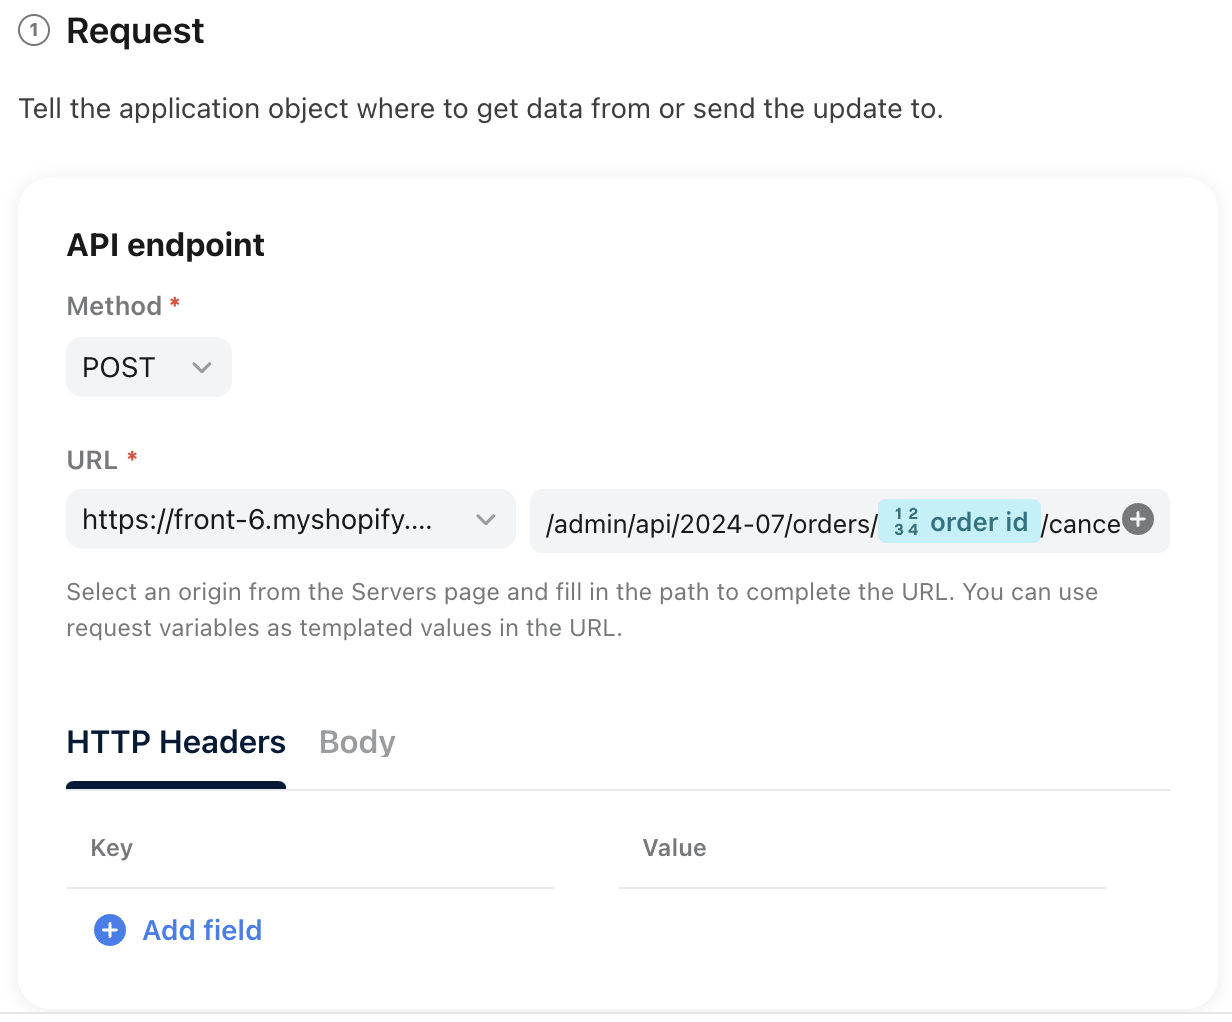
Note that the dynamic portion of the URL (“order id”) comes from the order id variable we created in the Create inputs step (in Step 2 above).
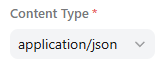
If your request is any method other than GET, specify the Content Type. In most cases, you can leave this as application/json. You should also add any additional headers or body parameters as documented by the API you are connecting to.
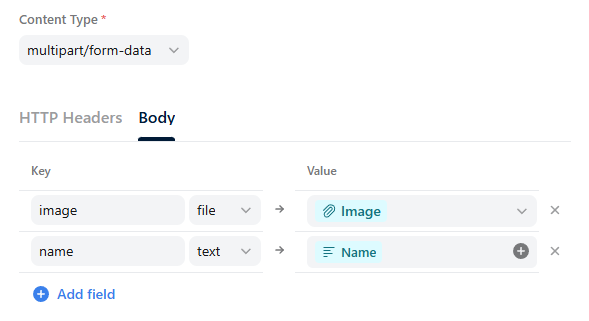
If you are sending an attachment through the application request, set the Content Type to multipart/form-data. Then, make sure to send the attachment file in the Body of the request per the documentation of the API you are using.
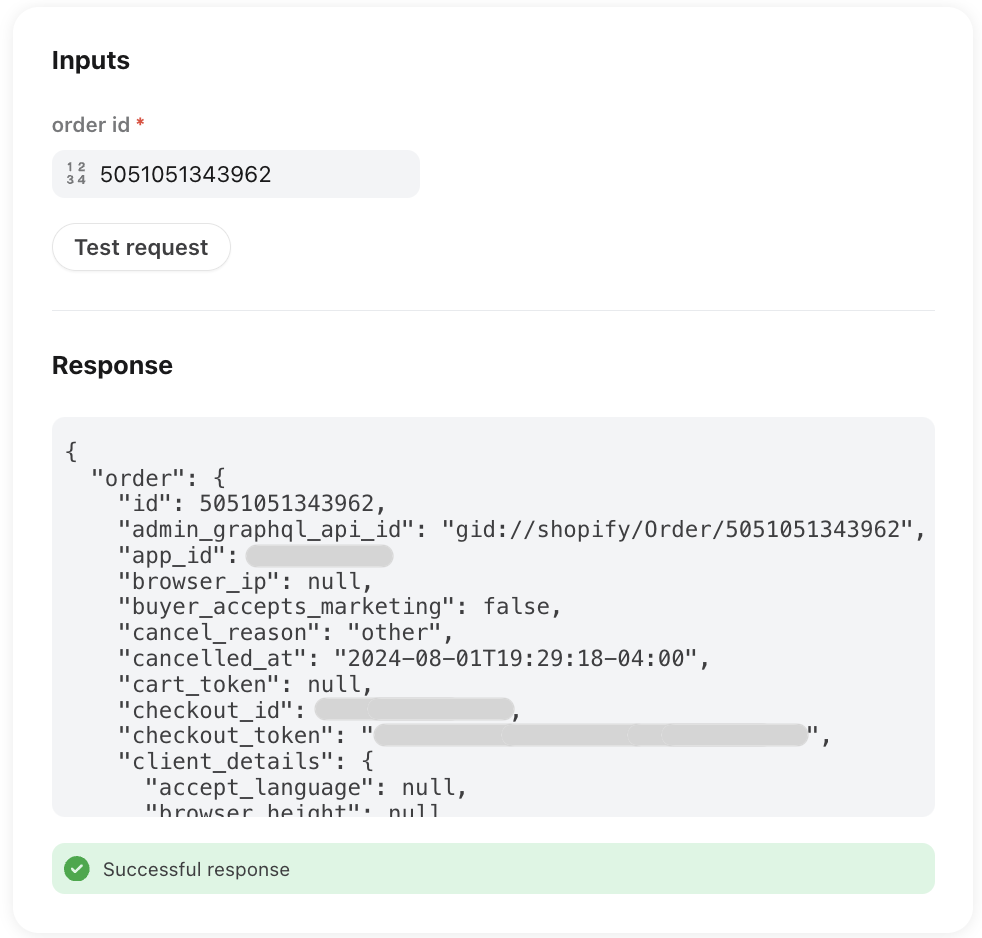
In order to move to the next step, you need to test your request by entering any required inputs and clicking Run test. Please note that this will execute the request if it is working correctly. You may consider testing the connection with a test environment in your third-party app to avoid canceling an order, updating a record, or any action you are testing.
In our example using Shopify, we’ll receive a response like this.
Step 5
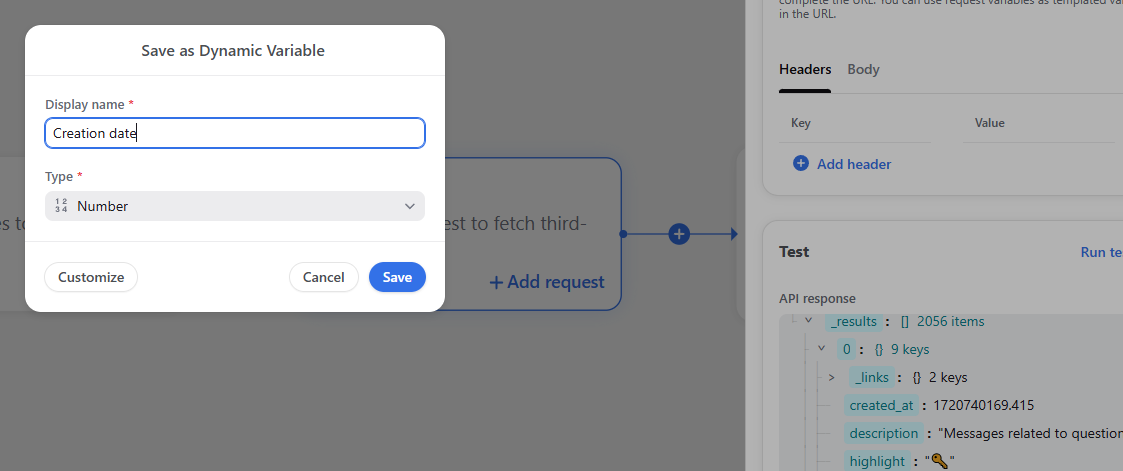
Determine what data you want to extract from the response by expanding the response in the Test section. Use the arrows to expand the response structure until you see the property you are interested in. Click the response property you want to save. Doing so will open a modal window to save the property as a dynamic variable. Accept the default display name or choose one that is easy for your end-user (workflow admins) to consume.
For example, to extract the "cancelled_at" property from our example above as its own variable, expand the response, expand the "order" object, and click the "cancelled_at" property. This will ask you to save the "cancelled_at" property as a dynamic variable with a default type of "String". After you click Save, you can see the extracted properties in the Extracted properties section of this node and in the Manage variables link available in subsequent flow builder nodes.
Step 6 (Optional)
Front allows you to string multiple application requests together. This unlocks more complex workflows — like retrieving data with one request and using it as input for another — without needing separate Connectors or custom code. To add another application request, click the blue plus sign in the flow builder.

After doing this, you'll see a second request added to the flow builder. Click on the request and configure it as needed.
You'll have access to the extracted variables from previous steps. For example, the first application request might return a customer account number that you want to use as an input to your second request. You can access this variable by clicking Manage variables.
Step 7
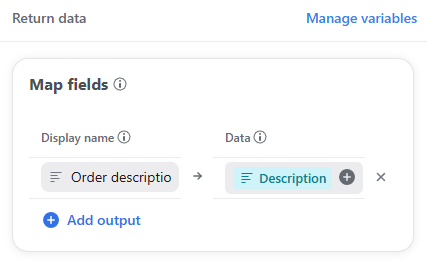
Next, define your outputs on the Return data node of the flow builder by clicking Add output.
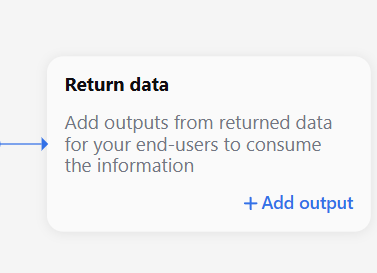
In the Map fields section, click Add output to configure a new output by first selecting a type (such as string, number, date, etc). Provide a name for the in the Display name column. This name should be descriptive and make sense to admins configuring workflows that use your application request. In the Data column, use the plus sign to add an extracted property/dynamic variable from a previous flow builder node or create a new dynamic variable.
If you enabled pagination in the input Collect input node, you will see a Configure pagination section, which is where you specify how to get the next page of results. Refer to our Pagination section to learn more.
Click Preview to see how your outputs render. Once you have saved all the outputs you need, click Done.
Step 8
Click Save in the flow builder to finish configuring your application request. It will now be available for use in workflows.
Part 2: Leverage application request in a rule, macro, or chatbot
Once an application request has been created for an application, a rule, macro, or chatbot is required to activate a request.
Option 1: Use application requests with rules
Step 1
To create a rule with an app request, first follow How to create a rule from scratch.
Step 2
Enter your preferred rule configuration for when you want the request to activate and under what conditions. Like other rules, you can define the triggers (when), conditions (if) and actions (then) of your rule. See this article to learn more.
Step 3
For POST, PUT, PATCH, or DELETE request methods
Once you have configured your triggers and conditions, select the Send app request action from the dropdown, then select the application request that you want the rule to execute.
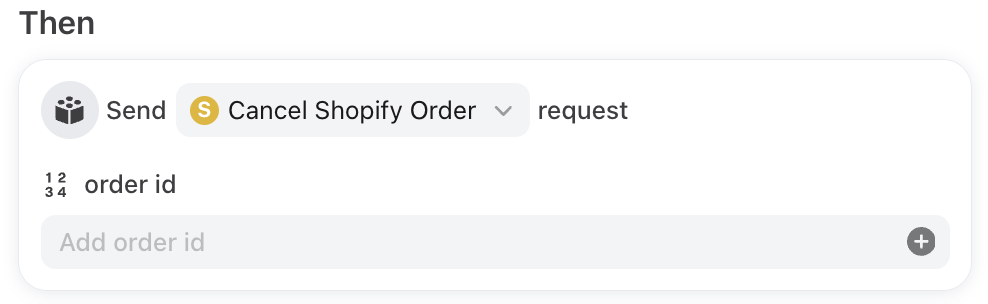
You will notice that after you select the application request, the input fields that were defined during the creation of the request will be shown. This is where you will add the input variable that will be sent with the request.
You will likely need to define a dynamic variable here that will pull information from the conversation message, from an associated application object, from a contact, etc.
Once you save, your rule will apply to the workspace the rule was created in.
For GET, POST, PUT, and PATCH requests
GET, POST, PUT, and PATCH requests can be used in dynamic variables leveraged by a rule’s condition(s), when you want a rule to take action dependent on information in your third-party application, or a rule’s action, when you want a rule to take action in your third-party application.
To use an application request in a dynamic variable leveraged by a rule’s condition(s), set your condition to Dynamic variable is, select New dynamic variable, click the Create new button on the right pop-out, choose your application request from the dropdown, and add steps as necessary.
Option 2: Use application requests with macros
Step 1
To create a macro with an app request, first create a macro using the steps here.
Step 2
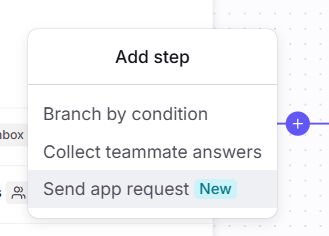
In the flow builder, click the plus (+) sign between nodes, and then select Send app request.
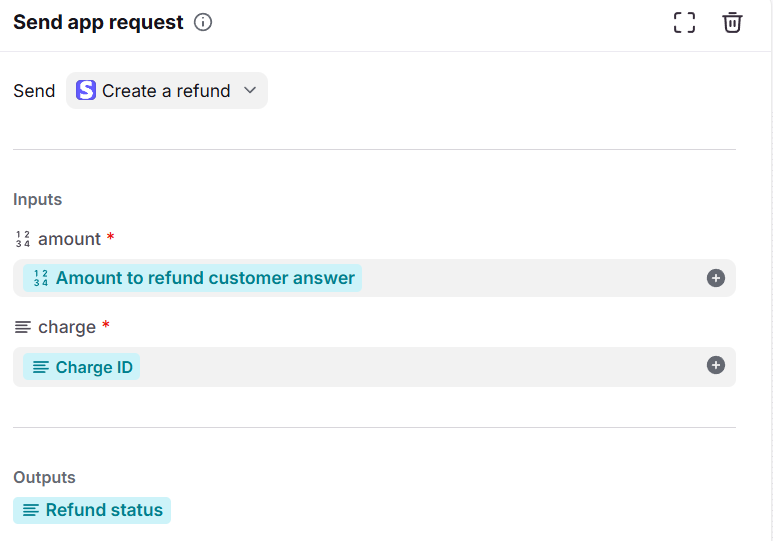
Tip: If the inputs to your app request require that the teammate running the macro supply inputs to the request (such as the amount of money to refund a customer), add a teammate input capture node first by selecting Collect teammate answers.
Step 3
Use the dropdown to select your app request. You will notice that after you select the application request, the input fields that were defined during the creation of the request will be shown. This is where you will add the input variables that are needed by the request.
You will likely need to define a dynamic variable here that will pull information from a teammate input answer, the conversation message, from an associated application object, from a contact, etc.
Step 4
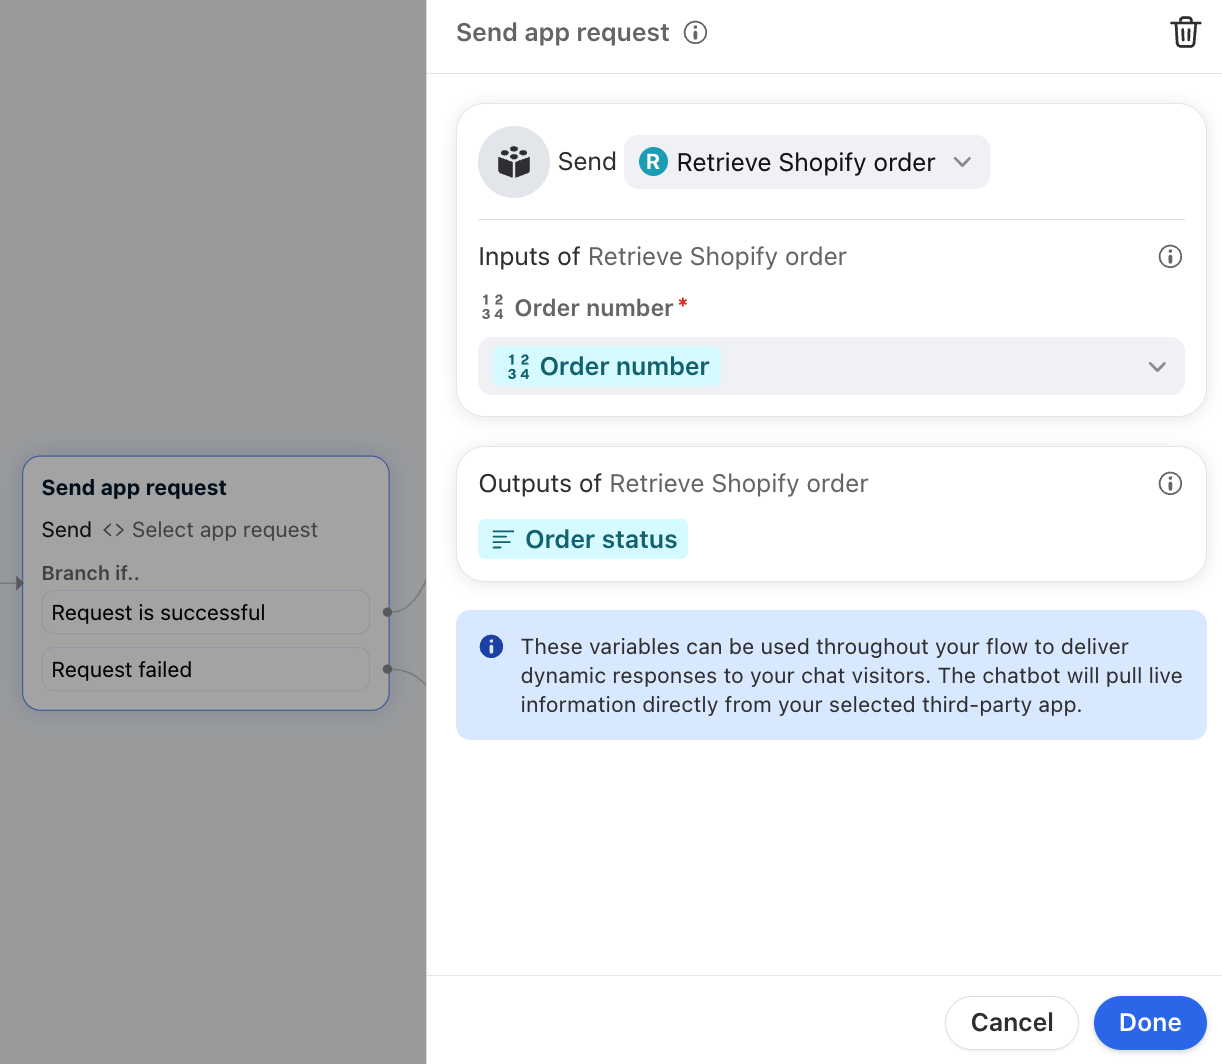
After you add the app request node, you will see it in your flow builder. It will contain two branching paths by default:
A path for when the request is successful
A path for when the request fails
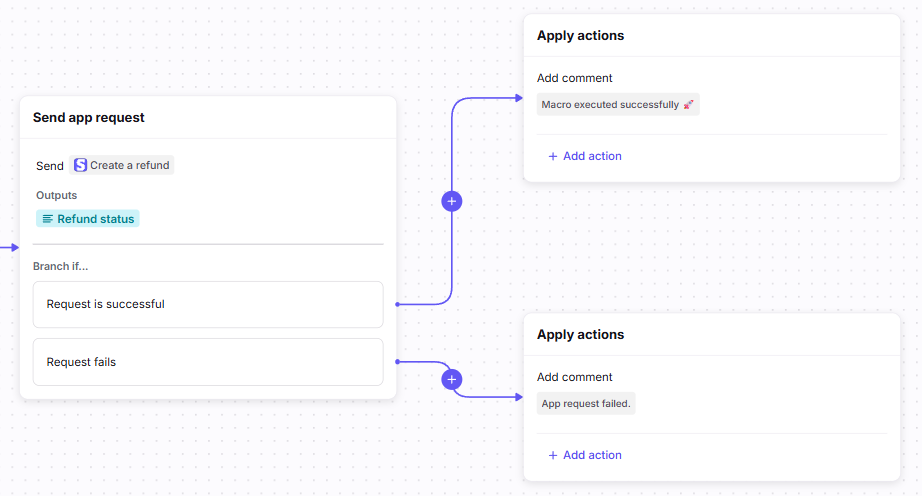
For each path, you can:
Add additional nodes. For example, you might want to branch by condition depending on the value of an output returned by the API the request connects to. This allows you to take different actions depending on the values of different properties returned by your app request. We recommend you alert your teammates as to whether the request failed or succeeded, as well as what next steps to take if needed.
Send another app request. For example, you might want to string multiple app requests together. The first request might look up a customer account by email. The next request might take the ID of the customer account and supply it to a second app request that updates a property on the customer account. You can string together as many app requests as you need.
Collect teammate answers. For example, you might want to supply the outputs of an app request to a teammate and have them select what further actions to take. In combination with branching paths, this allows you to build powerful and customizable workflows.
Step 5
After you decide how to configure your full workflow, make sure each path has the correct action in the Apply actions node that ends the path.
Step 6
Click Done to confirm the actions you’d like your macro to take. Click Create to finish the macro.
To review how to trigger macros, see this article.
Option 3: Use application requests with chatbots
When using app requests with chatbots, you can retrieve information from your third-party systems to share with chat visitors. Creating or modifying data is not currently supported.
Step 1
To create a Front chatbot with an app request, first create a chatbot using the steps here.
Step 2
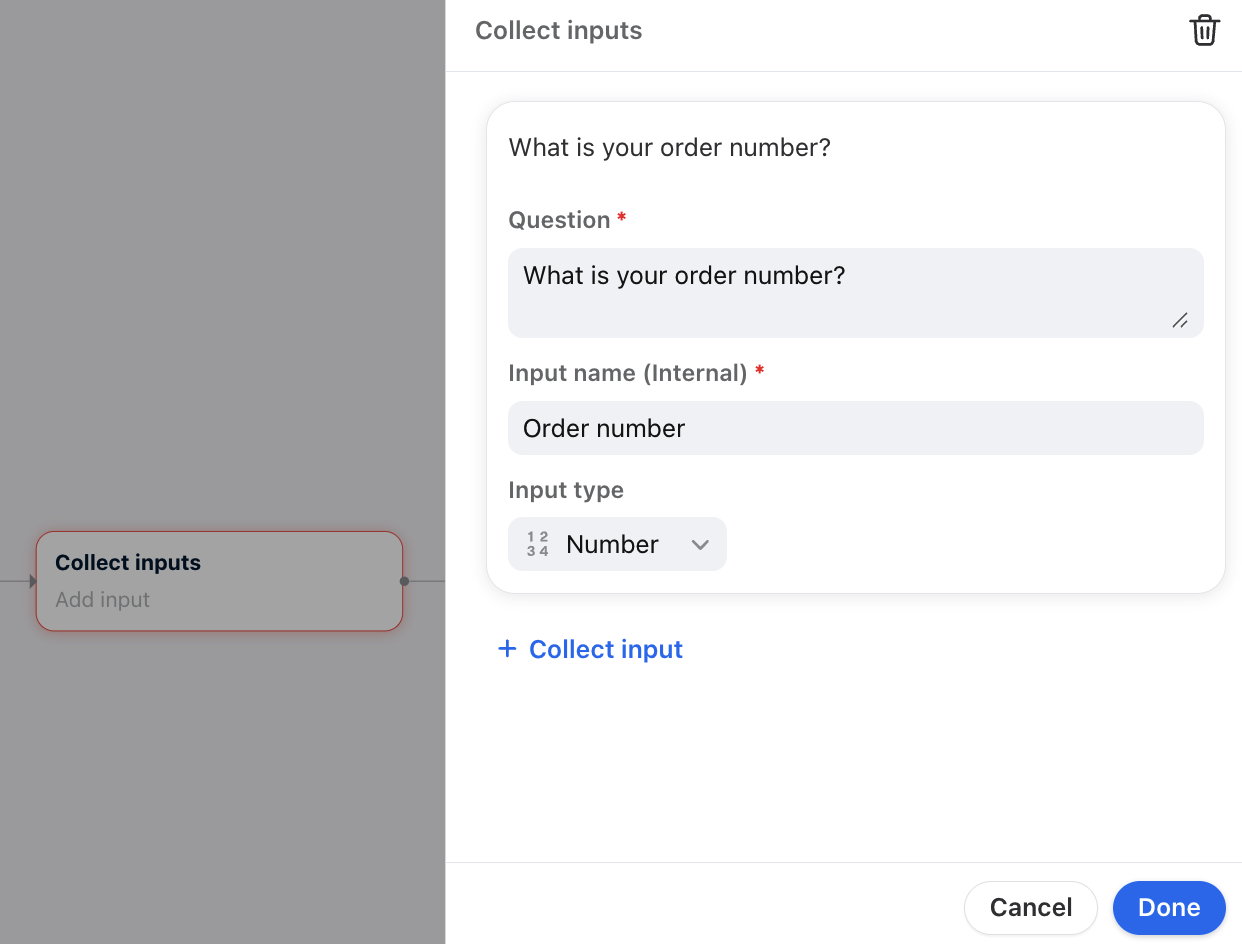
In the flow builder, click the blue “+” button within any arrow to add a new step to your flow. Select the Collect inputs step.
Step 3
Fill in the following fields:
Question: Enter a question to collect input from your chat visitor
Input name (internal): The internal name for this step
Input type: Select short text or number
Click Done to add the step.
Step 4
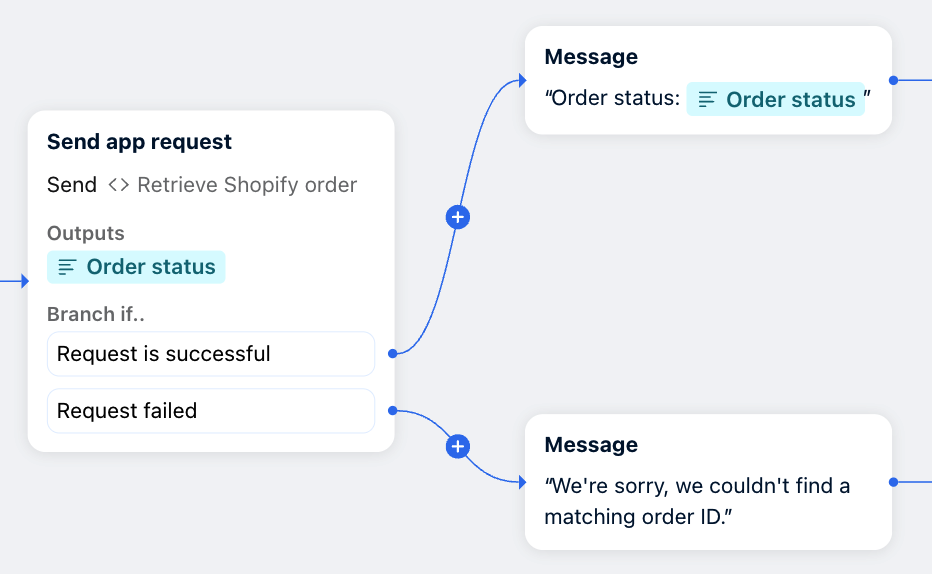
After the Collect inputs step, click the “+” button and select the Send app request step.
Step 5
Select your app request and set up the input and output values. In this example, when a visitor enters an order number, the chatbot will display the order status retrieved from the third-party system.
Click Done to add the step to your chatbot flow.
Step 6
Continue adding steps to your chatbot as needed. In this example, we’ll add Message steps for the “Request is successful” and “Request failed” branches.
Step 7
When you’re finished setting up your chatbot flow, save and publish your changes.
Search
You can enable search for your application requests so that Front teammates that implement the request in a macro can search through the API resources to find a match. For example, most GET requests that retrieve a full list of customers, orders, shipments, charges, etc. provide a query parameter that you can add to the request in order to filter or search through the results.
Enable search in the Collect input node
In the Collect input node, select to Enable search, and then configure the search input.
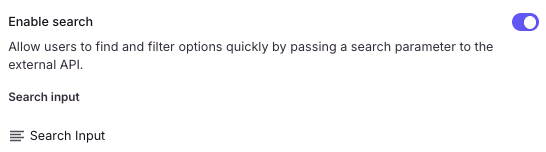
After you enable the toggle, click the default search input to rename it or provide a test value. The input supports String (text) values only.
You can determine what a good test value might be from the API documentation of the service you are connecting to. For example, if you are adding search to an application request that retrieves a list of contacts, you might provide a test value that represents the email address or name of the contact, depending on what fields the API docs indicate to be searchable.
Add the search input to your request
After defining the search input and providing a test value, you need to add the input to the Send request node, usually in the form of a query string parameter within the URL of the request. Consult your API documentation to learn the name of the search input parameter. For example, by reading the docs you might determine that a parameter called query allows you to search through the resources for an endpoint.
In the Send request node, find the URL for your app request. To specify query string parameters, add the name of the parameter in the Key column (for example, query). Then, click the plus sign under the Value column to add the Search input variable. You can add additional parameters in this same way by click Add param. The exact order of parameters does not matter.
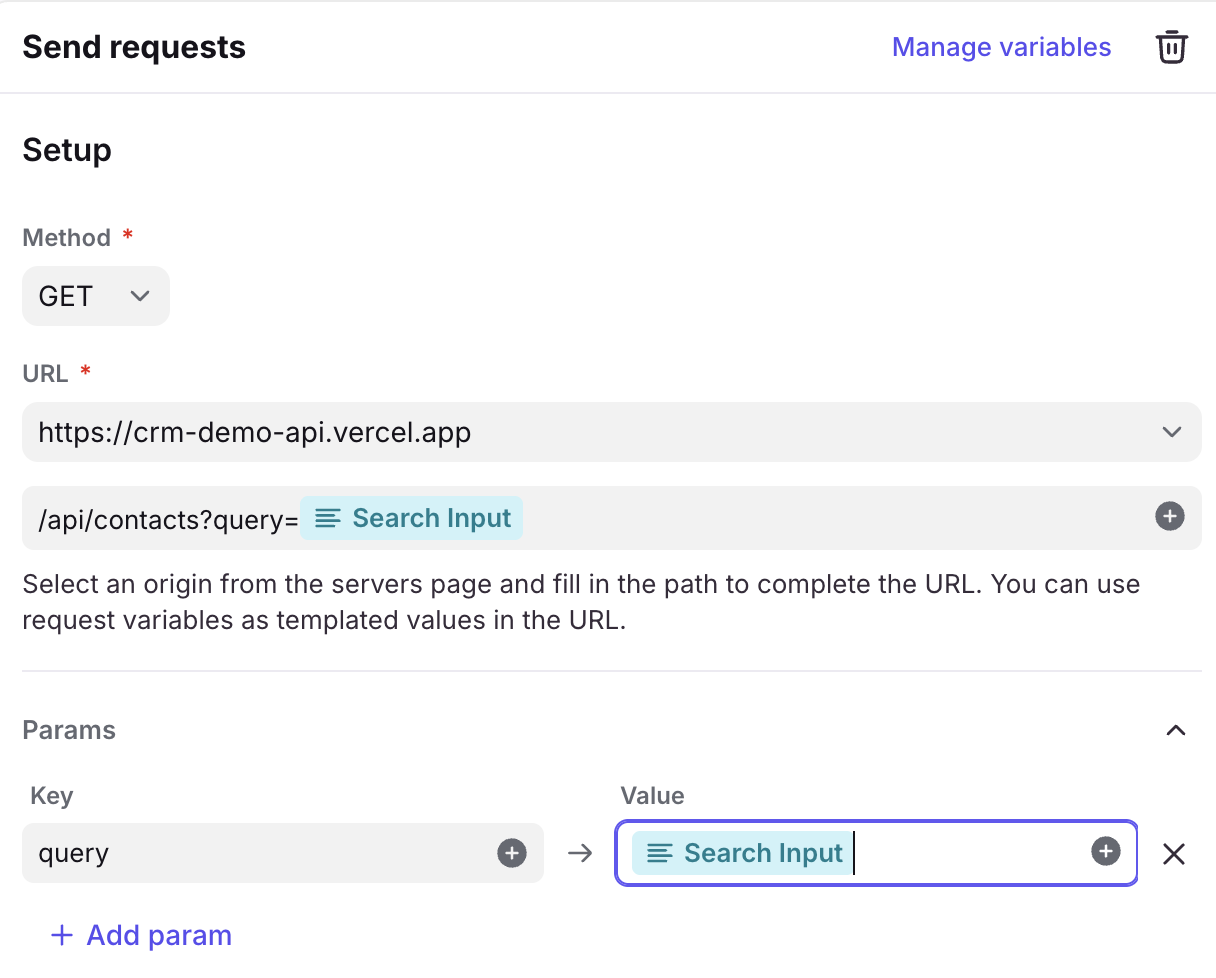
Fun fact: As you add parameters, you'll notice that a "?" question mark is added after the URL, followed by the parameter name, an "=" equals sign, and then the value of the parameter. If you add multiple parameters, they will be separated by "&" ampersands. This is how APIs expect to receive query string parameters, so Front automatically adds them to the URL. You can also type them directly into the URL if you prefer, and Front will add them as itemized parameters in the table.
Query string parameter syntax:
<endpointURL>?<parameter_name1>=<variable1>&<parameter_name2>=<variable2>How search appears in workflows
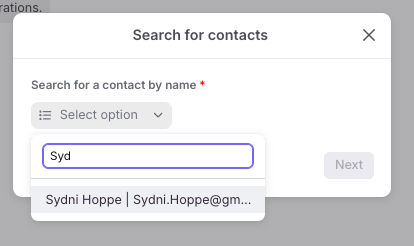
When your application request with search enabled is used in a macro, a search bar renders that allows teammates to enter text. The inputted text is used to search the API endpoint configured in your application request, returning only results that match the teammate's query.
Pagination
You can enable pagination for your application requests if you need to paginate through a large list of API results. For example, most GET requests that retrieve a full list of customers, orders, shipments, charges, etc. return between 10-100 results at a time, but the full list of resources is likely in the hundreds or thousands. Pagination refers to the practice of iterating through the full list of results one page at a time.
Enable pagination in the Collect input node
In the Collect input node, select to Enable pagination, and then configure the pagination fields.

After you enable the toggle, click Add pagination input to define the properties that define pagination. You can determine these from the API documentation of the service you are connecting to. Pagination parameters are typically named things like page_number, limit, offset, page_token, current_page, etc., but you should read the API documentation for the specifics.

Add the pagination inputs to your request
After defining the available pagination inputs, you need to add them to the Send request node, usually in the form of query string parameters. Consult your API documentation to learn more.
In the Send request node, find the URL for your app request. To specify query string parameters, add the name of the parameter in the Key column (for example, limit). Then, click the plus sign under the Value column to add the limit variable that you configured in the Pagination section. You can add additional parameters in this same way by clicking Add param. For example, you can repeat the process for a page_token parameter. The exact order of parameters does not matter.
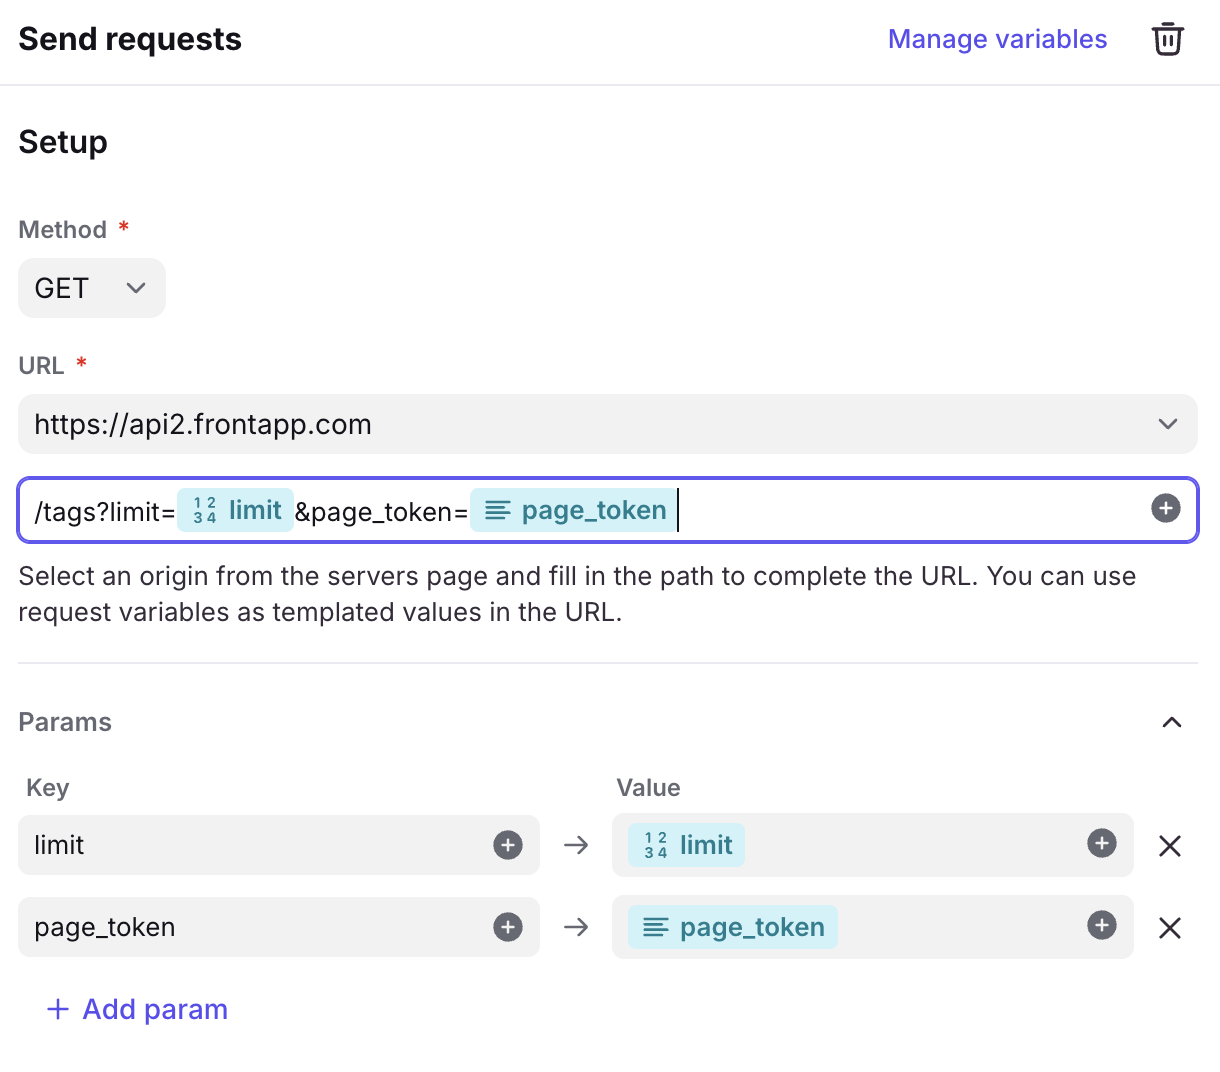
Fun fact: As you add parameters, you'll notice that a "?" question mark is added after the URL, followed by the parameter name, an "=" equals sign, and then the value of the parameter. If you add multiple parameters, they will be separated by "&" ampersands. This is how APIs expect to receive query string parameters, so Front automatically adds them to the URL. You can also type them directly into the URL if you prefer, and Front will add them as itemized parameters in the table.
Syntax:
<endpointURL>?<parameter_name1>=<variable1>&<parameter_name2>=<variable2>
Define how to increment the pagination in the Return data node
After you define the inputs and incorporate them in the request, go to the Return data node and configure how the pagination increments from one page to the next in the Configure pagination section.
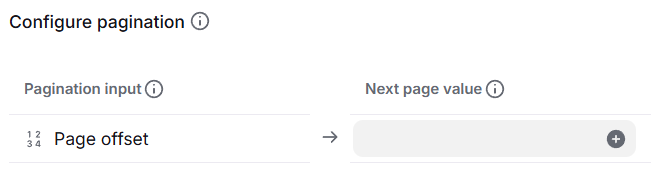
Under Next page value, click the plus (+) sign to select the dynamic variable that represents the next page of results. Generally speaking, you will:
Create a new dynamic variable that modifies the main pagination input (such as adding 1 to a "page number" or a certain increment to an "offset" or replacing the "current page token" with the "next page token").
Keep supplementary pagination inputs like "limit" the same.
Pagination examples
The following are examples of 3 common ways that pagination is incremented in APIs:
Page numbers—In this scenario, the API returns a page_number (or similarly named) parameter that specifies which page of results to view. This is typically accompanied by a limit which determines how many results to view per page. For example, if an endpoint has 100 results and the limit is set to 10, you would have 10 total pages. Items 1-10 would be returned when the page number is 1, items 11-20 would be returned when the page number is 2, and so on.
The following table shows a representative example of this type of pagination (refer to your API documentation for specific parameter names). See preceding screenshots for further guidance.Parameters
Type
Initial value
Next page value
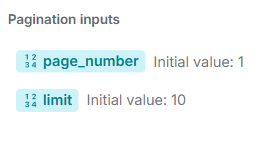
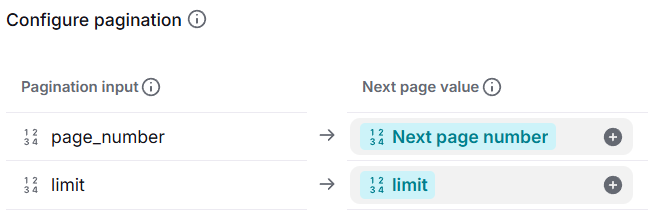
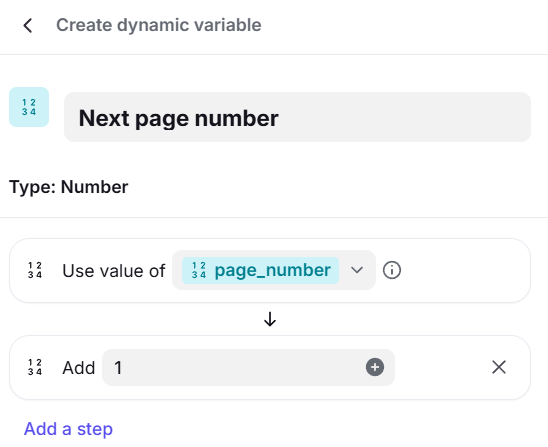
page_number
Number
1
Click plus (+) and select to create a new dynamic variable.
Choose Use result of variable.
Select page_number in the dropdown list.
Click Add a step.
Choose Add.
Input 1 in the Add value.
Name and save the dynamic variable, and then add it as the Next page value.
limit
Number
10 (or whatever number of results you want to return per page, within your API's accepted range)
Set this variable equal to itself
Offsets—An offset pagination strategy is similar to page numbers, but specifies which position in the list to start returning results for rather than specifying the page number. For example, if you have 100 total results and a limit of 10, there are 10 pages. An offset parameter would specify which item to start returning results after. An offset of 0 would return items 1-10, an offset of 10 would return items 11-20, and so on.
The following table shows a representative example of this type of pagination (refer to your API documentation for specific parameter names). See preceding screenshots for further guidance.
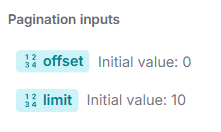
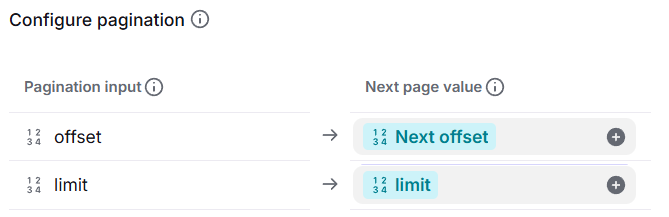
Parameters
Type
Initial value
Next page value
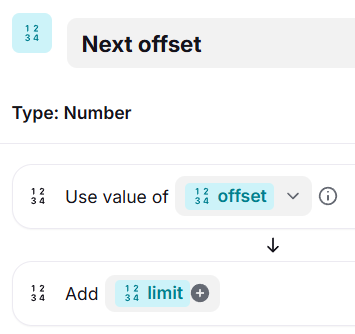
offset
Number
0
Click plus (+) and select to create a new dynamic variable.
Choose Use result of variable.
Select offset in the dropdown list.
Click Add a step.
Choose Add.
Click the plus (+) sign and select the limit variable in the Add value.
Name and save the dynamic variable, and then add it as the Next offset.
limit
Number
10 (or whatever number of results you want to return per page, within your API's accepted range)
Set this variable equal to itself
Page tokens—APIs that use this strategy supply a pair of tokens in their response, usually within a dedicated pagination object. One token represents the "current page" and the other token represents the "next page". To increment pages, you simply set the "current page" token to the value of the "next page" token. To get the first page, you can just leave the "current page" token blank.
Just like the other strategies, there is normally a limit parameter that represents how many results to return per page. For example, if you have 100 results with a limit of 10, the API might return a response in which the current_page (or similarly named parameter) is a value like k2309kklsd90sl and the next_page is k230fkklsd40s7. When you first send the request, the API returns results 1-10 if you leave the current_page parameter empty but set limit to 10. For the next request, if you specify k230fkklsd40s7 as the current_page, then results 11-20 are returned. The next page will have a different value for next_page, say kd7jfkklsd40sg, which you would then use to grab the following page, and so on, until next_page is null.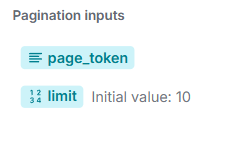
Unlike offsets and page numbers, a page token pagination strategy requires you to extract a value from the request response before you can paginate to the next page. In this case, we want to extract whatever property represents the "next page token". Consult with your API documentation to learn exactly what property to extract. For example, Front's API provides a next property within a _pagination object, which is what we would extract in the Send requests node as a dynamic variable.
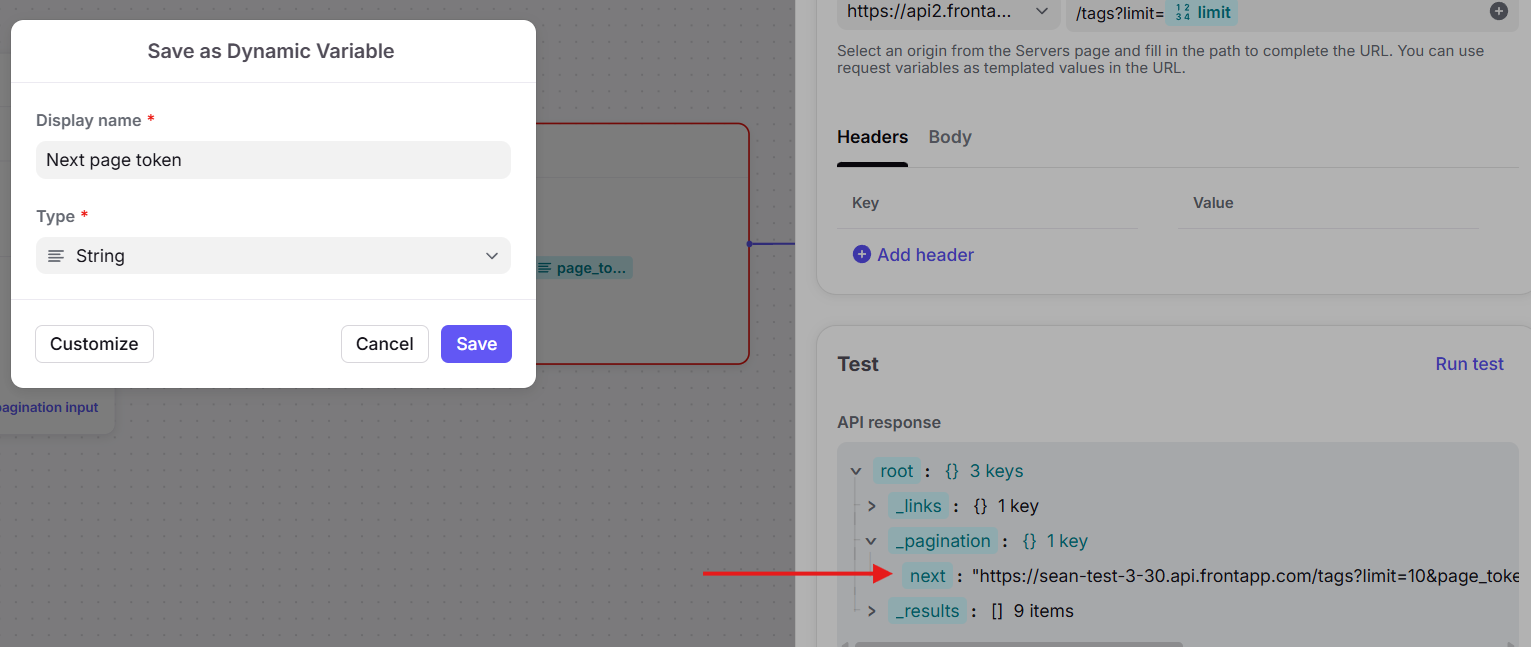
Tip: In some cases, you might have to process the variable further in order to extract the page token from a URL. For example, Front's next property returns URLs like https://api2.frontapp.com/tags?page_token=lkadjsfalsdfjass9889, where the next page token value is lkadjsfalsdfjass9889 and not the full URL. For these scenarios, you can use the dynamic variable system to split the URL value by the page token property name (page_token in the Front example) and equals sign (or whatever other segmentation you need), and then pull just the final part of the URL after that split.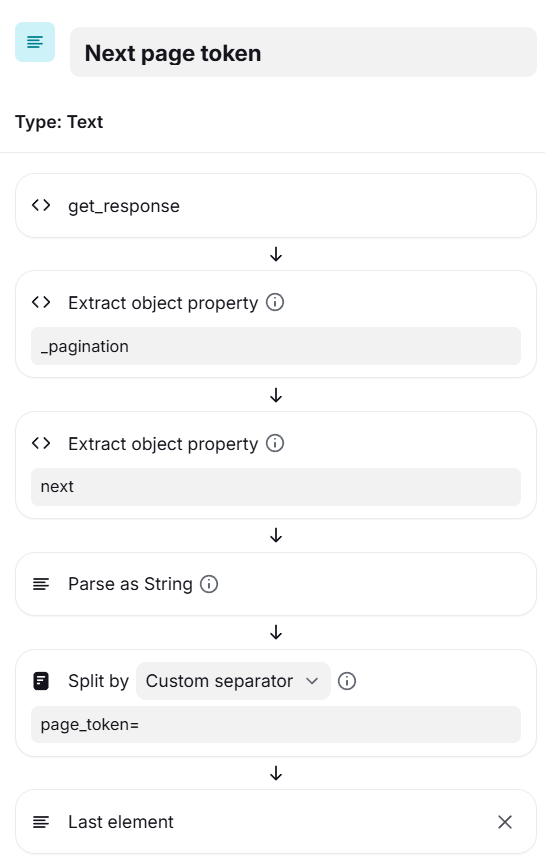
We would then use the finalized "next" dynamic variable in the Return data node to replace the value of the current page token.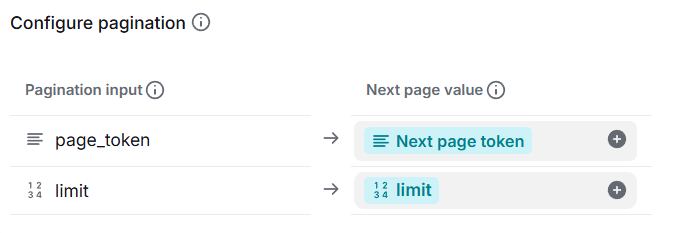
The following table shows a representative example of this type of pagination (refer to your API documentation for specific parameter names). See preceding screenshots for further guidance.Parameters
Type
Initial value
Next page value
page_token
String
Empty
Click plus (+) and select the "next page token" variable you extracted as a property from the Send request node.
limit
Number
10 (or whatever number of results you want to return per page, within your API's accepted range)
Set this variable equal to itself
FAQ
Can I rename or reorder application request nodes in the flow builder?
You can rename each step for clarity (e.g. “Get User ID”), but reordering is not supported.
What happens if I remove a step that’s used later?
If you remove a step that passes a variable to a later step, the flow builder displays an error and requires you to resolve the missing variables before saving.
How are variables managed when creating application requests?
Dynamic variables are only editable in the step where they’re created.
You can view variables in the Send request nodes by looking under Extracted properties or Manage variables.
Click on any variable under Extracted properties to edit it.
What information can app requests pull into chatbots?
App requests can retrieve data like order status, shipment tracking, or request status from third-party systems.
Can I use object lists with app requests?
Yes. App requests can retrieve object lists, which can be used to set up dynamic dropdown options in the Collect teammate answers step in macros.
What happens if a user enters the wrong order number (input)?
The app request will go down the failure branch if the input is incorrect. If you want to allow the user to try again, you'll need to add another Collect input step on the failure branch.
What happens if the chatbot can't find the requested information?
If the order or request ID isn't found, the chatbot will go down the failure branch of the app request. You can tailor a message to communicate that the request failed and allow the user to try again by adding another Collect input step on the failure branch.
Can chatbots take action on my behalf, like cancelling an order?
Not at the moment. App requests in chatbots only retrieve information, but action-based features like modifying an order are planned for a future update.
Can admins customize chatbot error messages if something goes wrong?
Yes. Admins can set up custom error messages to guide users when an issue occurs.
How many times can a visitor retry the app request chatbot steps?
There's no hard limit, but admins can configure chatbot behavior to prevent endless loops.
Pricing
Application requests are available to build from scratch on the latest Enterprise plan. You can access pre-built requests on the Professional and Enterprise plans by visiting the App Store.