Overview
Rules save you time by automating repetitive processes. More information about understanding shared and individual rules can be found in the Understanding rules article.
For a full list of rule conditions, see the Guide to rule conditions. For more examples of popular rules and templates, visit our rule template library in our app.
Instructions for creating a shared rule
Follow these steps if your account was created after May 2, 2023.
Step 1
Click the gear icon on the top right of Front, then select company or Workspace settings in the left sidebar. Click Rules, then click the Create a rule button.
For a company rule, which could apply to all individual inboxes and shared inboxes, follow this guide.
Step 2
Click Create a rule, then click Create custom rule.
Step 3
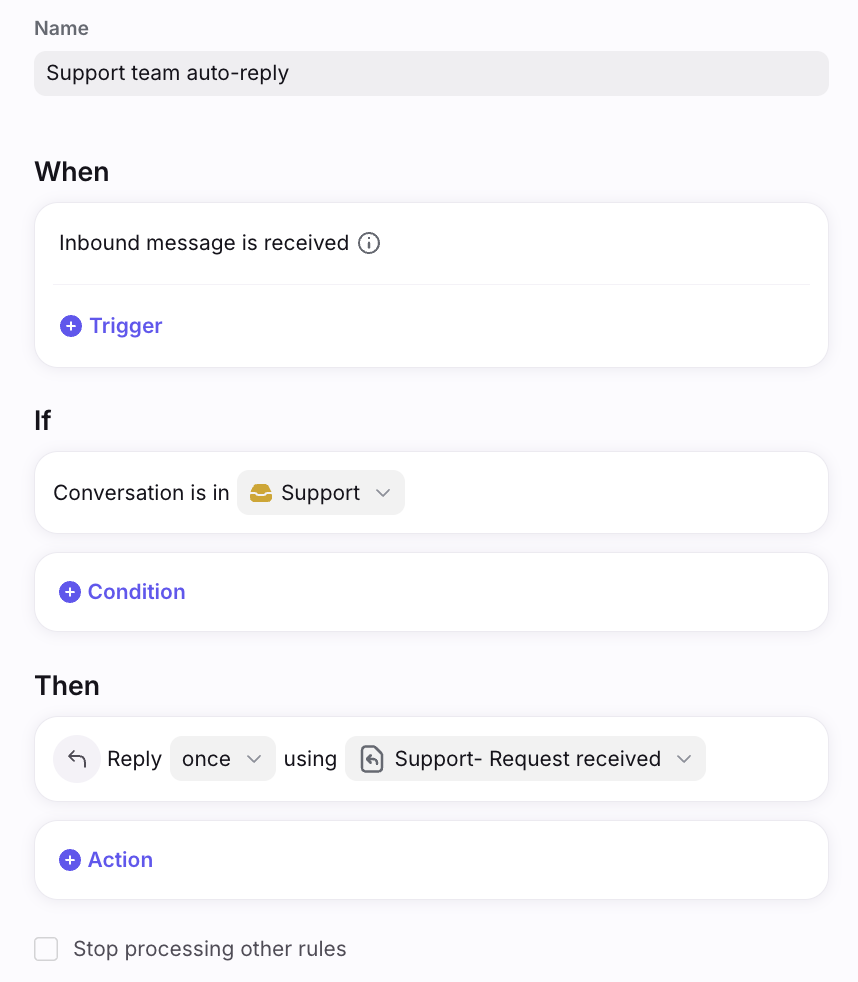
Use the When, If, and Then conditions to customize the rule to your needs. The possibilities are endless for you to automate actions in your inboxes.
In this example, we are setting up an auto-reply to be sent after we receive a support inquiry. This rule is stating that an inbound message into the Support inbox will be automatically replied with the message template Request Received. See this article for an in-depth guide on setting up auto-replies.
Step 4
Remember to give your rule a name, or else you won't be able to save it. Once your rule is complete, click Create rule.
Instructions for creating a shared rule [legacy]
Follow these steps if your account was created before May 2, 2023.
Step 1
Click the gear icon on the top right of Front and into the Company settings tab, and click Rules.
For a company rule, which could apply to all individual inboxes and shared inboxes, follow this guide.
Step 2
Click Add a rule and you will be taken to the rules library. Look through the various template and choose one, or choose to create a custom rule from scratch.
Step 3
Once you've selected a template or a custom rule, you'll see the rule editor screen. You can customize the template to fit your needs or build the rule yourself.
Step 4
Use the When, If, and Then conditions to customize the rule to your needs. The possibilities are endless for you to automate actions in your inboxes.
In this example, we are setting up an auto-reply to be sent after we receive a support inquiry. This rule is stating that an inbound message into the Support inbox will be automatically replied with the message template Request Received. See this article for an in-depth guide on setting up auto-replies.
Step 5
Remember to give your rule a name, or else you won't be able to save it. Once your rule is complete, click Create rule.
Instructions for creating an individual rule [all plans]
Step 1
Click the gear icon on the top right of Front, then select personal settings in the left sidebar. Click Rules.
Step 2
Click the Add a rule button.
Step 3
Use the When, If, and Then conditions to customize the rule to your needs.
Step 4
Click Create rule.
Quick rules to file messages
You can also quickly create rules directly from an individual email or private tag. These quick rules allow you to easily set up a rule to move an email into a private tag based on the sender of that message. You can also manually create individual (personal) rules to file your messages into tags.
Rule templates
Front has rule templates to help teams discover and create rules in a few simple clicks. Use our rules library to automatically create and build rules for your team.
For more information check out these articles:
Rule template library (for accounts created after May 2, 2023)
Front's rules library (for accounts created before May 2, 2023)
Pricing
Custom rules for shared inboxes are available to:
Latest Scale plans or above created after May 2, 2023
Legacy Growth plans or above created before May 2, 2023