
How to enable and use Jira Connectors
Overview
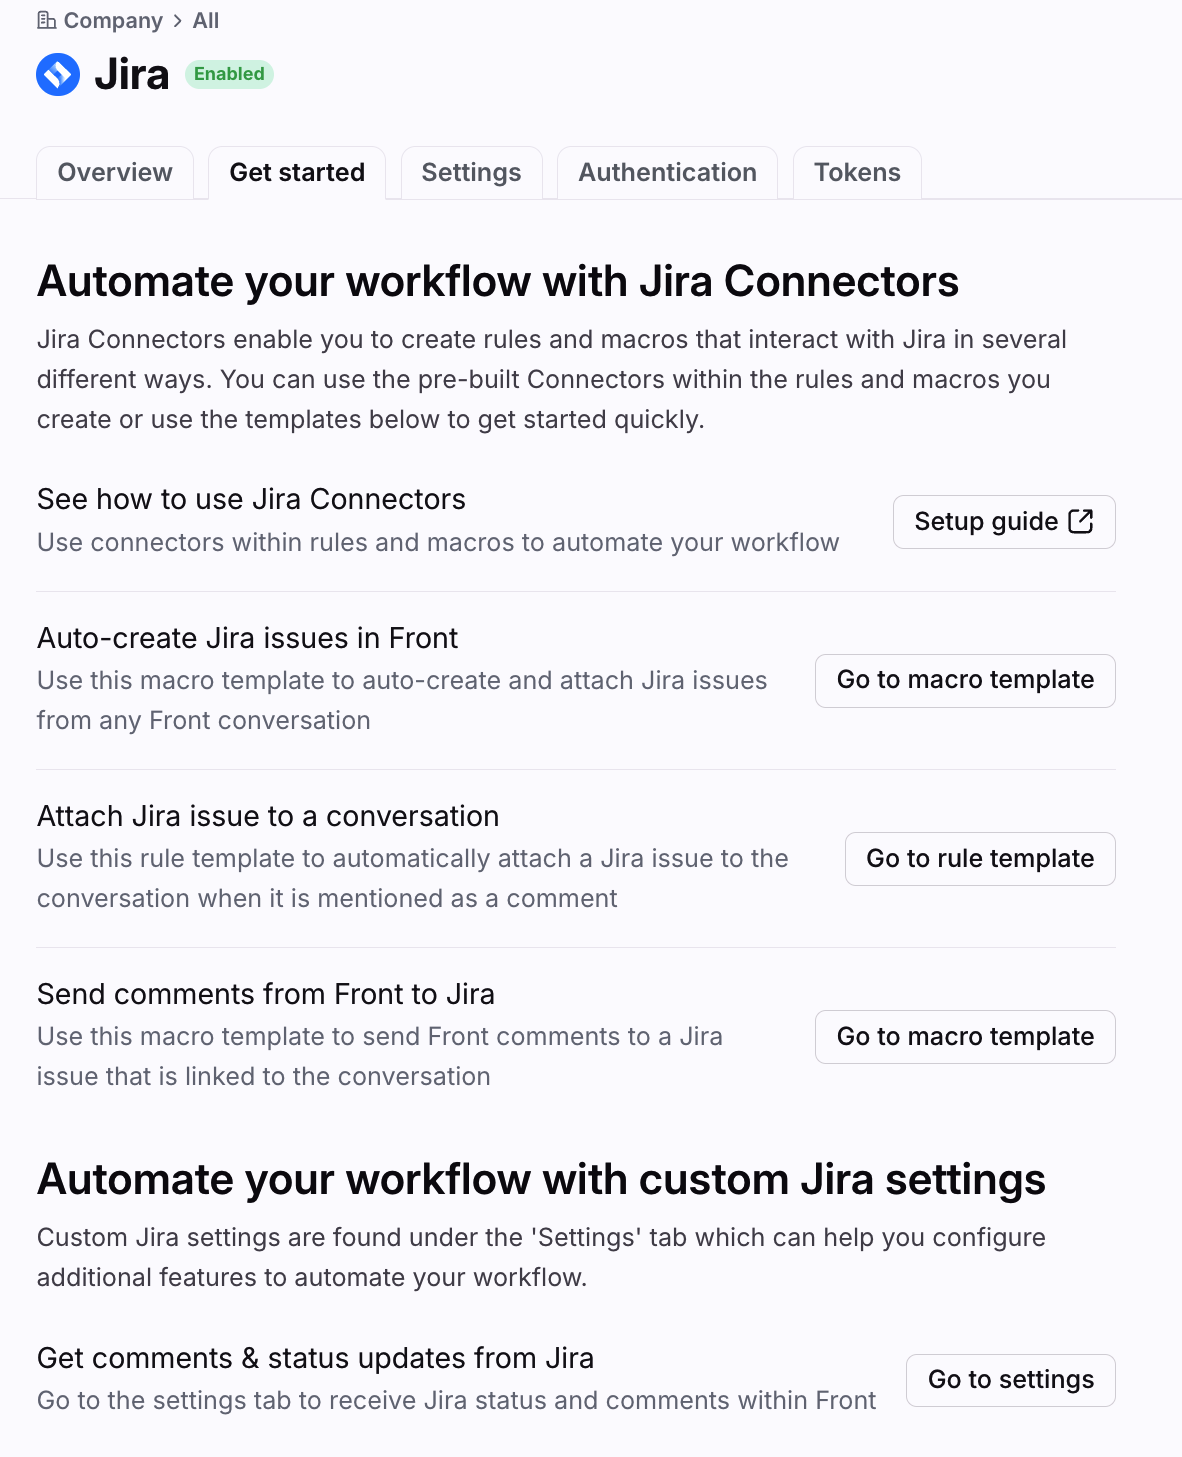
If you are on the Professional plan or above, this integration also includes a library of prebuilt Connectors that give you access to every action available in the Jira API. Use them in rules, macros, or chatbots to easily automate Jira actions directly from Front, supercharging your workflows without having to write any code. Front has several rule and macro templates and settings available to simplify the setup process to automate specific tasks.
Use Jira Connectors to:
Quickly create Jira issues from your Front inbox
Send comments from Front to Jira
Automatically attach a Jira issue to a conversation from comments
And more!
Configure additional settings to:
Receive comments from Jira within Front
Get specific Jira issue status updates within Front
If you’d like to create or browse Jira issues using Front’s sidebar plugin, see this article: How to enable and use the Jira Integration.
How it works
Once you’ve connected your Jira account to Front, select and configure the templates and settings that support your team’s workflows. These templates are customizable, so your end-user experience can vary from pre-built settings based on your final configuration.
Workflow | Type | Description |
Auto-create Jira issues in Front | Macro | Use a macro to create and attach Jira issues from any Front conversation. When the macro is triggered by a teammate, they can quickly fill out description and other required fields. A Jira issue is automatically created and linked to the conversation. |
Attach Jira Issue to a conversation | Rule | Use a rule to automatically attach a Jira issue to a conversation when the Jira issue ID is mentioned in a comment or message. |
Send comments from Front to Jira | Macro | Use a macro to send comments to the Jira linked to the conversation, directly from the Front conversation. When the macro is triggered by a teammate, they can enter a comment and it will be sent to the Jira issue(s) associated with that conversation. The comment sent to Jira will also be added as a comment in the Front conversation. |
Get comments from Jira into Front | Setting | Enable this setting to sync Jira issue comments to the linked Front conversation. If a comment is made in Jira on an issue that is associated with a conversation in Front, the conversation will re-open with the associated comment posted. |
Get status updates from Jira into Front | Setting | Enable this setting to re-open Front conversations when the Jira issue status changes. You can select specific Jira issue statuses that will reopen a conversation and post a comment with the status change. |
Admin setup
Part 1: Connect Jira to Front
You must have Front company admin permissions to set up the integration. Once enabled it can be used by any teammate.
Step 1
Click the gear icon, navigate to your company settings, then select App store from the left menu.
Step 2
Select Jira from the list of integrations. Click See details, then click Enable app.
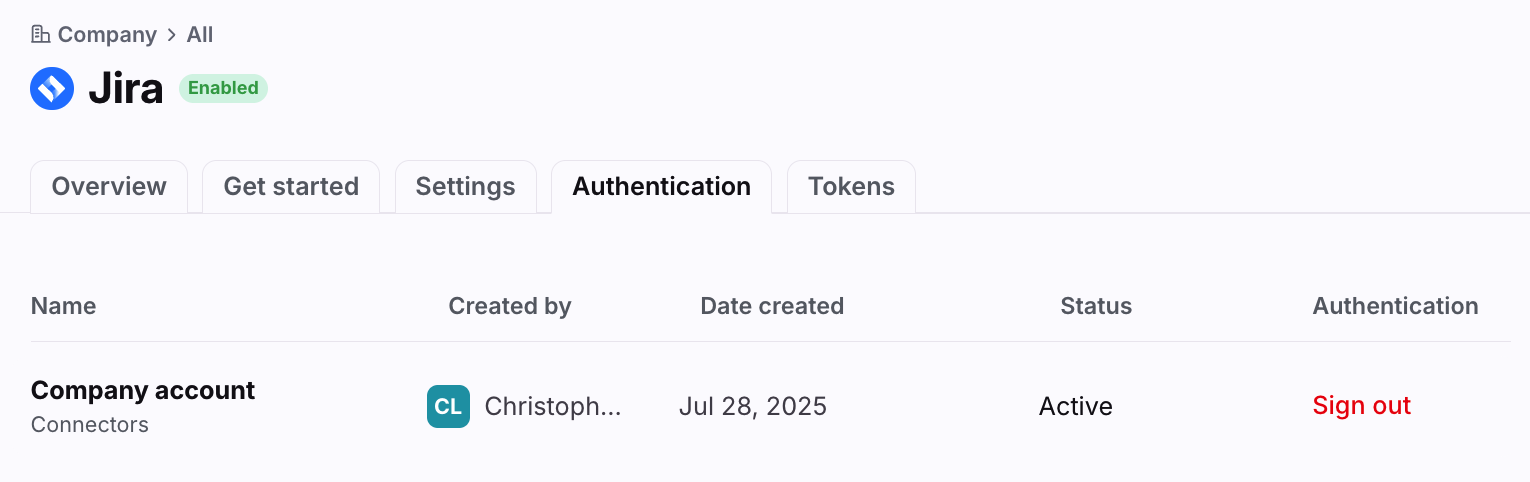
Step 3
You’ll be navigated to the Authentication tab in the Jira integration. Click Sign in.
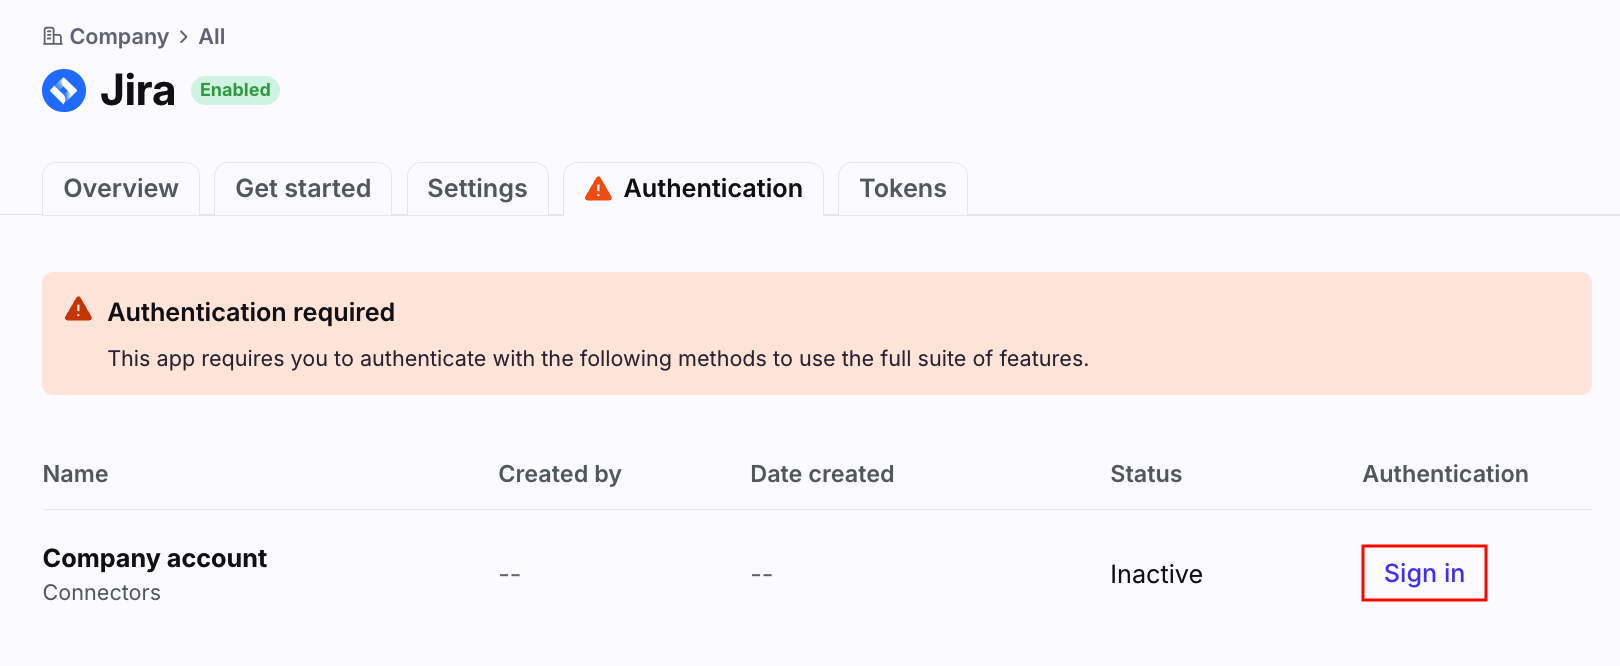
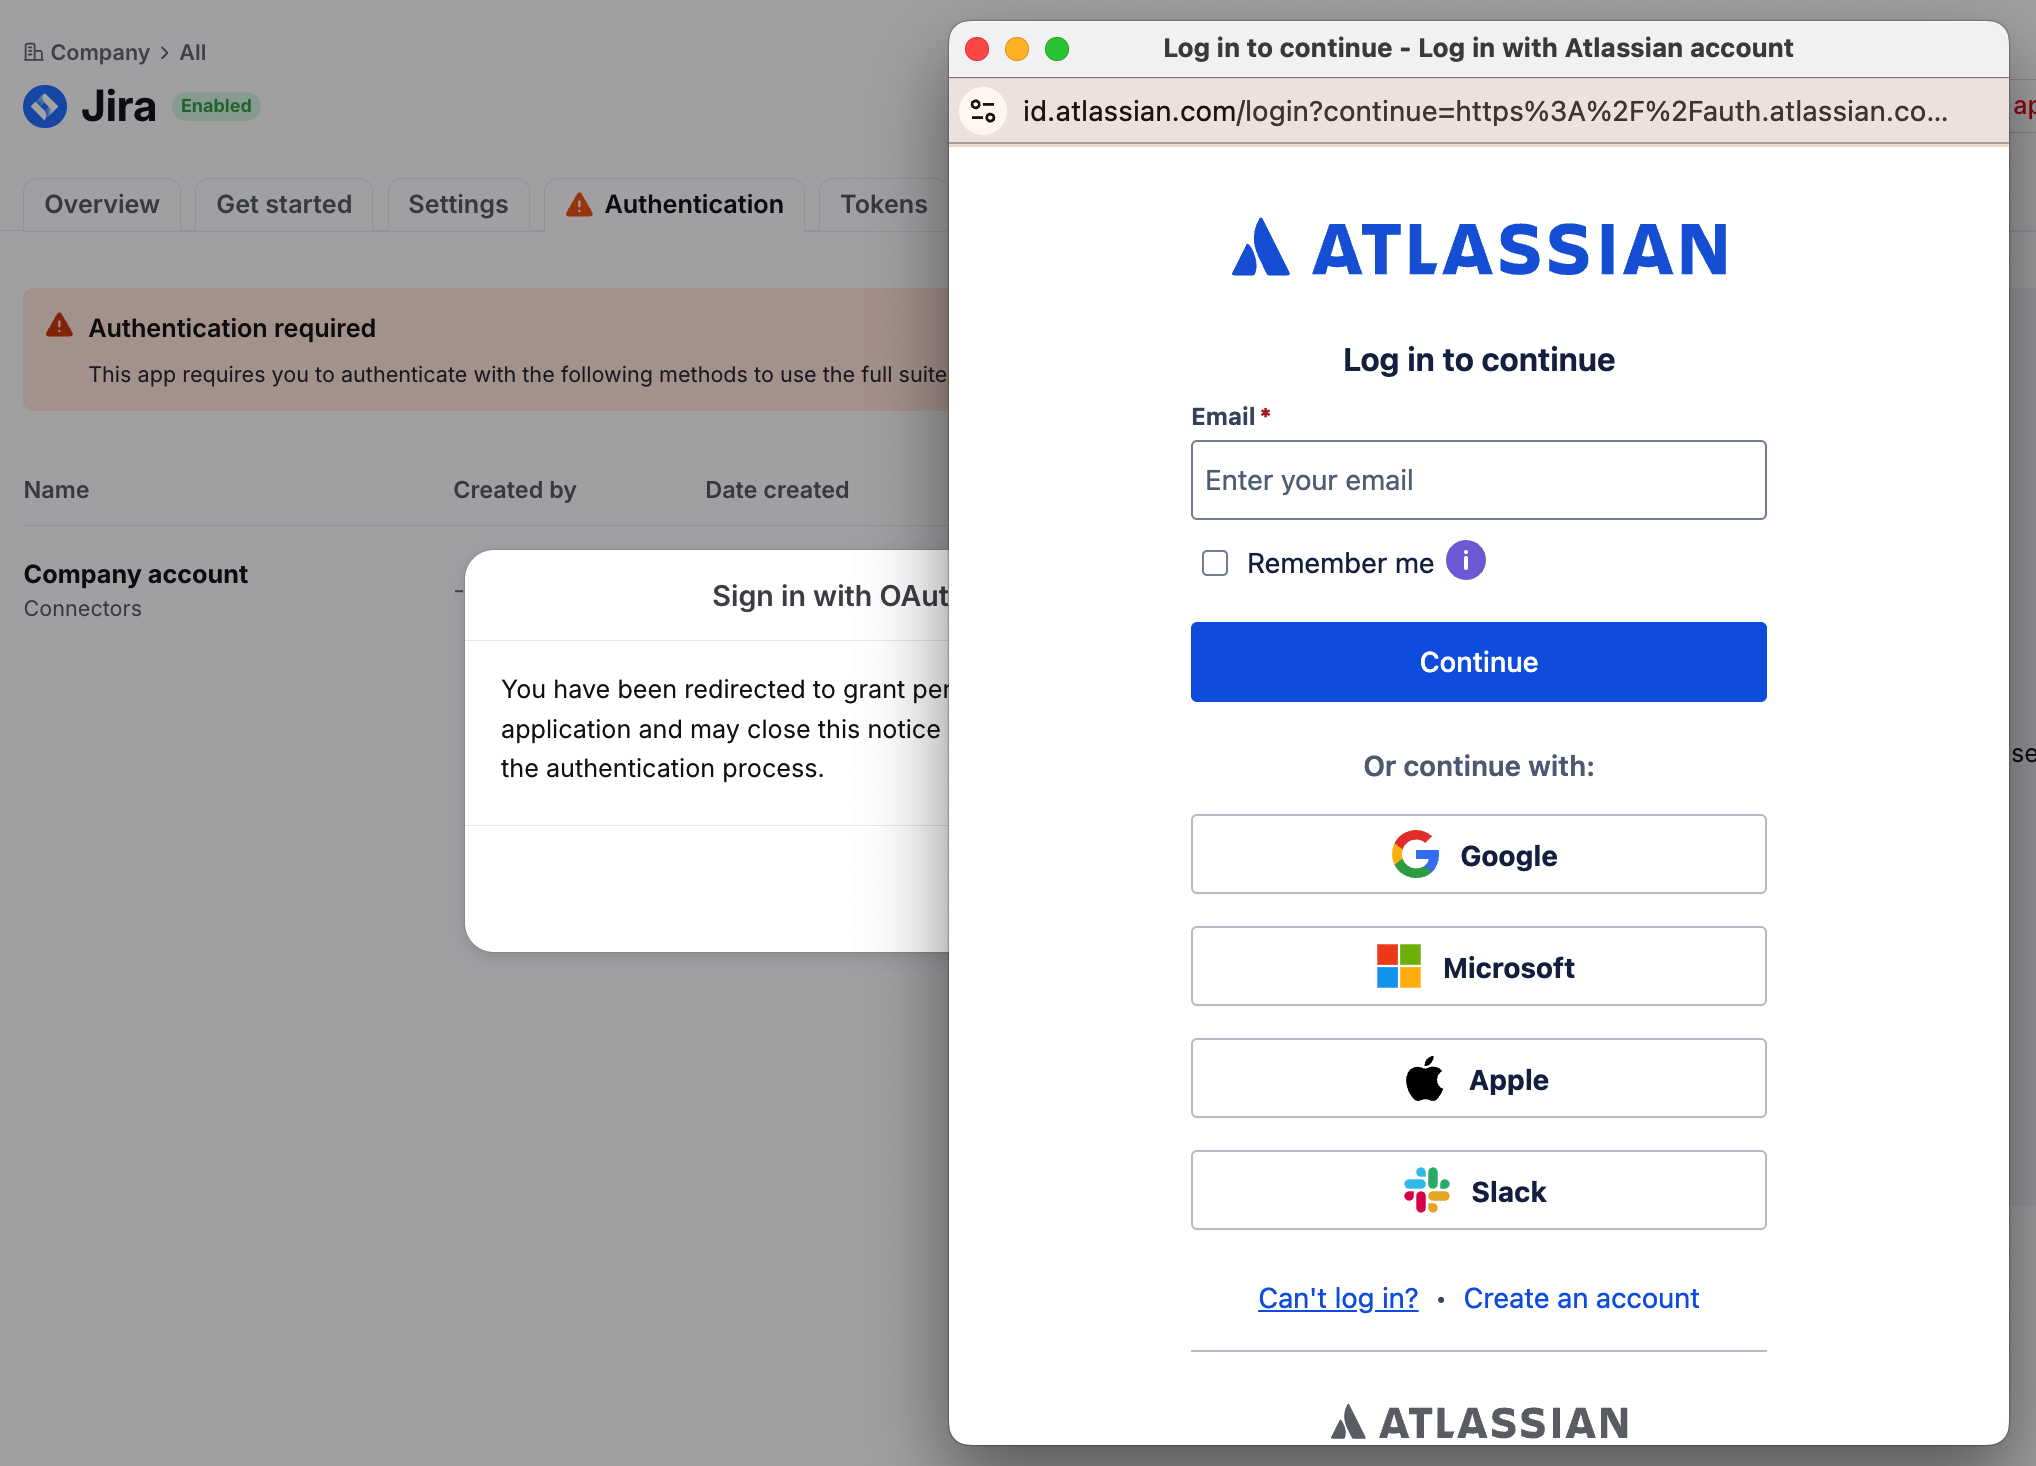
Step 4
You’ll see a pop-up window to authenticate with your Jira credentials to enable the integration for the company.
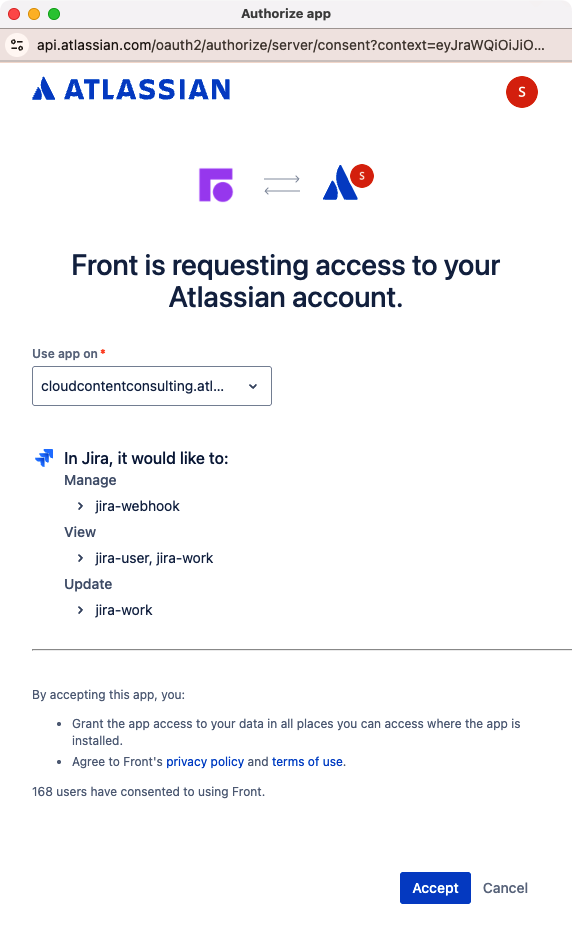
Note: When authenticating the Jira integration, Front attempts to add a webhook subscription for Jira issue updates. This lets Front know when Jira resolves an issue. If Front is not reopening closed issues, please check with your Jira admin to see if a webhook to frontapp.com exists in your Jira settings. It may be necessary to re-authenticate on Front's side with a Jira admin that is able to create webhooks through the Jira API.
Step 5
Click Save in the pop-up to finish enabling the Jira integration. You’ll see updated values in the Created by, Date created, and Status fields.
Part 2: Enable workflows
Once you’ve connected your organization’s Jira account to Front, you can select which Jira Connectors you’d like to enable (see How it works section for the full list).
In this example, we’ll select the Auto-create Jira issues in Front macro template.
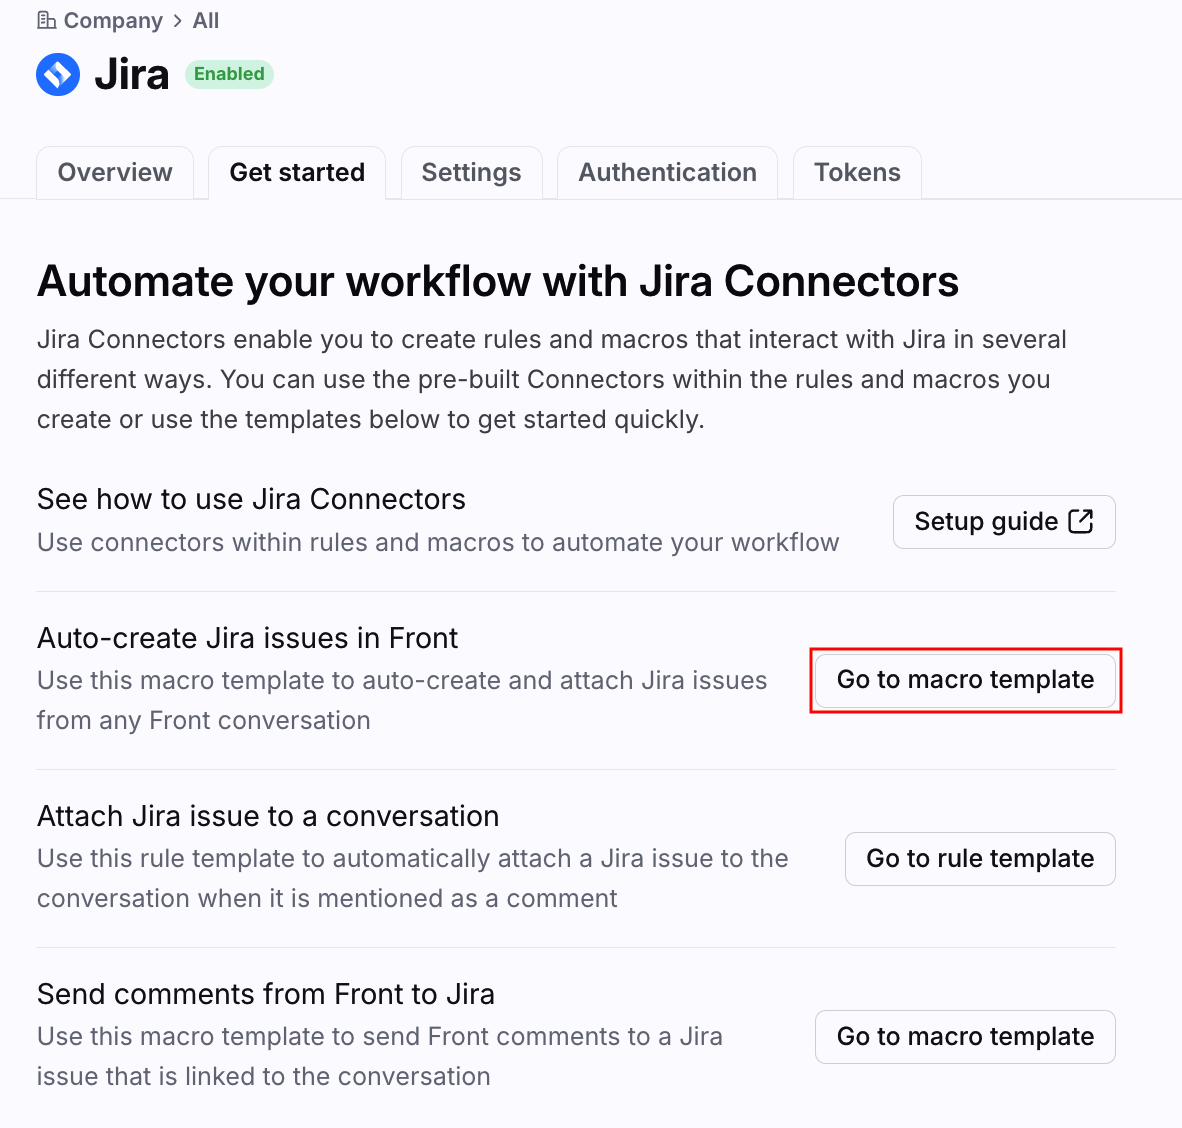
Step 1
In the Get started tab, navigate to the Auto-create Jira issues in Front Connector, then click Go to macro template.
Step 2
In the pop-up, select which workspace you’d like to create this macro in. Click Save.
Step 3
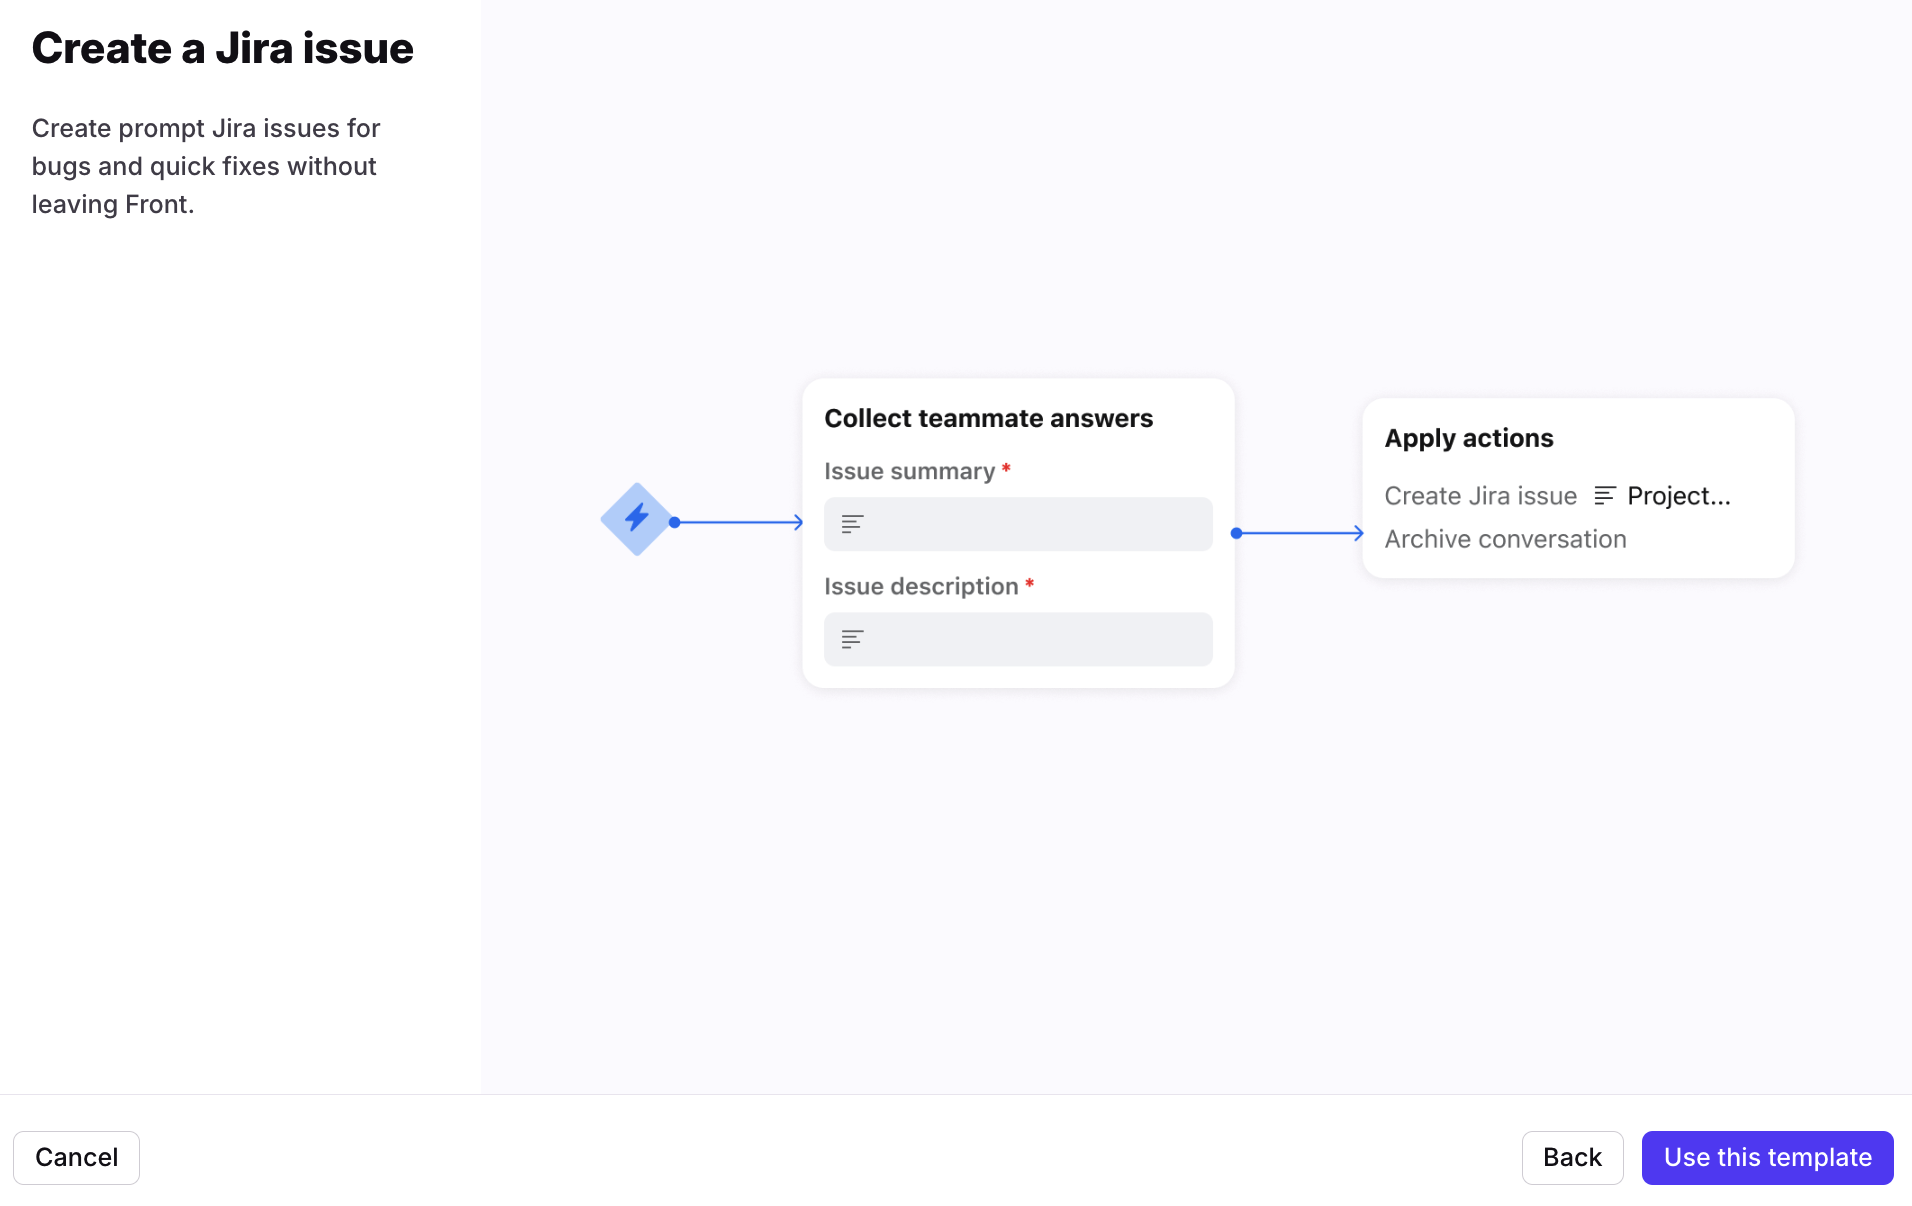
You’ll be navigated to the macro library. Hover over the Create Jira issue template, click View template, then select Use this template.
Step 4
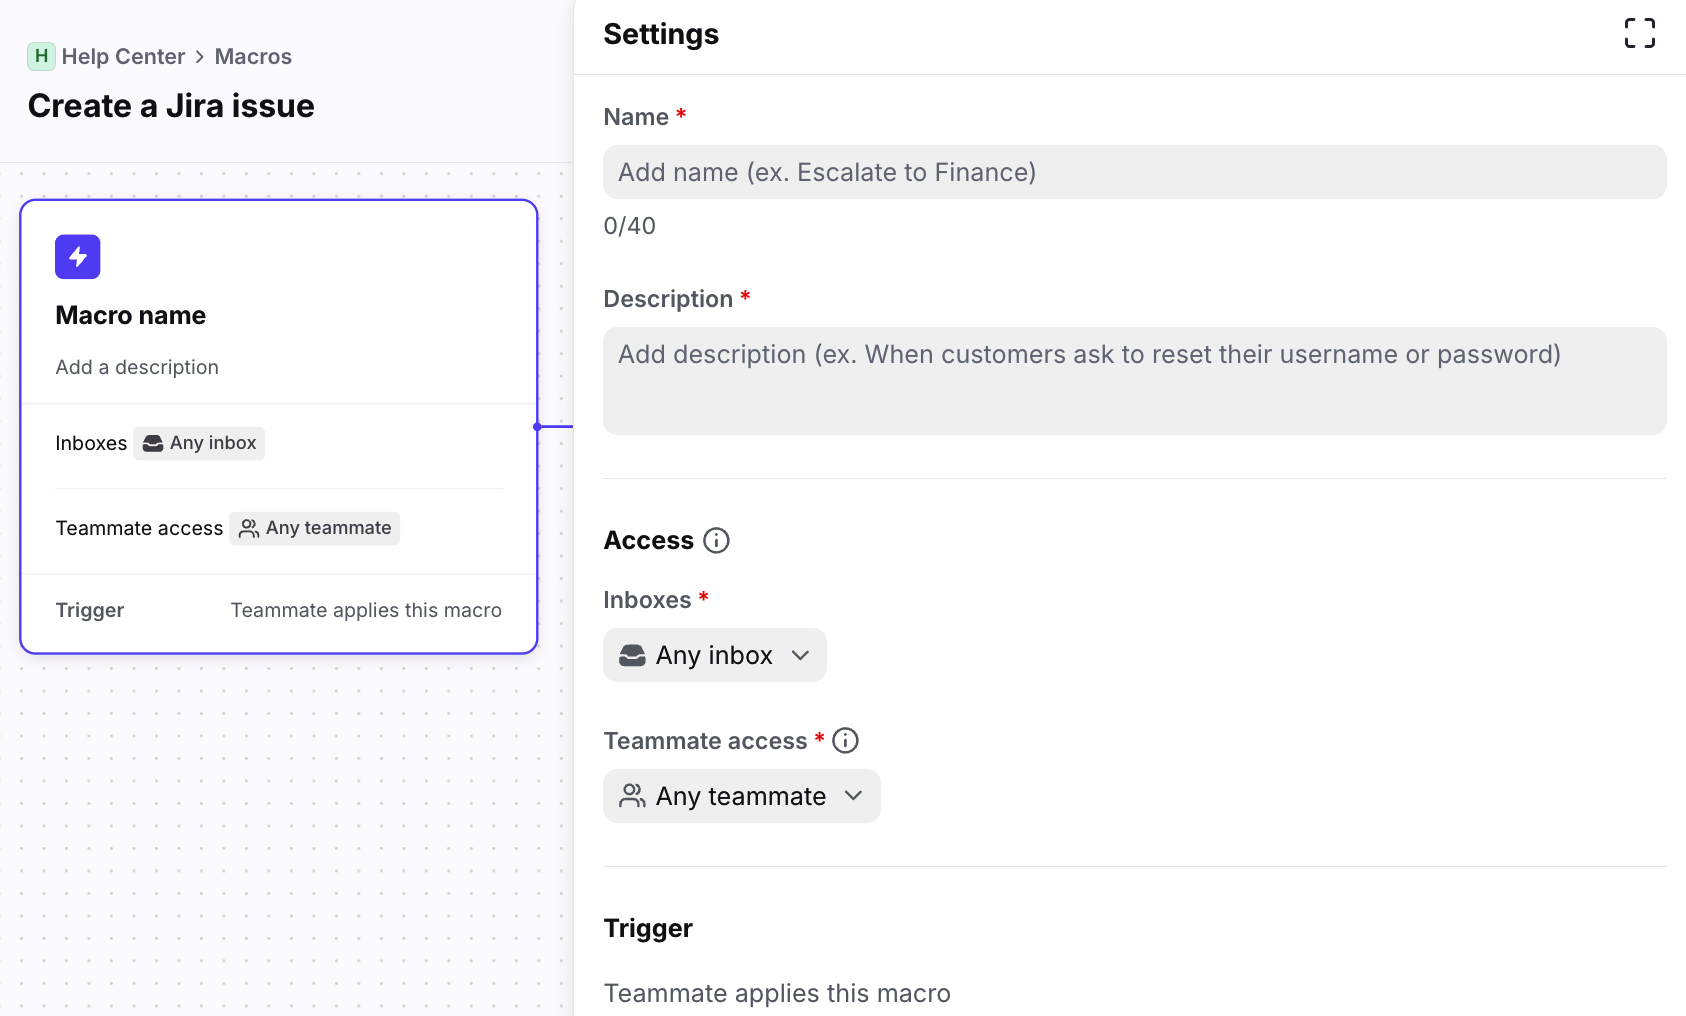
In the settings step, enter a name and description for your macro, then select the inboxes and teammates it applies to.
Step 5 (optional)
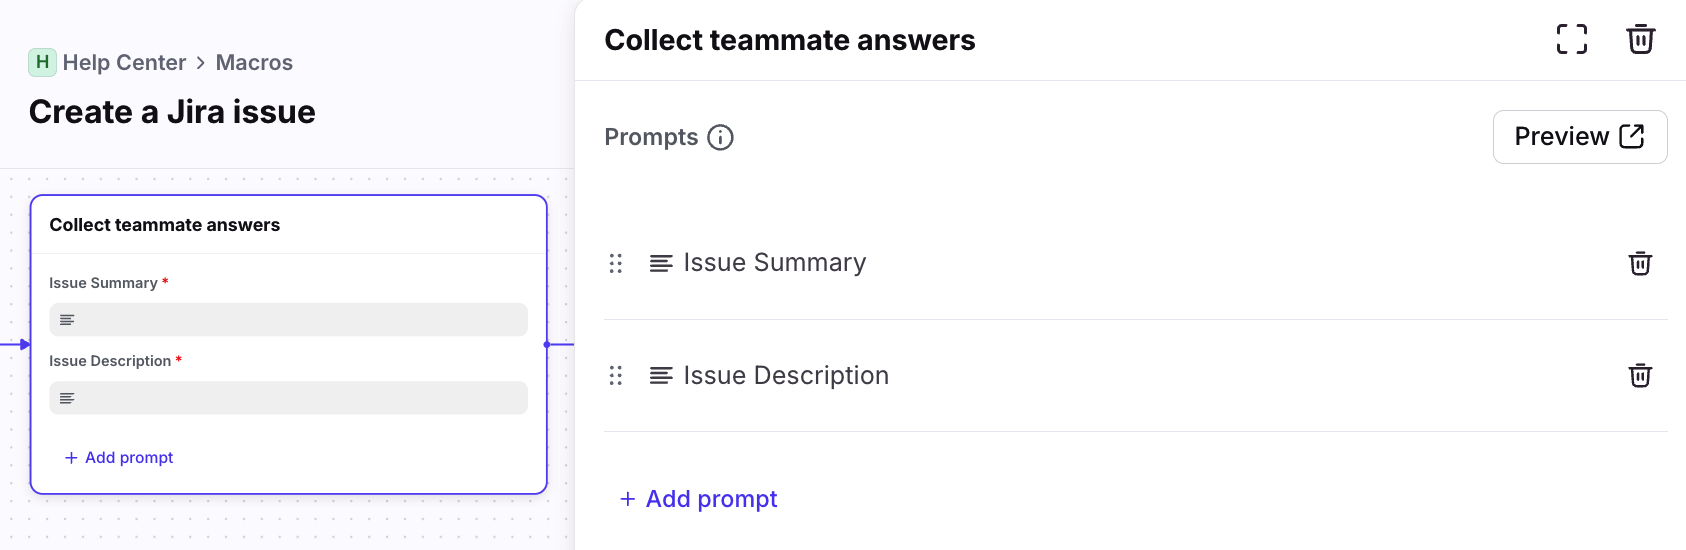
Click the Collect teammate answers step to adjust the fields you want teammates to fill out. Click the Preview button to see how the pop-up will look.
In this example, teammates are required to provide an issue summary and description when they trigger the macro.
Step 6
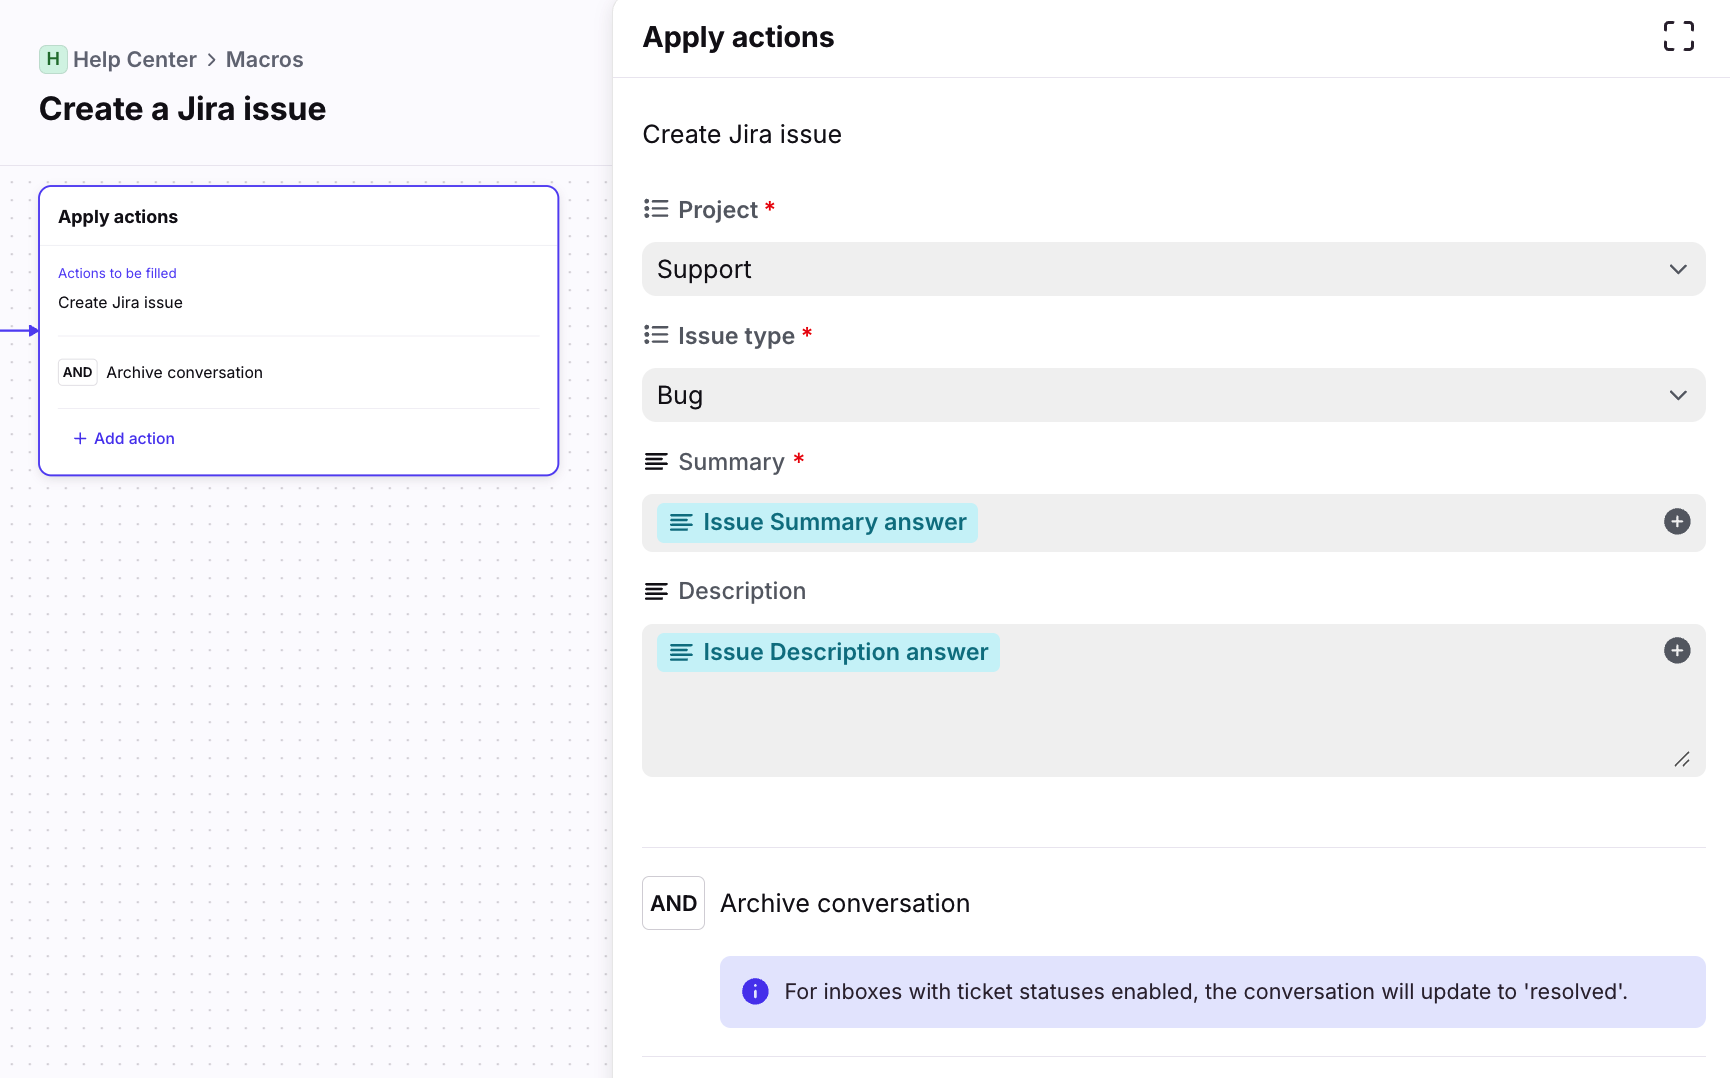
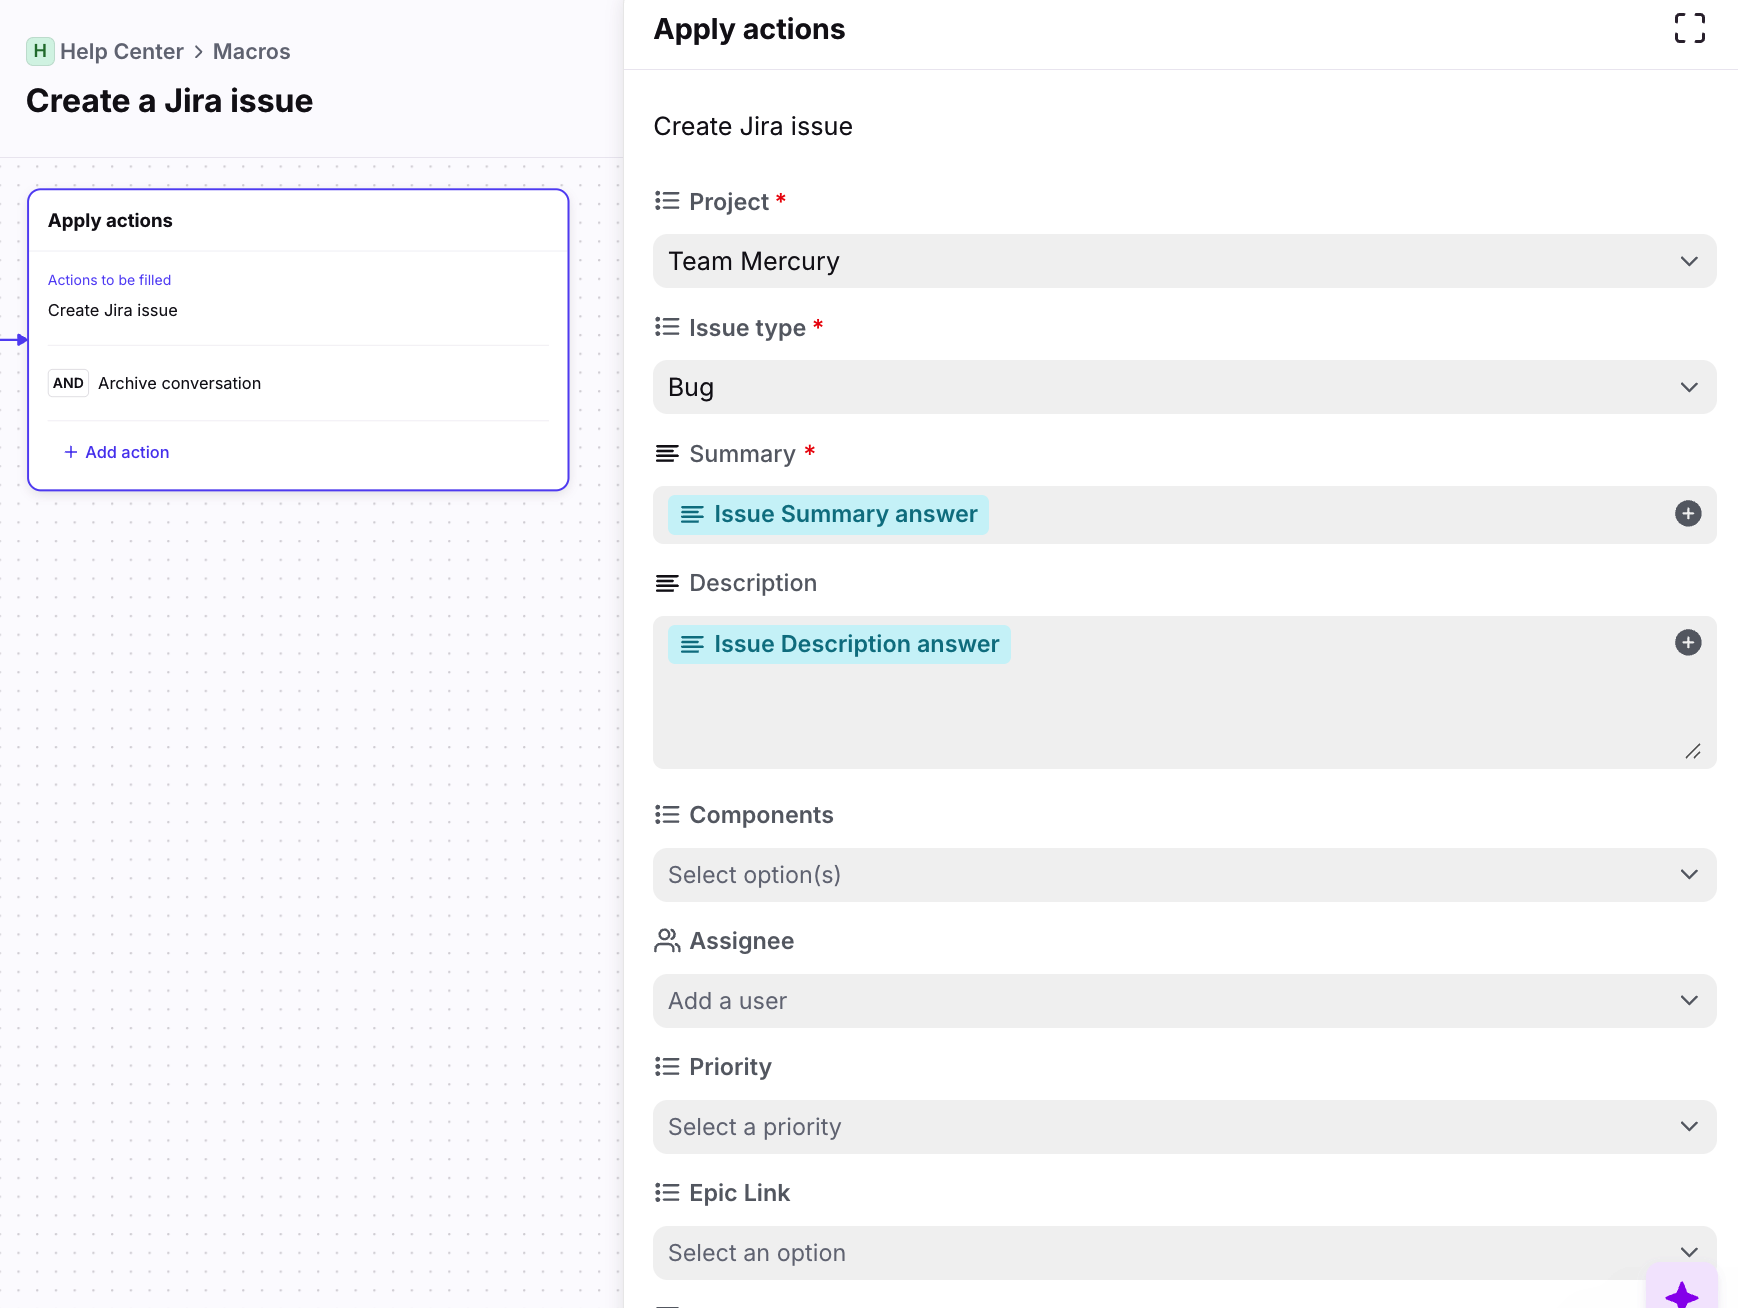
Click the Apply actions step to modify the actions the macro should take when it is triggered.
See here for a list of supported macro actions.
Jira fields available will vary based on the configuration in your Jira instance. See this FAQ to learn more.
In this example, we want the macro to take the following actions:
Action | Purpose |
Create Jira issue with these prefilled values:
| Create and categorize bugs reported by the Support team |
Archive conversation | Signify that the conversation no longer needs action in Front |
Step 7 (optional)
Use the (+) plus sign to add branches based on specific conditions. This allows your macro to dynamically react to the context of the conversation to perform the correct actions.
Step 8
Click Create. Teammates can now see and use the macro in their conversations.
Using Jira Connectors
Once your admin sets up Jira Connectors for your team, you can auto-create and link Jira issues, send and receive comments, and get real-time Jira status updates—all within Front. Connectors are customizable, so your experience can vary from pre-built settings.
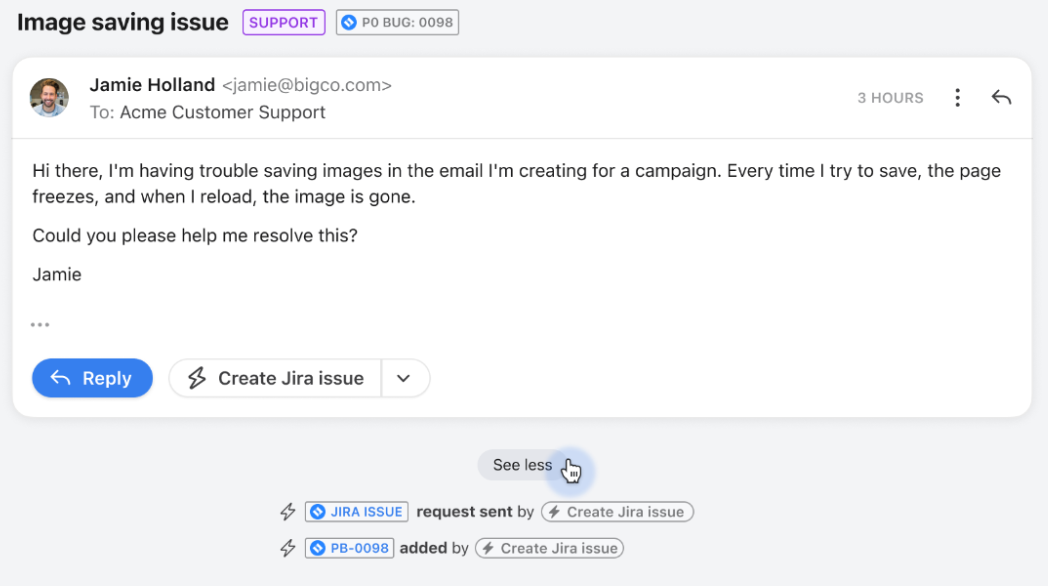
Auto-create Jira issues in Front
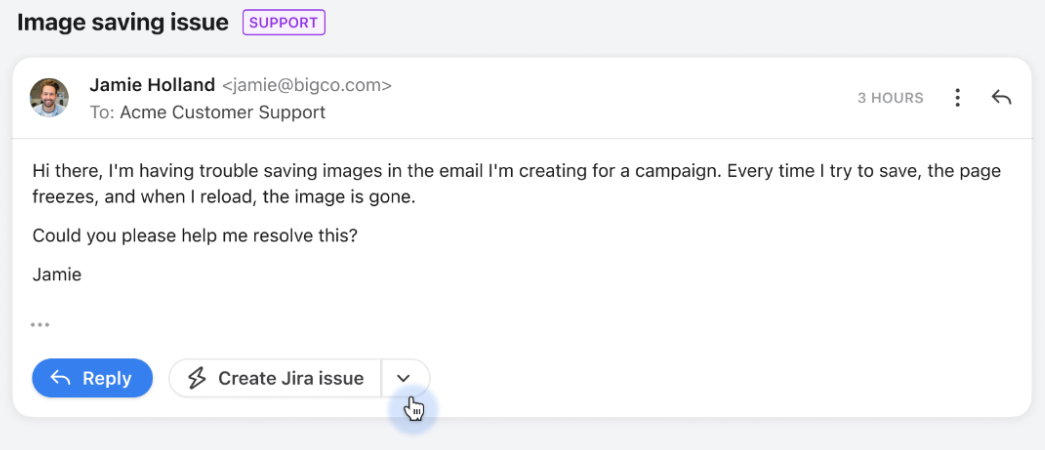
In the conversation, select your Jira macro and fill in the required fields.
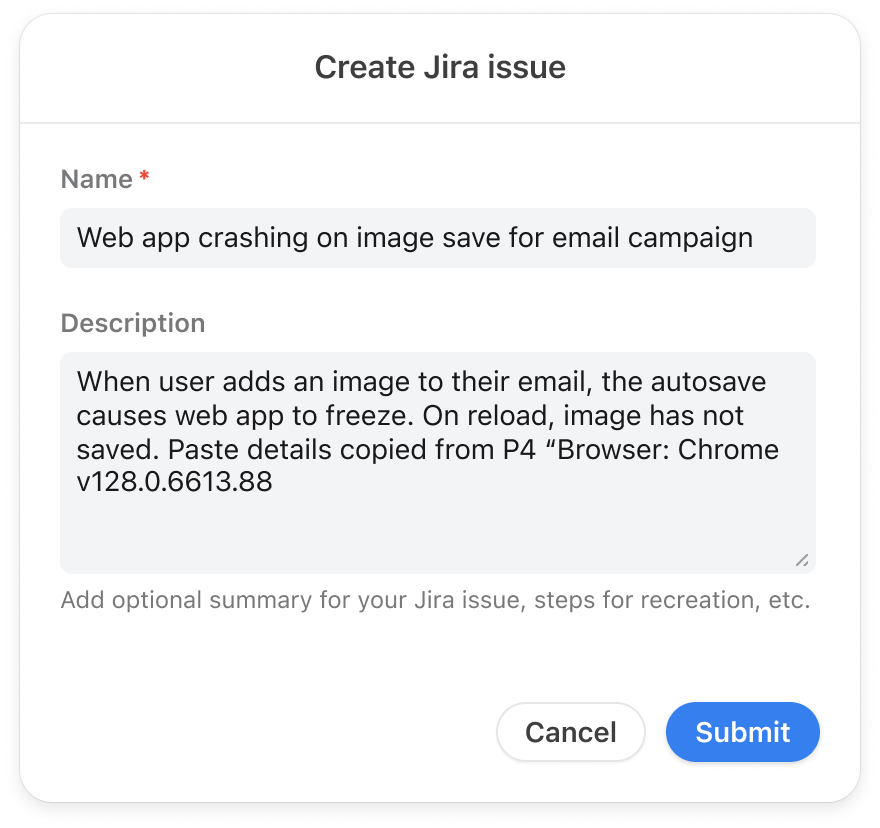
After you click Submit, a Jira issue is automatically created and linked to your conversation. The actions will display in the conversation’s activity history.
Attach Jira issues to a conversation via comments
When a teammate mentions a Jira issue in a comment or message, the issue will automatically link to the conversation.
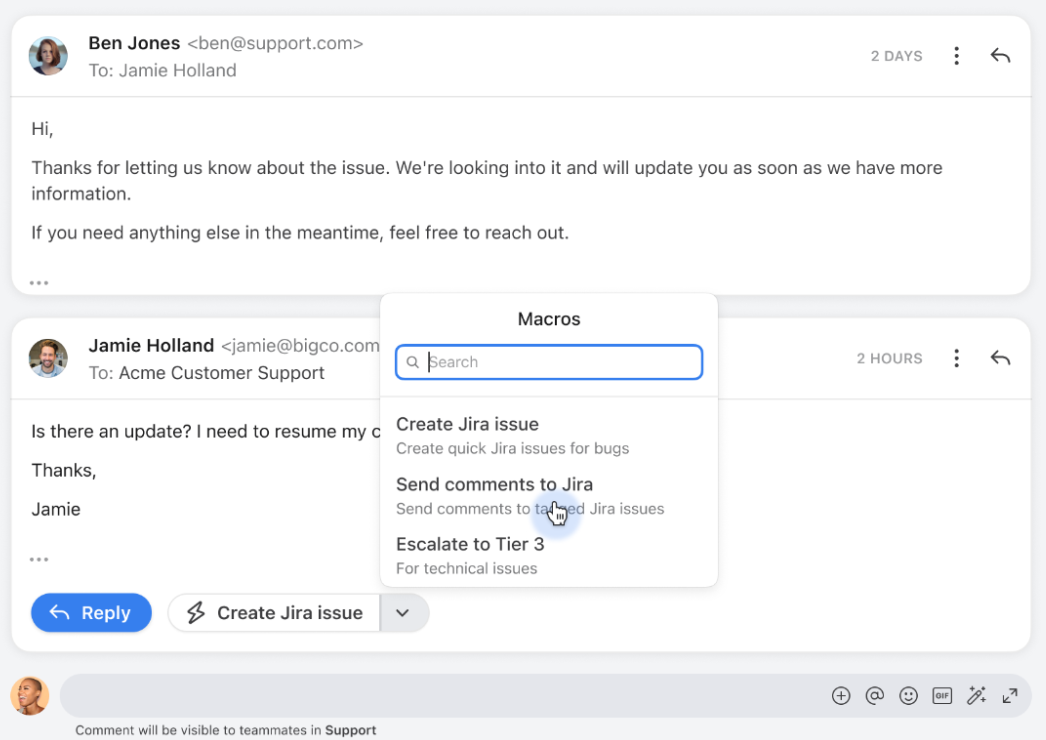
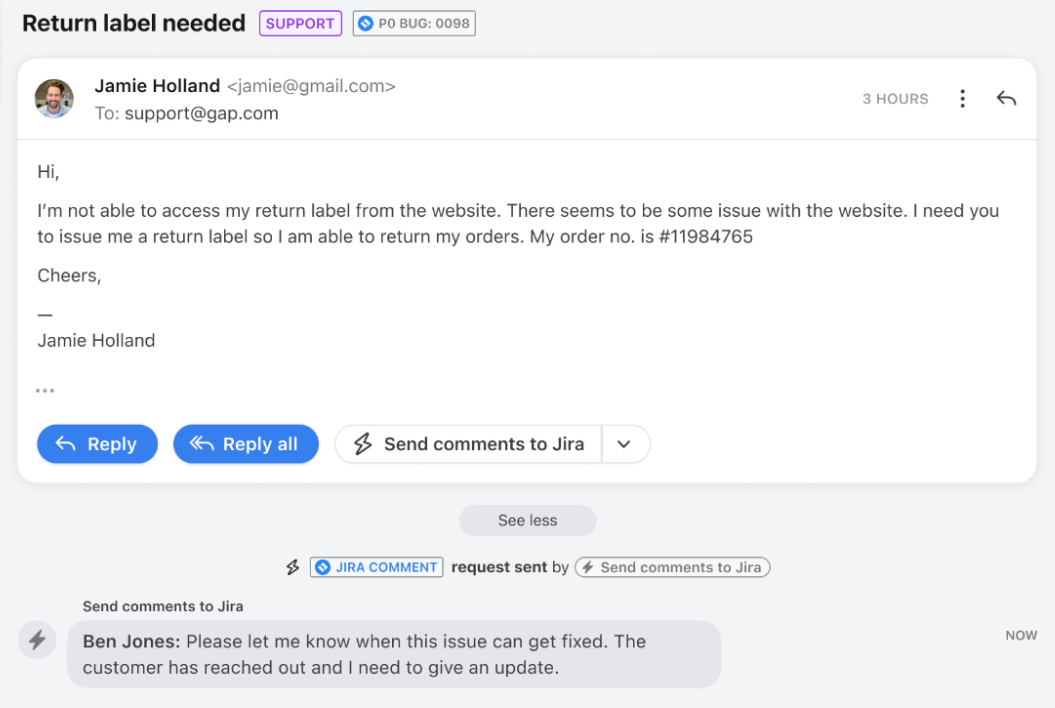
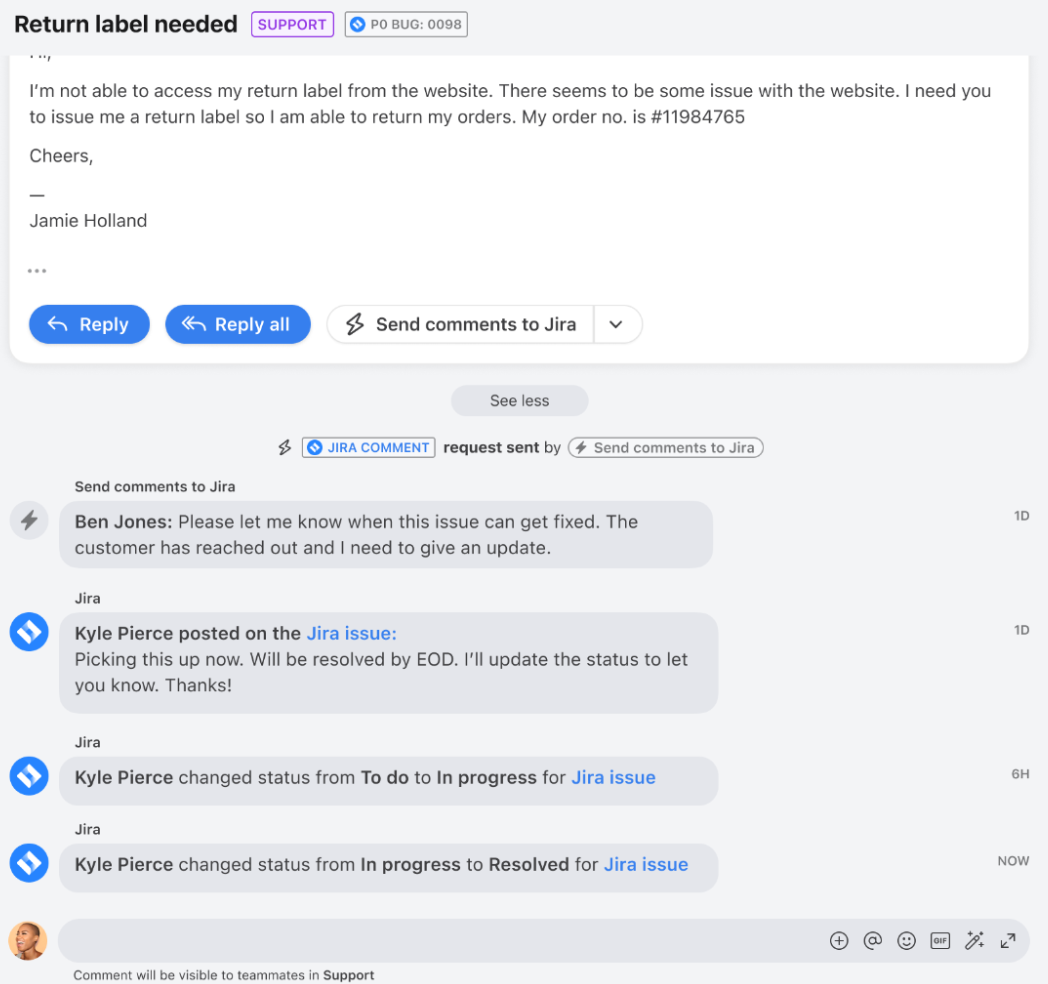
Send comments from Front to Jira
If a customer checks in on a request, use a macro to ask for an update in the Jira issue. A pop-up will appear allowing you to send a comment from Front to Jira.
Once you’ve sent your comment:
The action will display in the conversation’s activity history.
The comment will also be posted in the conversation.
Receive comments and status updates from Jira
When teammates add comments to a Jira issue or changes its status, you’ll see those updates are visible in the conversation’s comments.
FAQ
When should I use the Jira Connector vs. the plugin?
This depends on your team’s workflows and how you’d like to use Jira and Front together. Each integration provides different benefits:
Jira Connector: Great for teams who want to enhance their Front<>Jira workflows using automations
Jira plugin: Helpful for teammates who want to see Jira issue details side-by-side with their conversations
See the table below for details on supported features:
Feature | Jira Connector | Jira Plugin |
Manually create Jira issue from the sidebar | - | ✅ |
Automate Jira issue creation with pre-filled project, issue type, title | ✅ | - |
Automatically link Jira issue to conversation | ✅ | ✅ |
Send comment to Jira issue via macro | ✅ | - |
Send comment from Jira to Front conversation | ✅ | - |
Post Jira status as comment in Front conversation | ✅ | - |
Reopen conversation if resolution status changed to “resolved” | - | ✅ |
Reopen conversation based on Jira custom statuses | ✅ | - |
How many Jira instances can I connect?
You can connect one Jira instance to the integration.
How do comments work if multiple Jira issues are linked to a conversation?
When sending comments from Front to Jira, the comment will send to all of the Jira issues associated with the conversation.
Can I customize the fields used in the macro to create Jira issues?
Yes. Front will match the field configuration for the selected Project and Issue type set up in your Jira instance. By default, all Jira issues created include these fields: Project, Issue type, Summary, Description.
In this example, when the "Data" Project and "Epic" Issue type are selected, you'll see the 4 default fields and any custom fields you've associated with the Project and Issue type (Components, Assignee, and Priority).
Why can't I see the Jira Connector in the app store?
If you're currently using the Jira plugin integration, an admin will need to disable then re-enable the Jira app in the app store to access the Jira Connector.
Note: Legacy plugin users will lose access to the legacy plugin. Users will gain access to the current plugin and Connector moving forward.
Why don't conversations reopen when a Jira issue has changed status?
When a Jira issue changes status, Front will post a comment to the conversation if you have the Get status updates from Jira to Front setting enabled. To reopen a conversation when a comment with the Jira issue status change is posted, you can either:
Change your company bump settings to reopen conversations when comments are added
Create a rule to reopen conversations when a comment is added
Why aren't my Jira statuses syncing to Front?
Your Jira statuses must be selected in the Get status updates from Jira to Front setting.

Pricing
This feature is available on the latest Professional plan or above. Some legacy plans may have access.