
User provisioning with Microsoft Entra ID [new]
⚠️ This article references the new permissions system. Front companies using legacy permissions can view the instructions here.
Overview
Use Microsoft Entra ID (previously Azure Active Directory) SCIM provisioning with Front to fine-tune control of your users in Front.
You can:
Automatically create users in Front.
Automatically block users when the Microsoft Entra ID profile is suspended.
Sync Microsoft Entra ID groups to teammate groups in Front.
Create a user from a teammate preset.
To set up user provisioning with Microsoft Entra ID, you must be a Front company admin.
Prerequisites
Create a Front API token
You’ll need to create a Front API token to complete the setup process in your Microsoft Entra admin center.
Step 1
In Front, follow the steps on this article to create an API token.
Step 2
In the Feature access page, select Access resources and Auto-provisioning. Click Continue.
Step 3
In the Namespace access page, select all resources, then click Continue.
Step 4
Check the boxes in the Read and Write columns for the following resources:
Inboxes
Shifts
Teams
Click Create.
Step 5
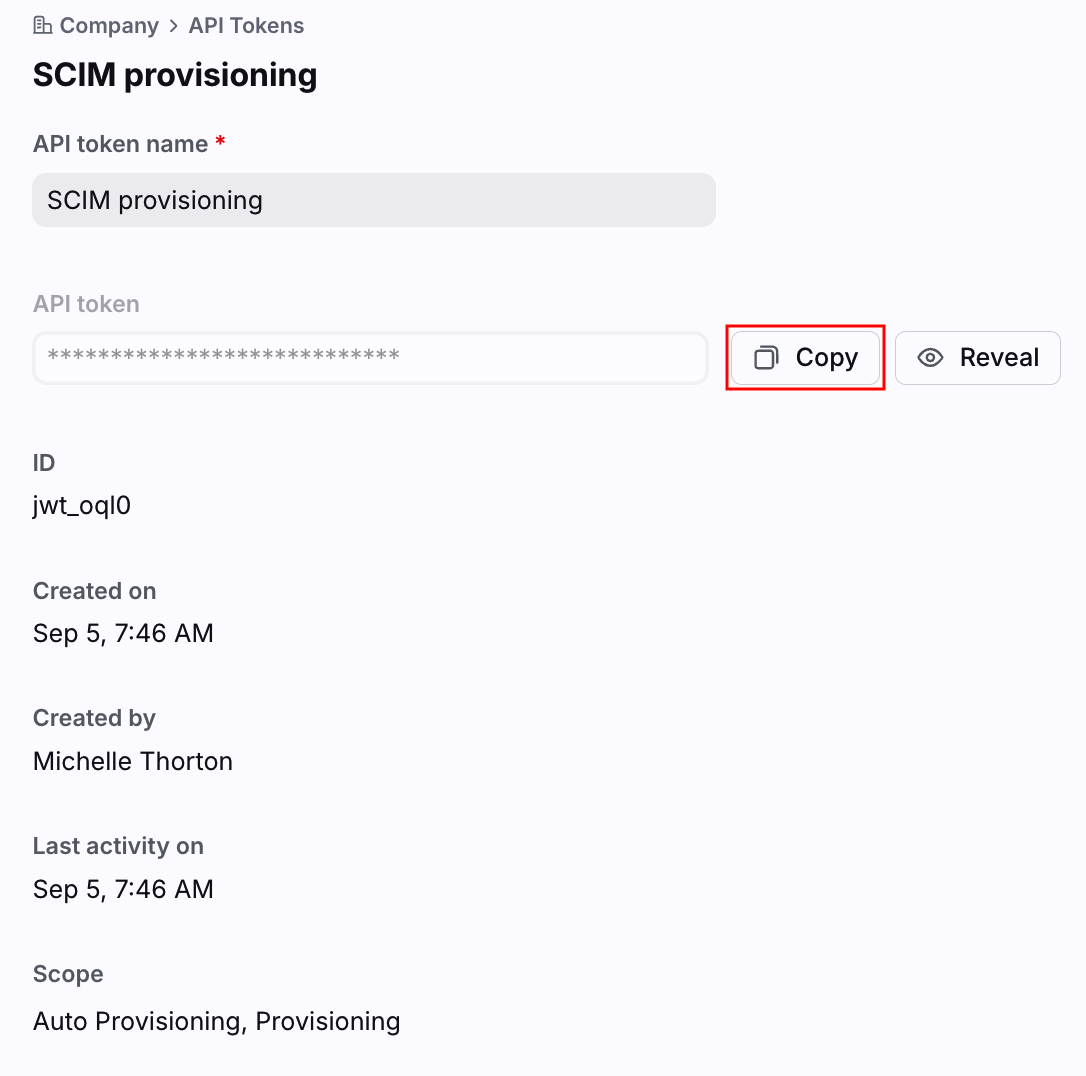
Select your newly created API token from the list, then click Copy next to the API token field to add the token to your clipboard.
Step 6
Your token can now be pasted into your Microsoft Entra admin center.
Instructions
Part 1: Connect Front to Microsoft Entra ID
Step 1
Follow these steps as defined by Microsoft to create a “non-gallery application” that will be able to provision from Microsoft Entra ID.
Step 2
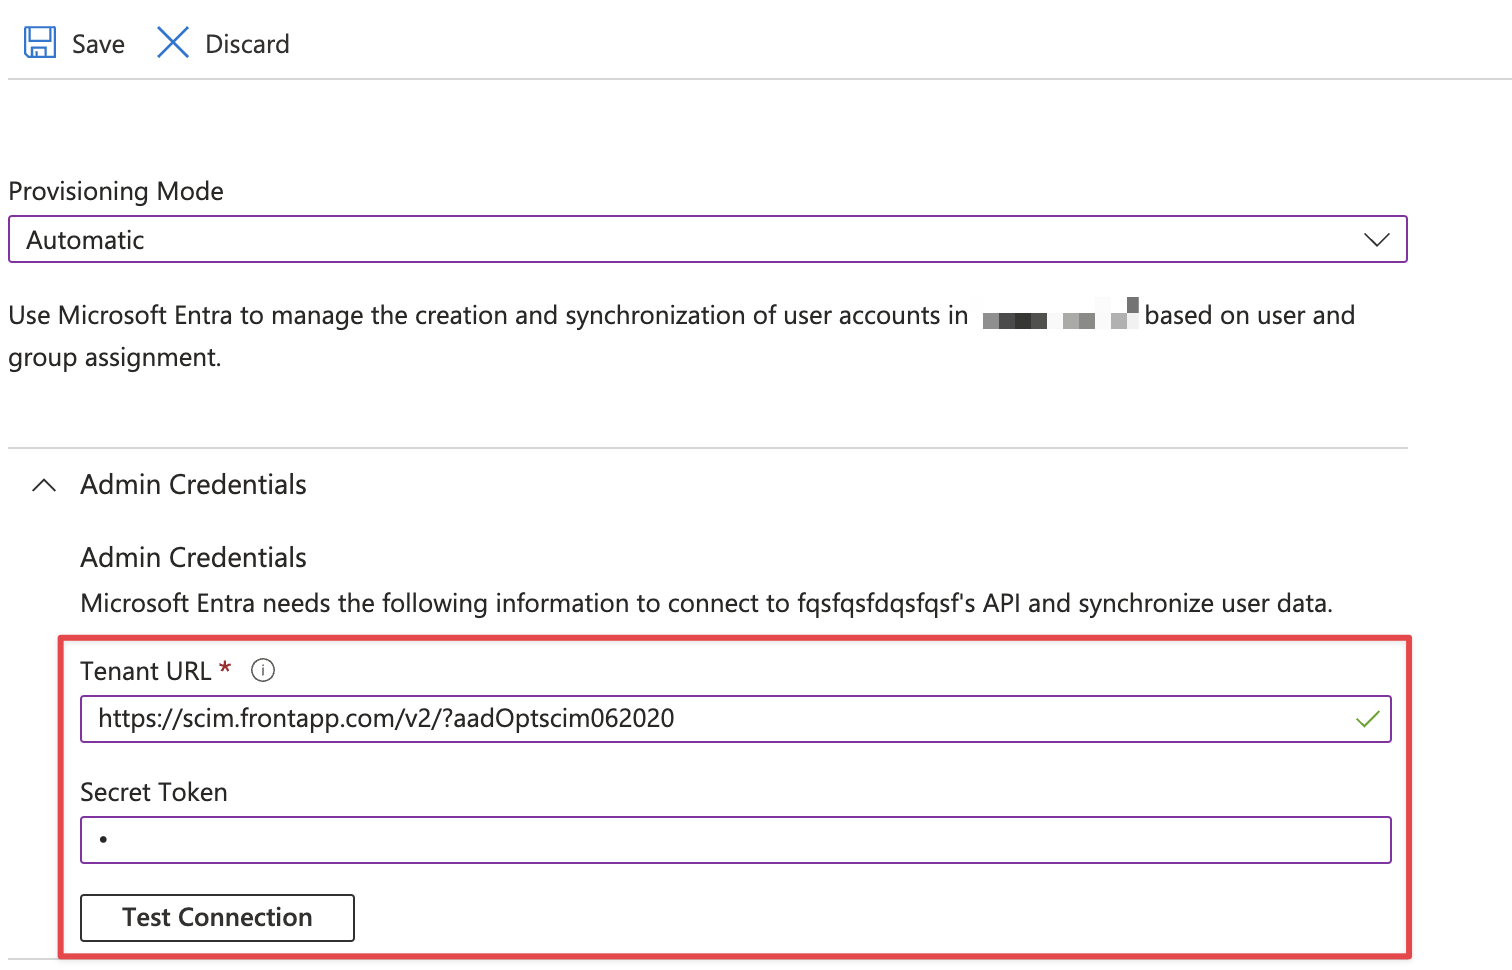
In Step 8 of Microsoft’s instructions, enter the URL for Front’s SCIM endpoint in the Tenant URL field: https://scim.frontapp.com/v2/?aadOptscim062020
The aadOptscim062020 parameter is mandatory for Microsoft Entra ID to work properly with Front's SCIM.
Step 3
In Step 9 of Microsoft’s instructions, paste your Front API token in the Secret Token field.
Step 4
Click the Test Connection button to confirm Microsoft Entra ID connects with Front. Click Create when finished.
Part 2: Edit attribute mappings
Step 5
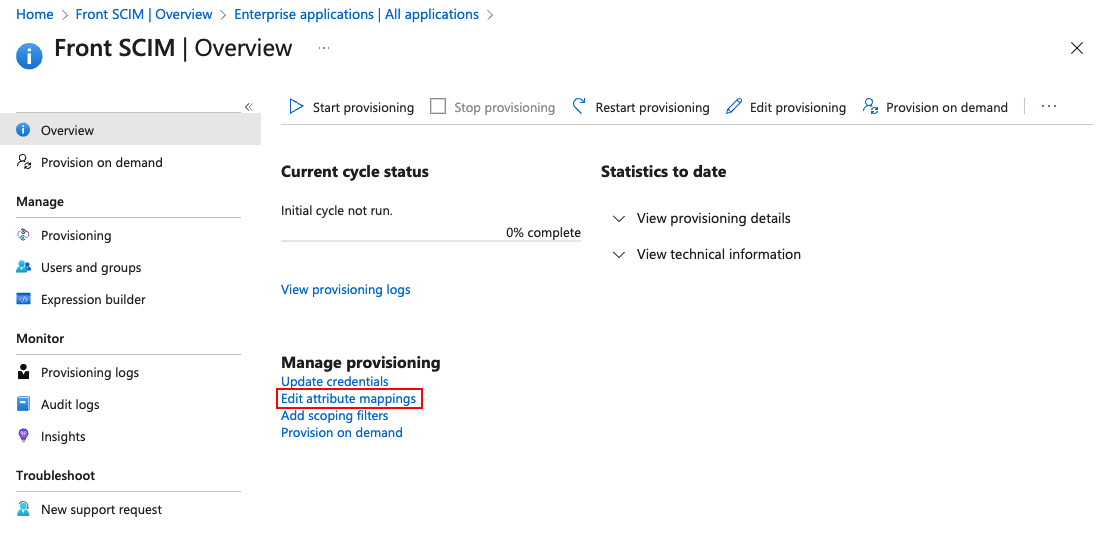
In the enterprise application you just created, select Provisioning in the left panel, then click Edit attribute mappings.
Step 6
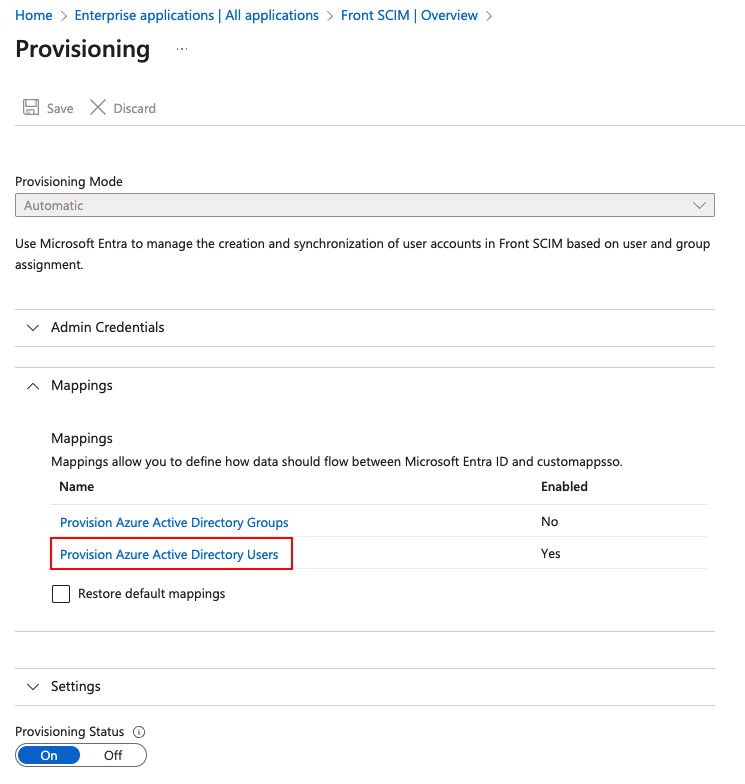
In the Mappings section, click Provision Azure Active Directory Users.
Step 7
You will see a list of Microsoft Entra ID Attributes and their corresponding Front SCIM API fields (customappsso Attributes).
We recommend configuring your field mapping like the screenshot below. Delete any Attributes omitted from this list (e.g. department, employeeNumber, etc).
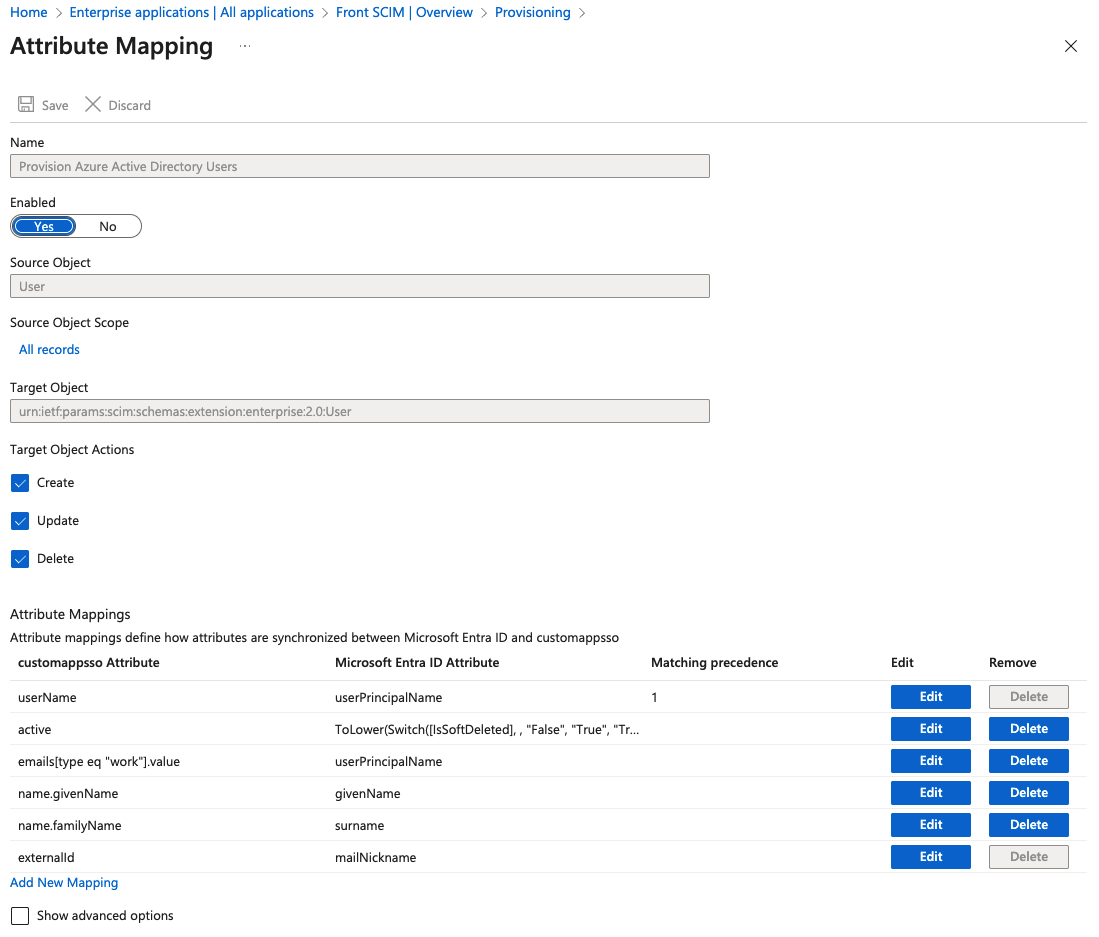
There are 4 main adjustments you will need to make that deviate from the defaults.
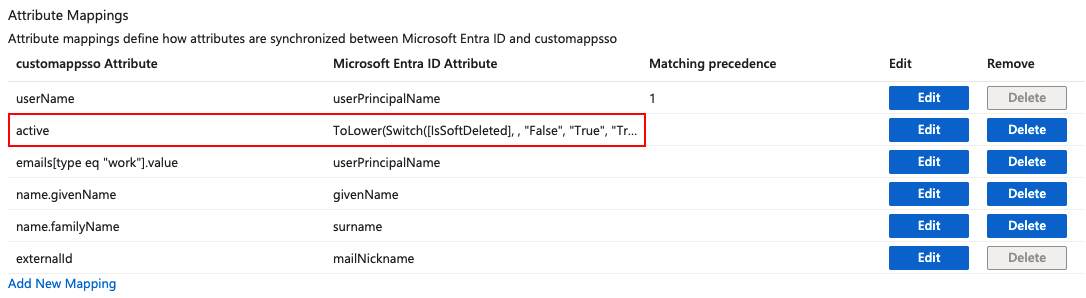
Adjustment 1: Add the ToLower function onto the active field mapping.
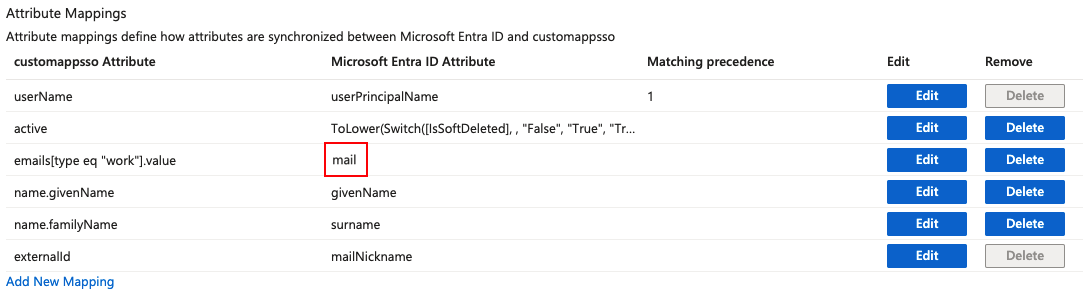
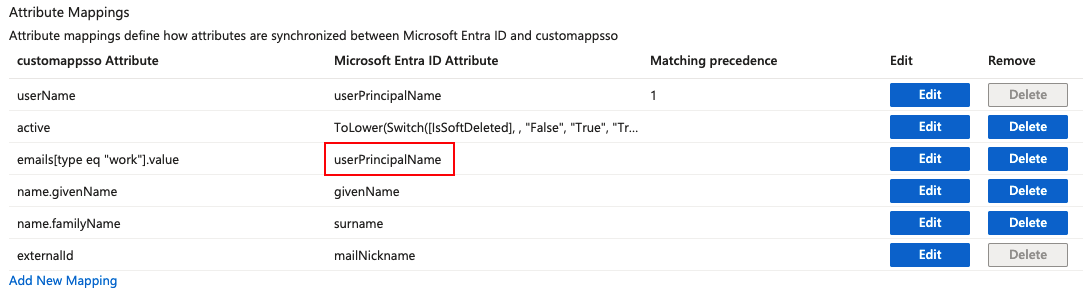
Adjustment 2: Change the mail Microsoft Entra ID Attribute to userPrincipalName.
Before
After
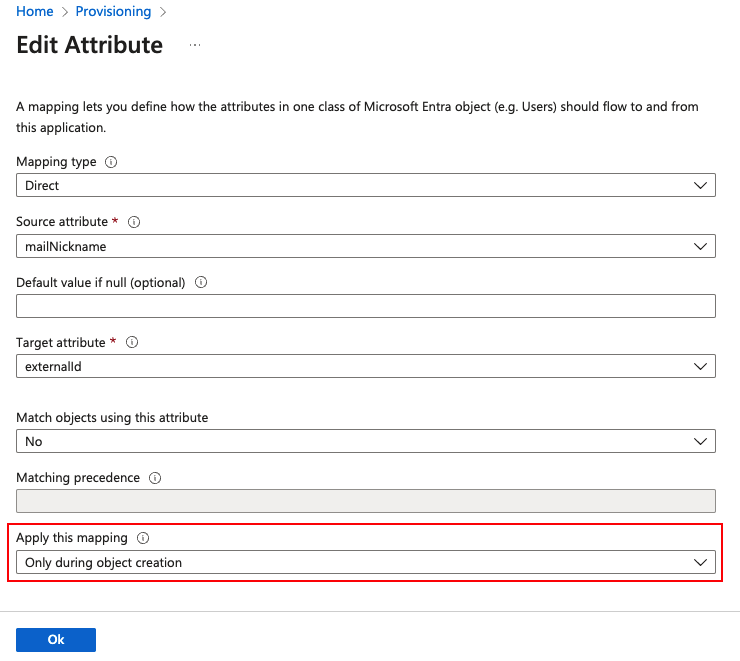
Adjustment 3: Click into the mailNickname mapping, and ensure the field is only applied on object creation.
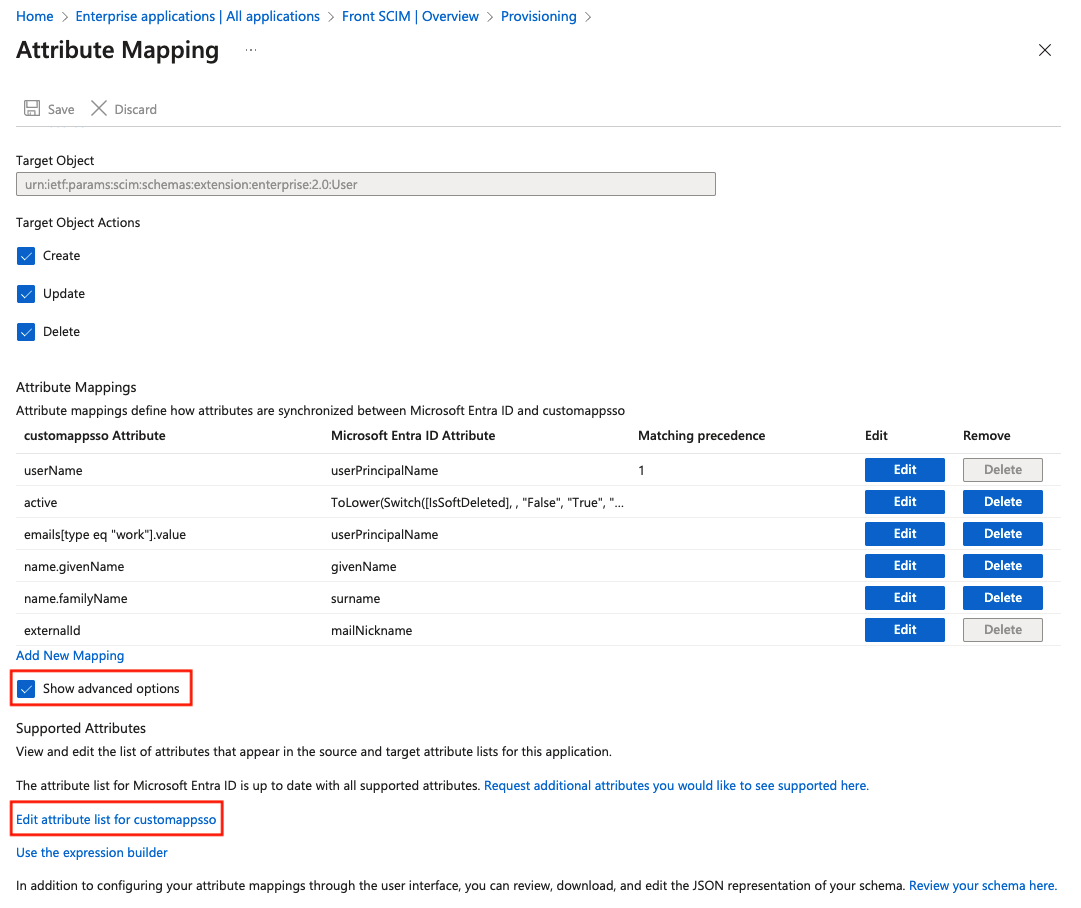
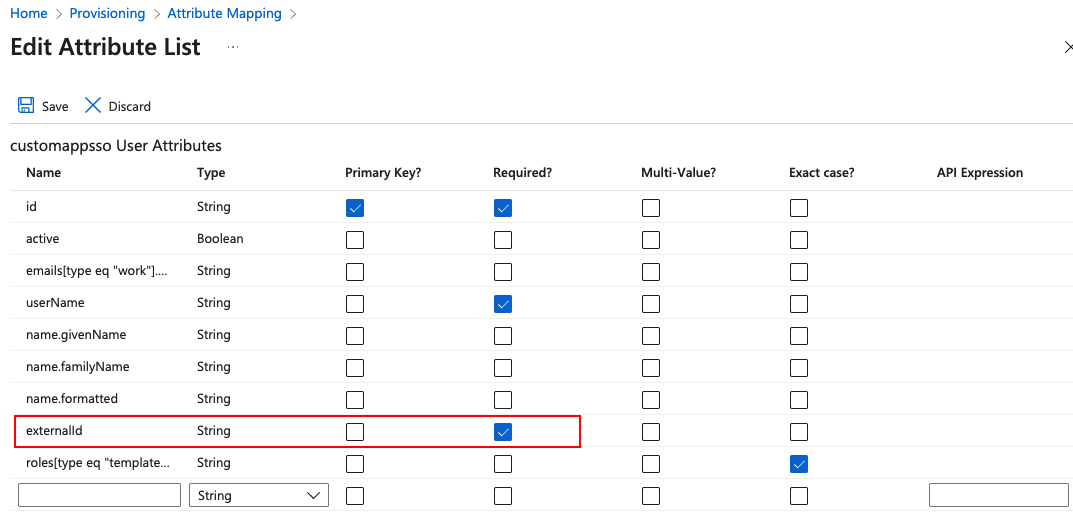
Adjustment 4: Navigate to the advanced options section of the attribute mapping portal. Set externalId as required.
Part 3: Select users or groups to sync
Step 8
In your enterprise application, select Users and groups in the left panel.
Step 9
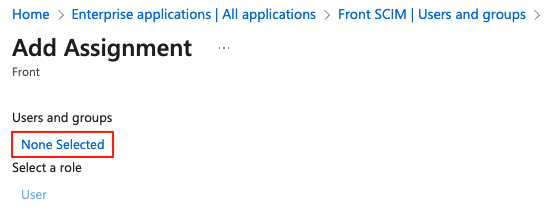
Select Add user/group, then click None Selected.
Step 10
Identify a net new user to be added to Front. If the user already existed in Front and was deleted this will likely cause an error.
Step 11
Select the user, then click Select at the bottom of the screen. Click Assign to confirm your selection.
Step 12
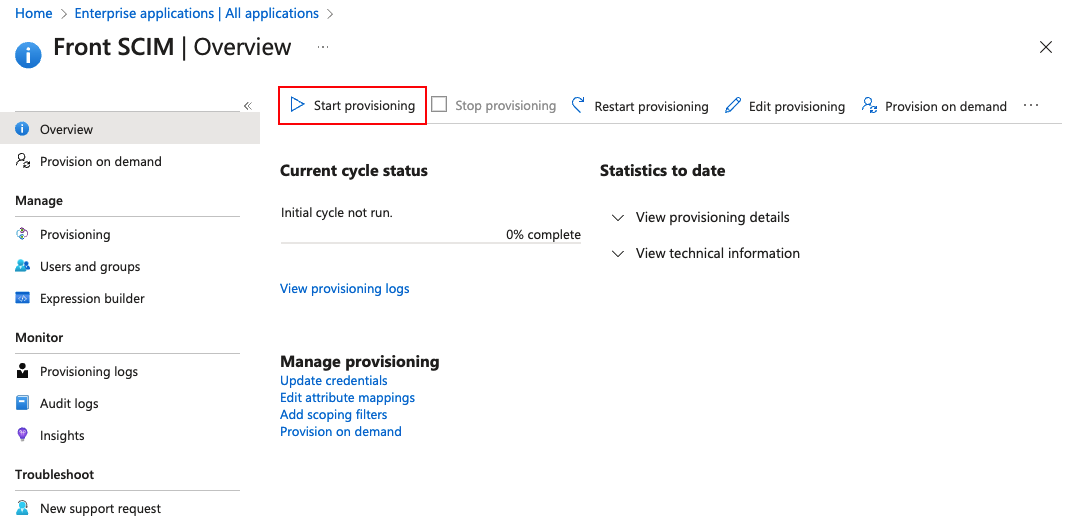
Navigate back to the Provisioning section of your enterprise application, then click Start provisioning.
Step 13
By default, the provisioning cycle runs once every 40 minutes. Check the provisioning logs to verify successful provisioning. Ideally we something like the screenshot below.

You can also confirm whether a user was successfully provisioned in Front via the Teammates tab in your company settings.
Part 4: Provisioning with presets (optional)
You can apply teammate presets to a user or group in Microsoft Entra ID when they are provisioned in Front. Teammate presets allow you to set a new user’s default values for several fields including:
Custom fields
User preferences
Notification rules
Teammate presets can only be used upon initial user creation. A preset cannot be applied to an existing user, and users will not stay in sync with edits to the preset.
It is assumed that user provisioning from Microsoft Entra ID has already been set up per the steps in Parts 1-3.
Create teammate presets
Step 1
In Front, create at least two teammate presets as explained in this article. It is necessary to create two presets due to a limitation of Microsoft Entra ID. If you only require one preset, we recommend creating a dummy preset just for the purpose of the integration.
Step 2
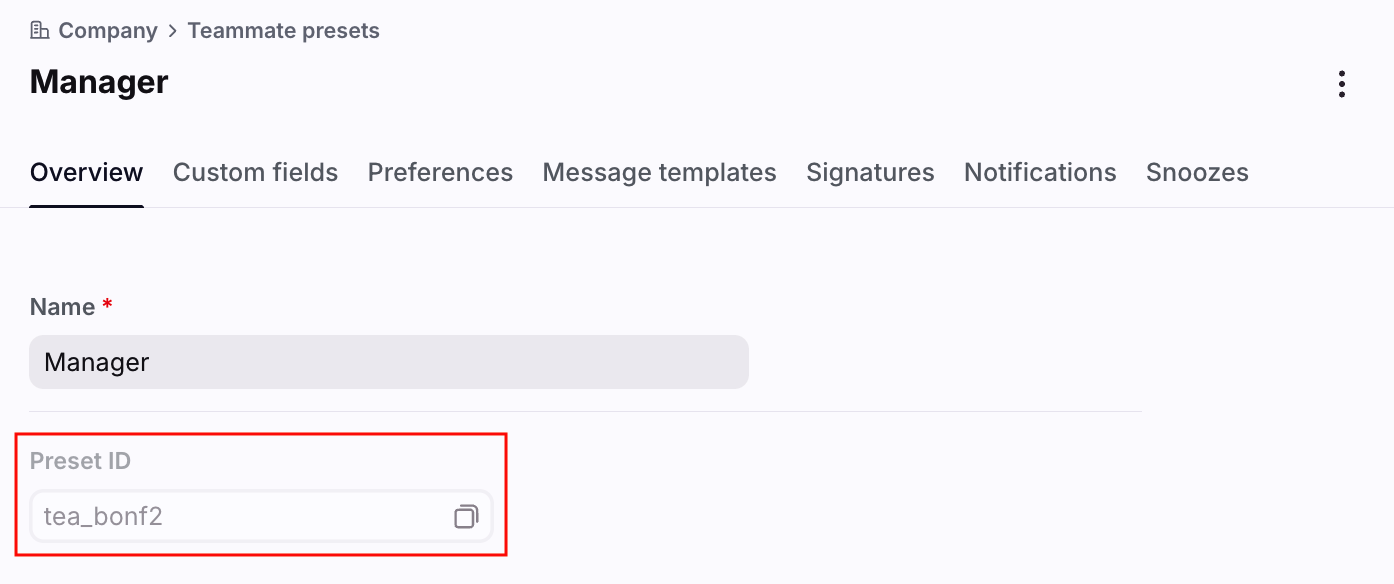
For each preset, take a note of the Preset ID in the Overview tab.
Create app roles
Step 3
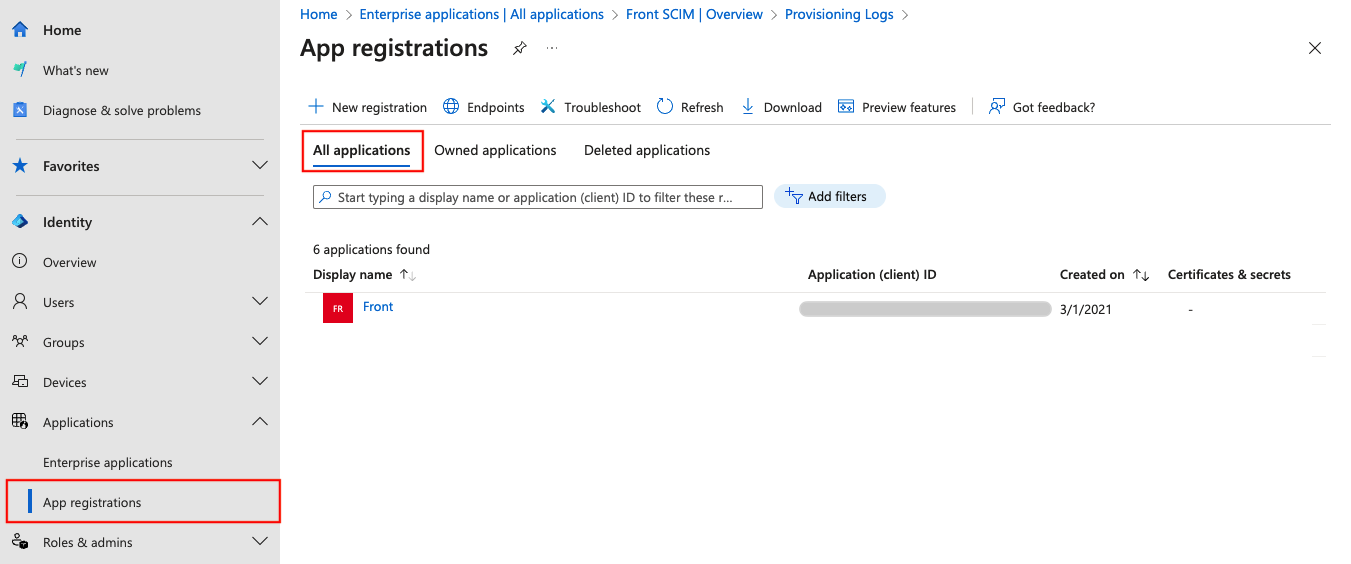
In your Microsoft Entra admin center, navigate to App registrations in the left panel and go to the All applications tab. Click on your Front application.
Step 4
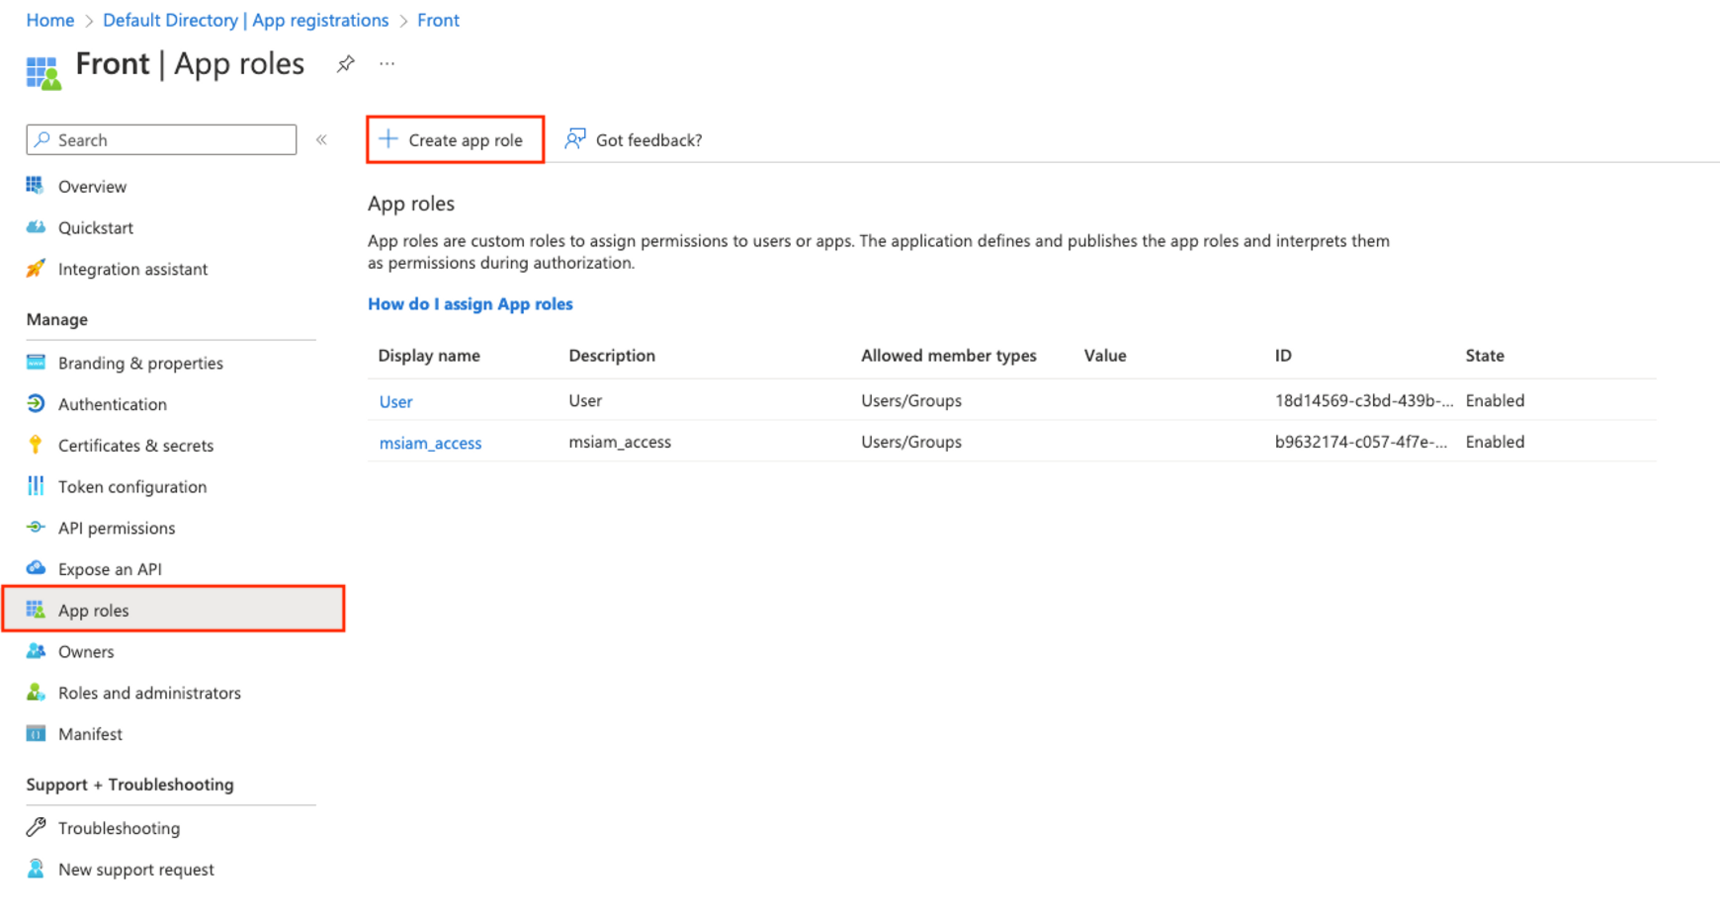
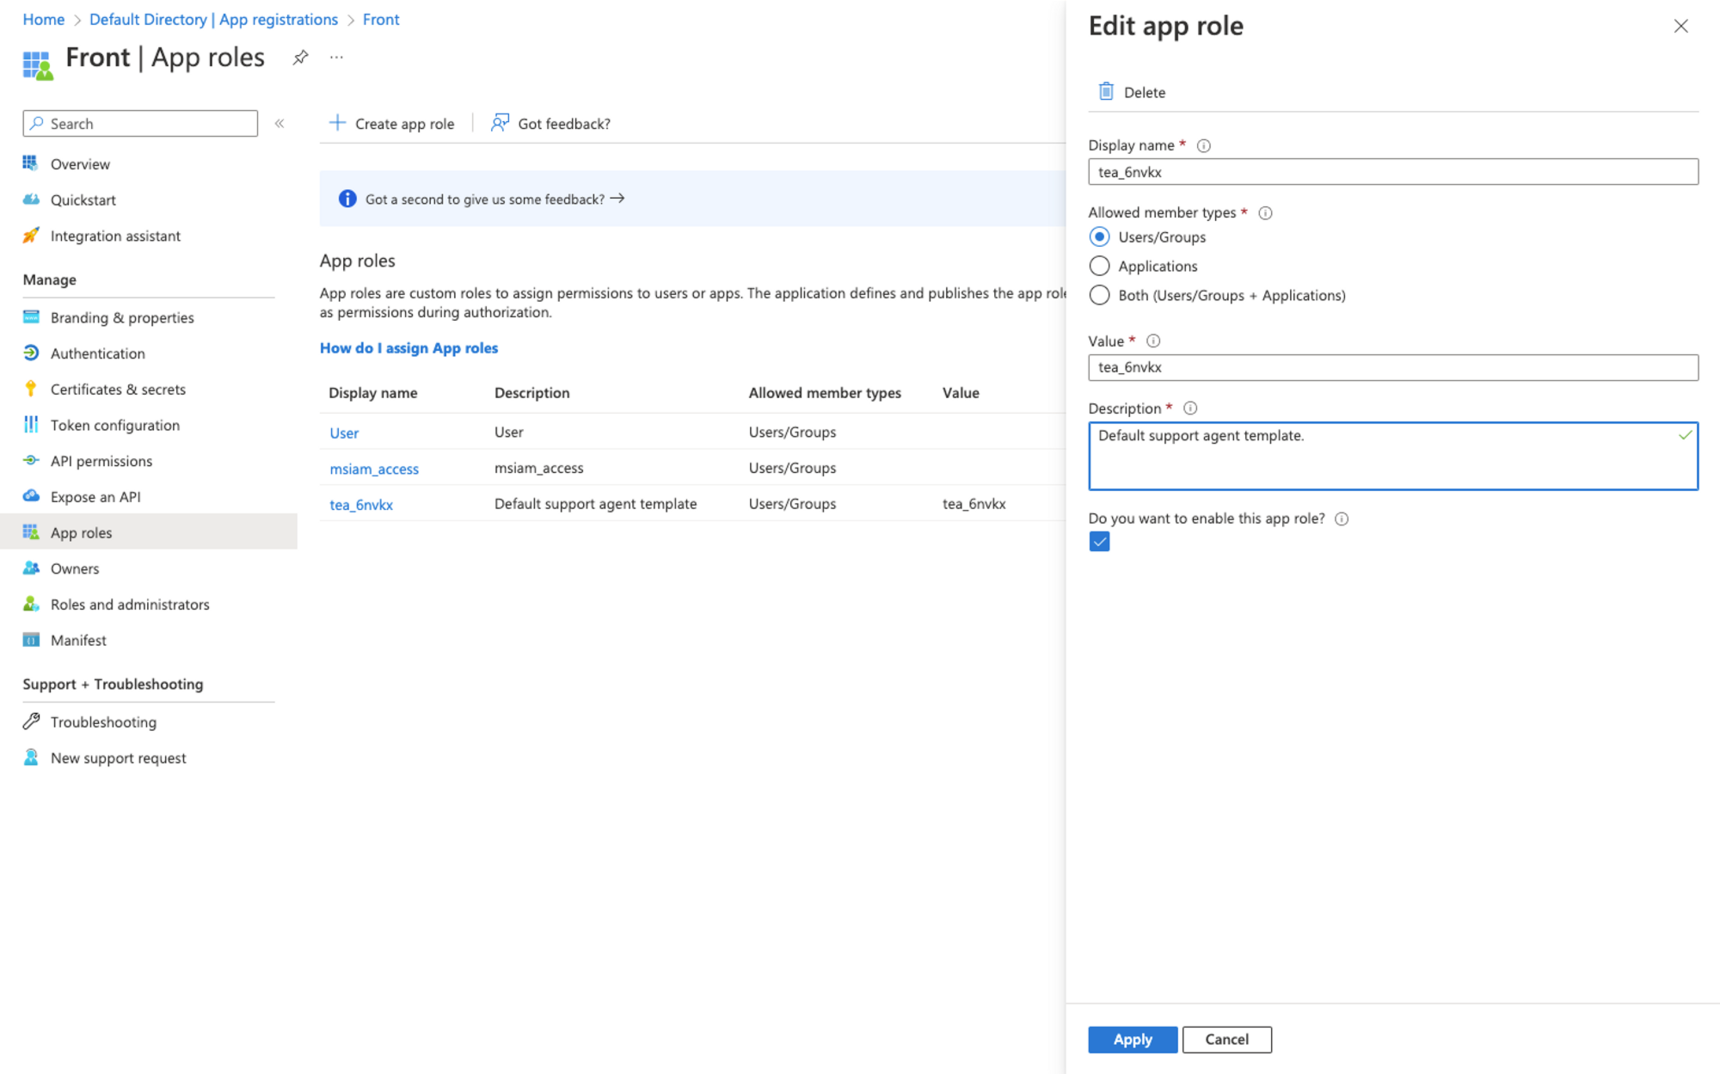
In the left panel, navigate to App roles. You will need to create an app role for each teammate preset. To do this, click Create app role.
Step 5
Enter the following values in the Create app role form:
Display name: Enter the name of the role followed by a colon and then the preset ID, as described in Step 2. For example, if the preset is called ‘Support squad’ and the preset ID is tea_6nvkx, then enter the display name ‘Support squad: tea_6nvk’.
Allowed member types: User/Groups
Value: The preset ID again
Description: Free text. We recommend including the name of the preset given in Front as part of the description.
Do you want to enable this app role?: Yes
Step 6
Click the Apply button to finish creating the app role. Follow Steps 3-5 again for each preset. You must create at least two app roles as explained in Step 1.
Set up attribute mappings
Step 7
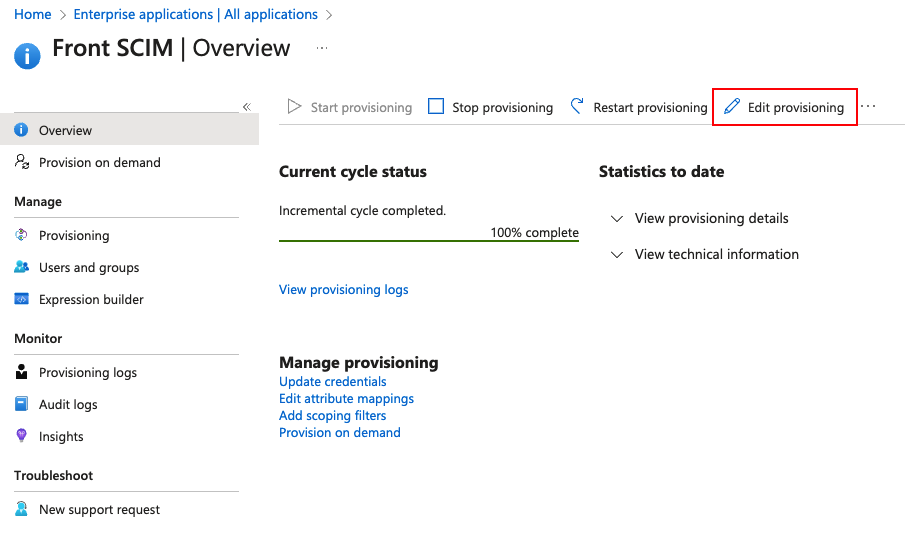
Navigate back to the Microsoft Entra admin center. Click Enterprise applications and select your app. In the left panel, navigate to Provisioning, then click Edit provisioning.
Step 8
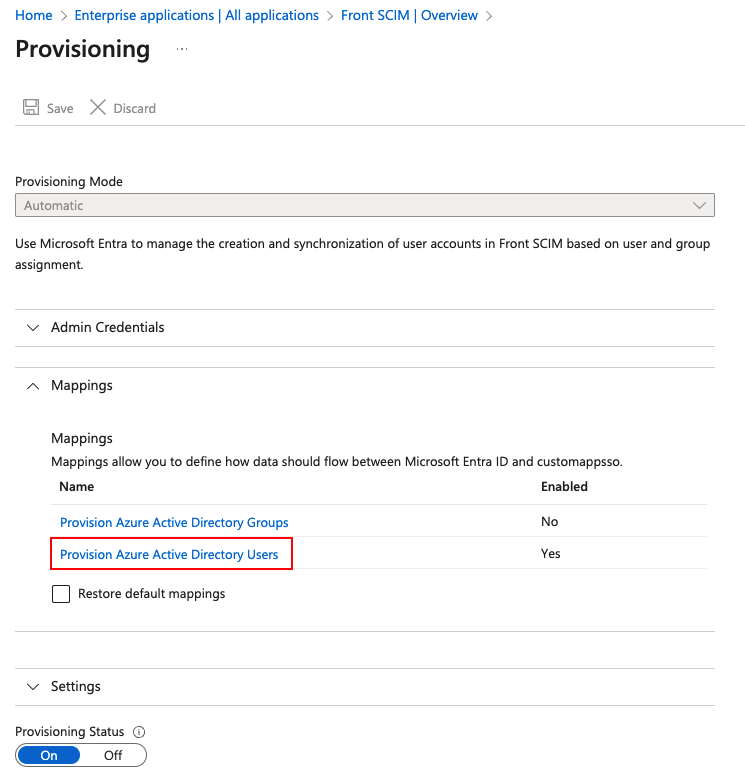
In the Mappings section, click Provision Azure Active Directory Users.
Step 9
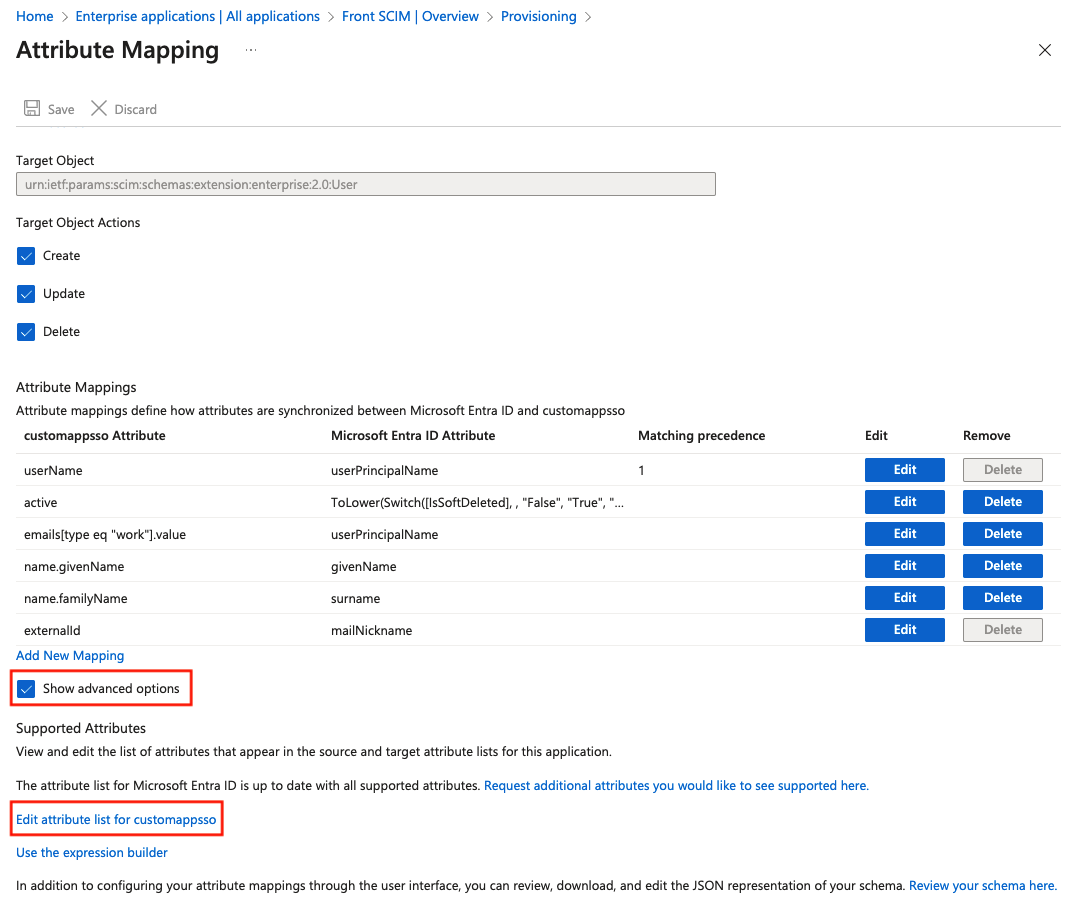
Scroll down the page, and select Show advanced options. Then click Edit attribute list for custommapsso.
Step 10
At the bottom of the table, add a new item:
Name: urn:ietf:params:scim:schemas:extension:frontapp:teammate:template
Type: String
All other fields: Leave blank
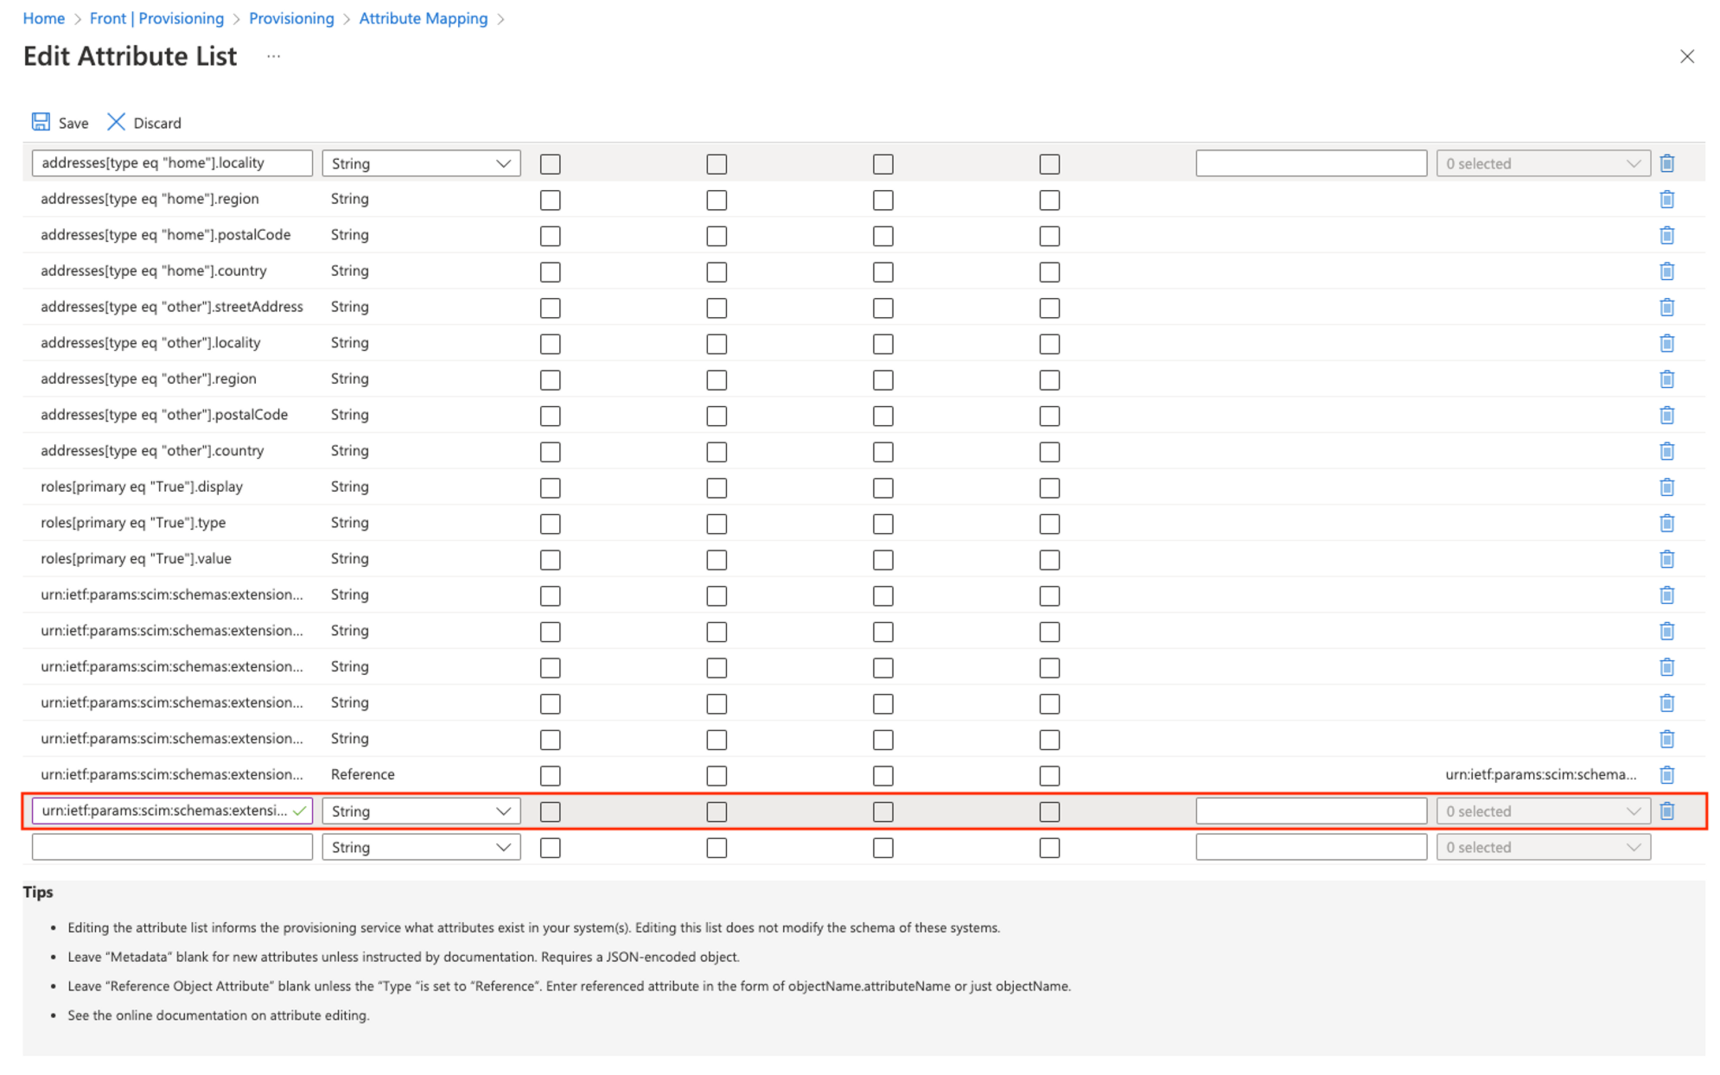
Step 11
Click Save to return to the attribute mapping page. At the bottom of the Attribute Mappings table, click Add New Mapping.
Step 12
In the Edit Attribute form, enter the following information:
Mapping type: Expression
Expression: SingleAppRoleAssignment([appRoleAssignments])
Default value: Leave blank
Target attribute: Select urn:ietf:params:scim:schemas:extension:frontapp:teammate:template
Match objects using this attribute: No
Apply this mapping: Only during object creation
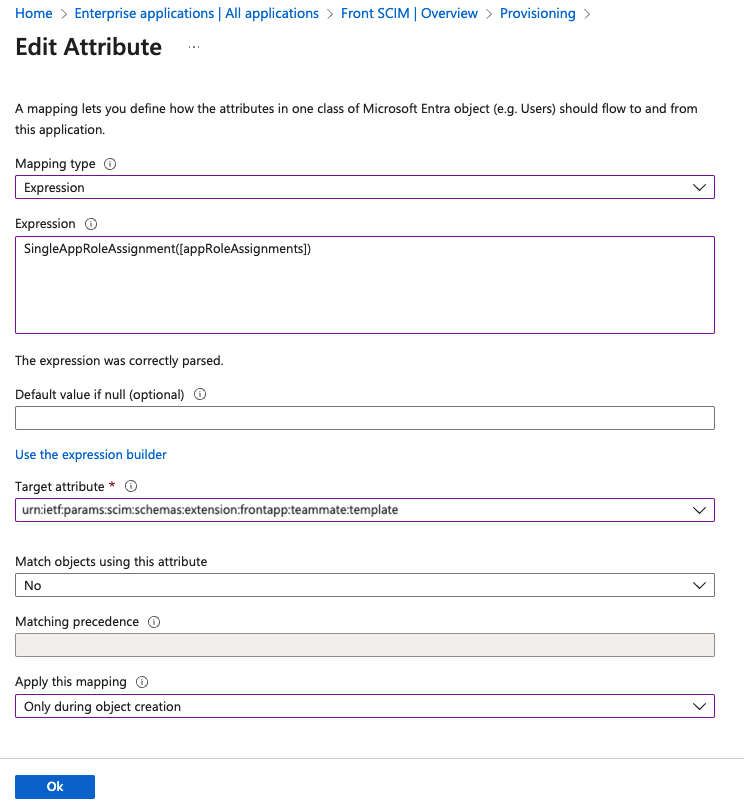
Step 13
Click Ok to save this new attribute and confirm. The attribute mapping is now complete.
Apply preset to teammates
The final task is to apply the preset to the desired teammates. This can be done by either applying the role created earlier to a user or to a group. We recommend using groups to assign presets, as new users added to the group in Microsoft Entra ID will automatically be provisioned with the correct preset in Front.
Step 14
Navigate back to the Microsoft Entra admin center, then to Enterprise applications and select your app. In the left panel navigate to Users and groups.
Step 15
Select the checkbox on the left of the users/groups you want to assign the preset to, and then click Edit assignment.
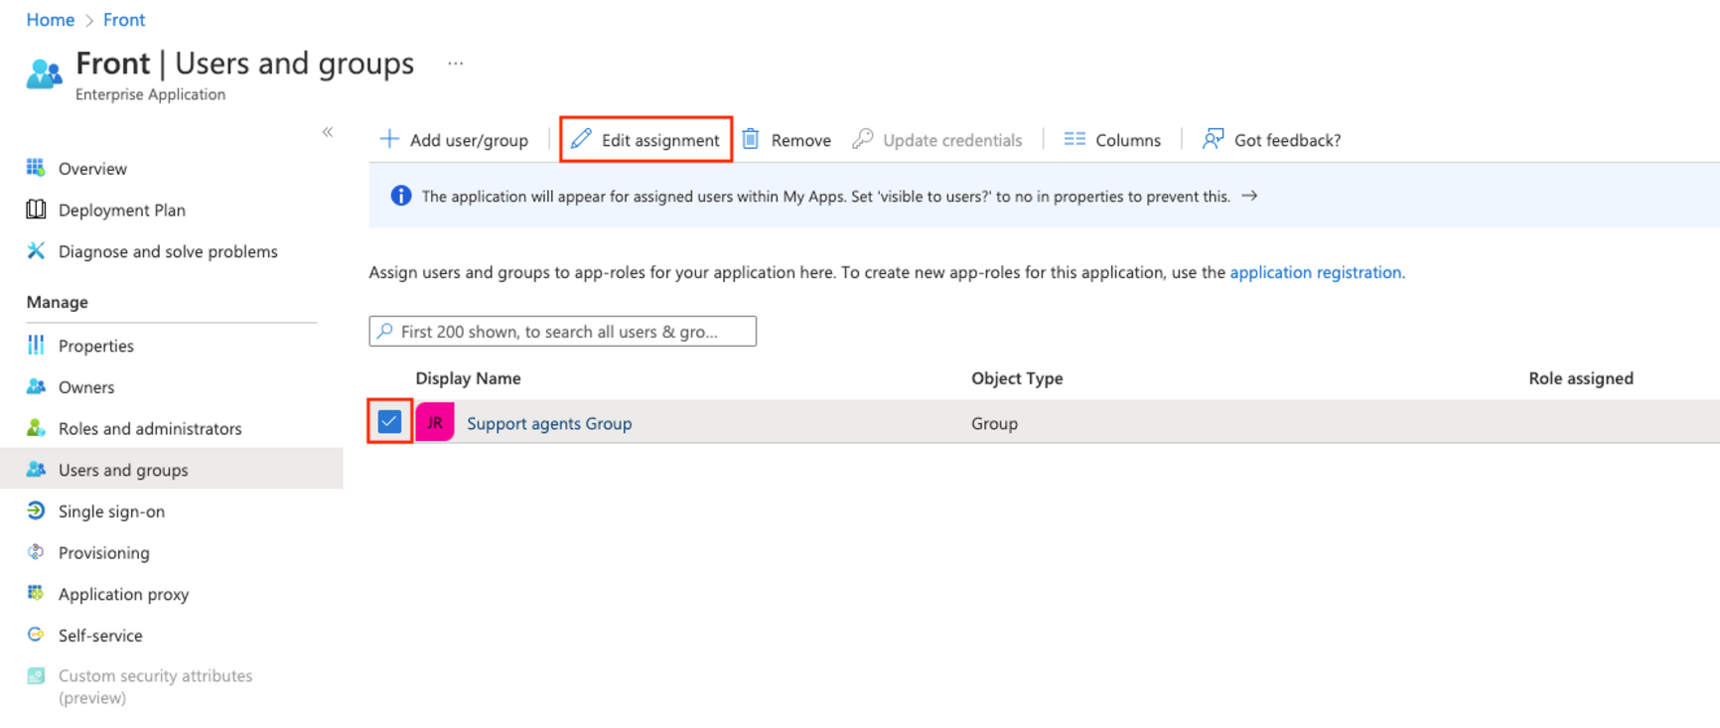
Step 16
Click on the text under Select a role (e.g. click None Selected). A panel will appear on the right hand side. Select the preset ID of the preset you want to assign to these users/groups, then click Select at the bottom of this panel to confirm.
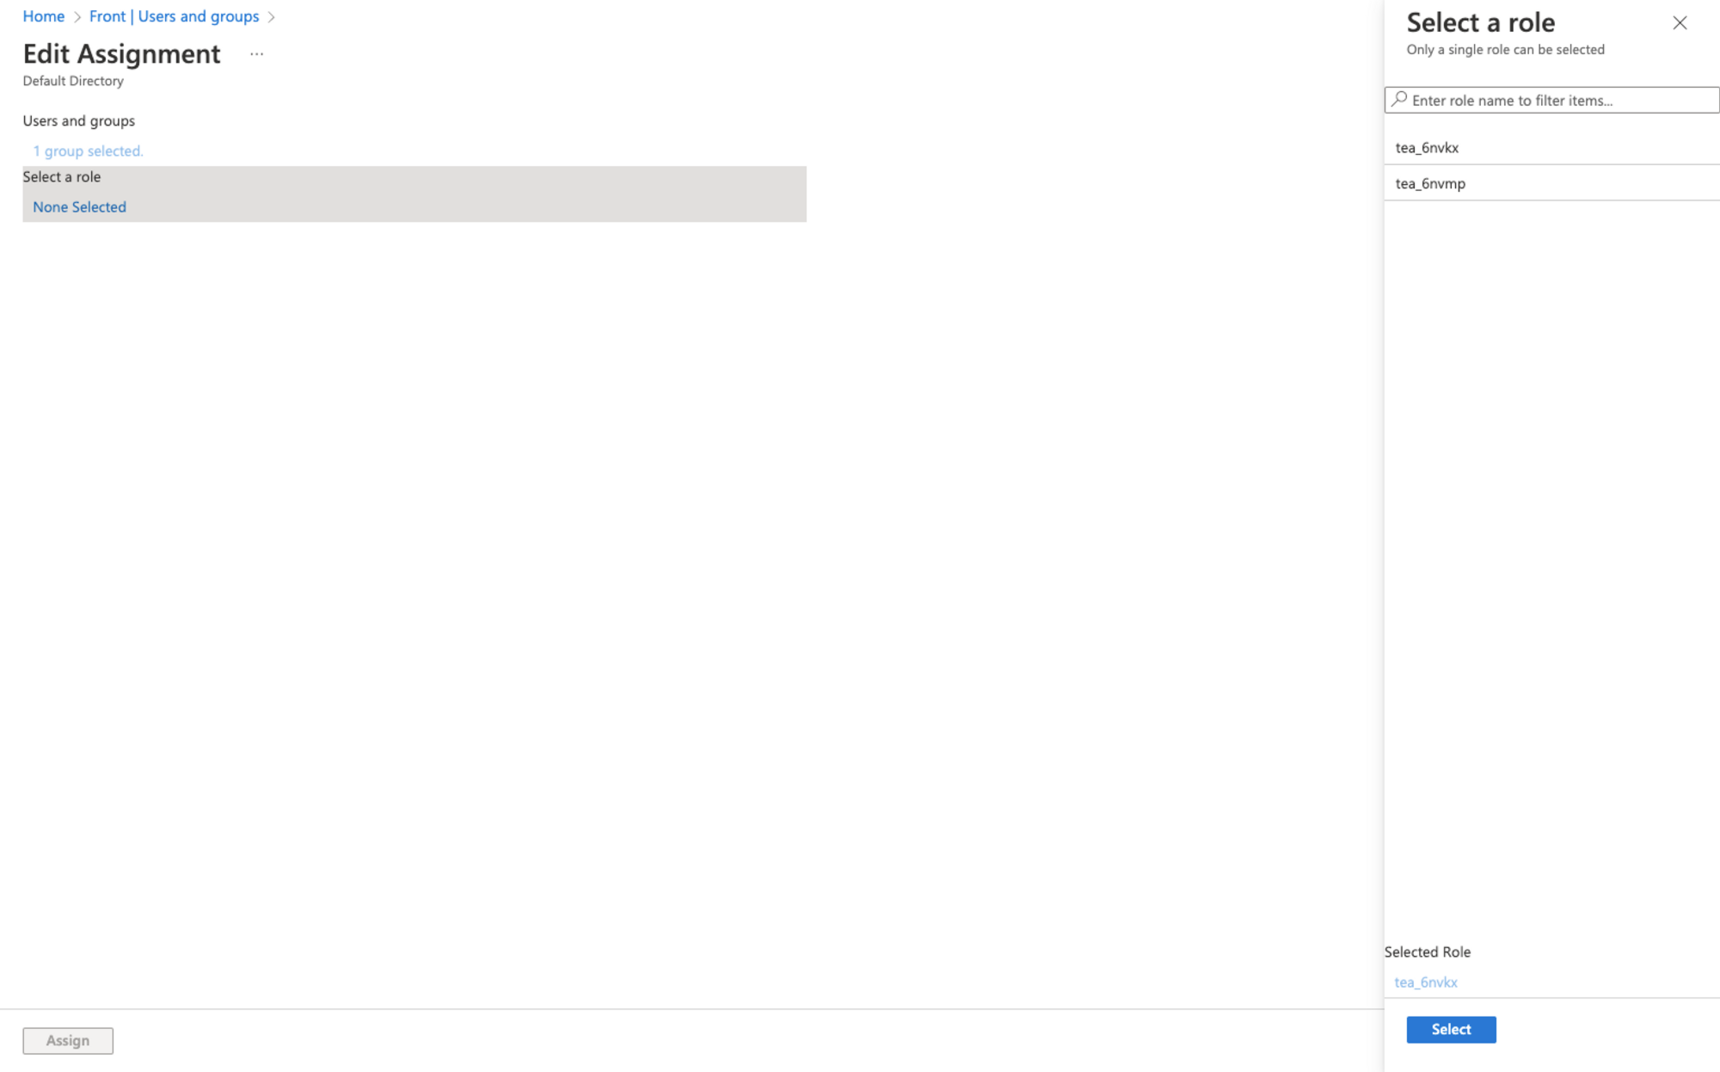
Step 17
Click on Assign at the bottom of the page. The preset has now been assigned to the user/groups.
You can test that the setup is successful by checking the logs after the next sync. You can also use Microsoft Entra ID’s Provision on demand function to test the provisioning immediately.
Part 5: Syncing groups to teammate groups (optional)
See this article for more information about syncing groups from an Identity Provider, like Microsoft Entra ID, to Front.
Warning: If you are pushing an Microsoft Entra ID group to sync with an existing teammate group in Front with the same name, the teammate group in Front will not be synced to the group in Microsoft Entra ID.
Step 1
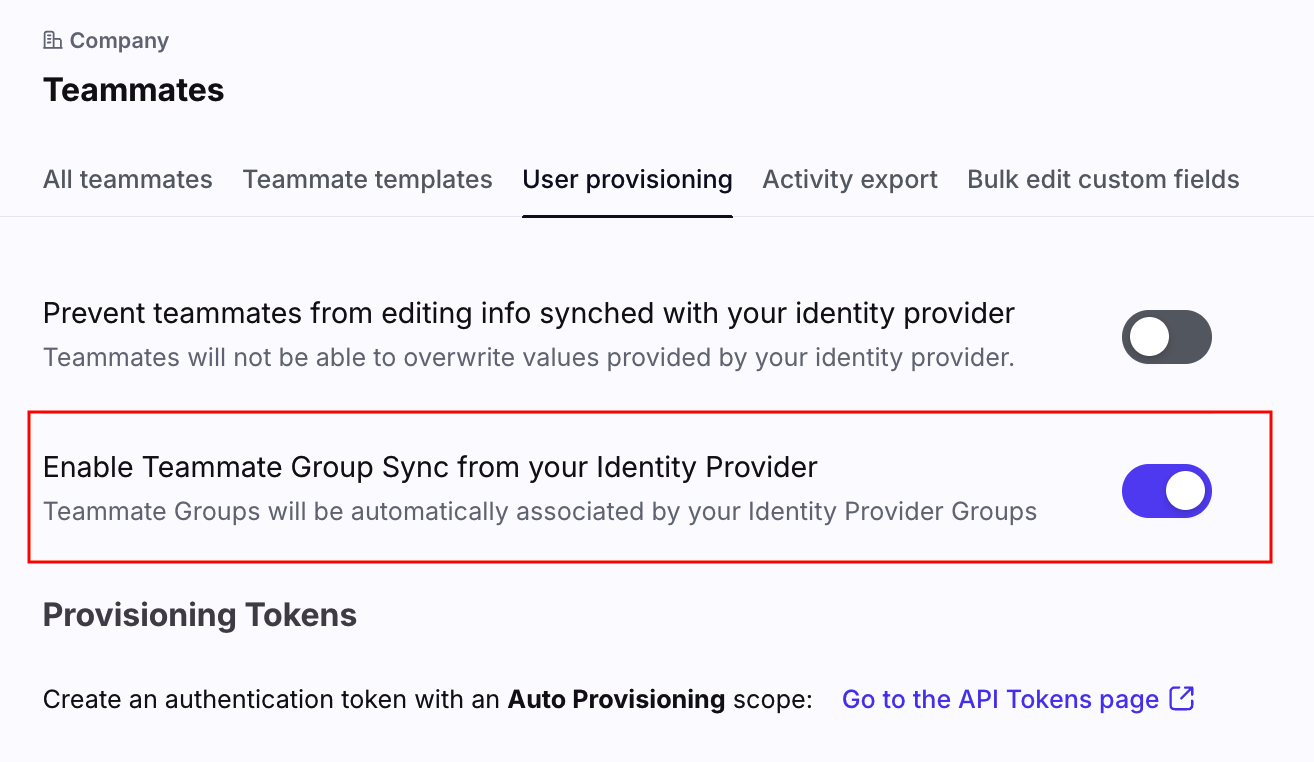
In Front, navigate to company settings. Click on Teammates, then go to the User provisioning tab.
Step 2
Toggle on the Enable Teammate Group Sync from your Identity Provider setting and Click Save.
Step 3
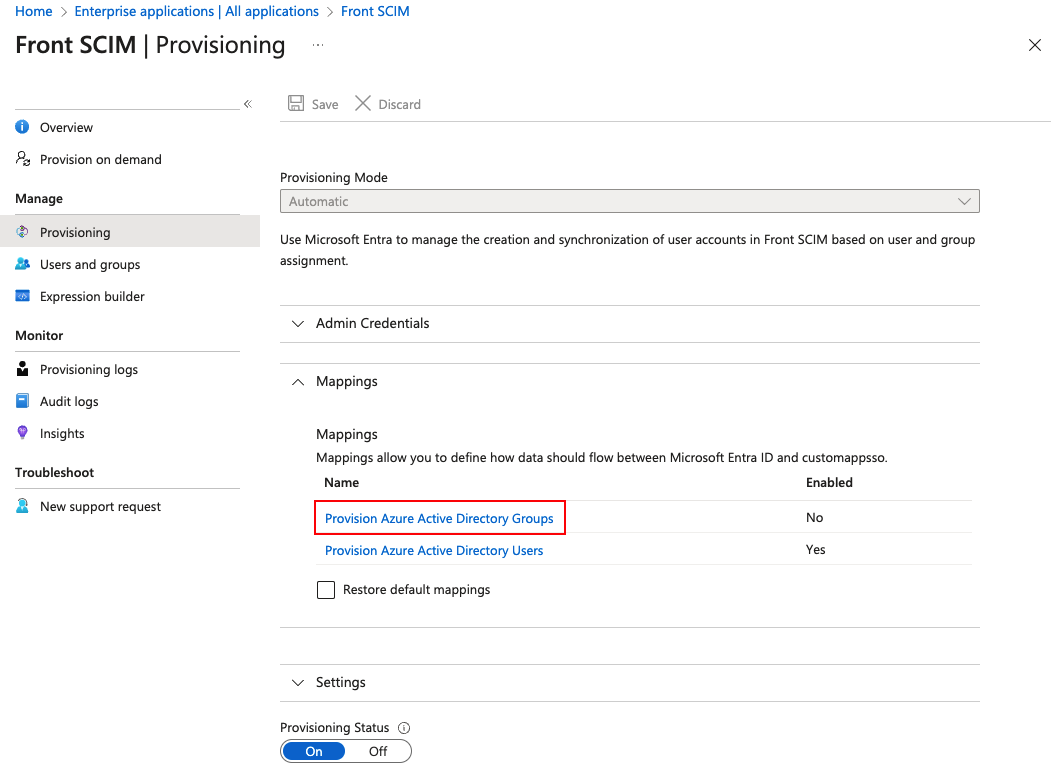
From your Microsoft Entra admin center, navigate to Home then click Enterprise applications and select your app. In the left panel, navigate to Provisioning, then click on Edit provisioning.
Step 4
In the Mappings section, click Provision Azure Active Directory Groups.
Step 5
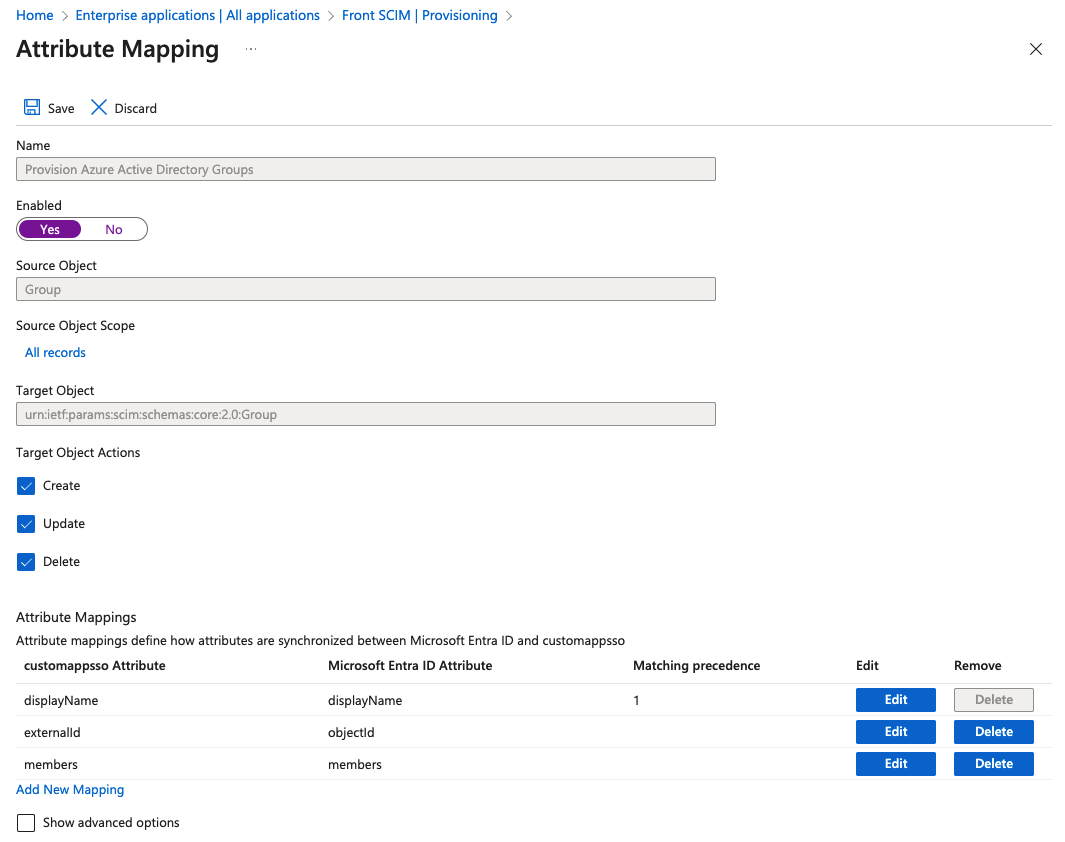
Make sure you have the following settings:
Enabled: Yes
Target object actions: Create, Update, Delete
Step 6
Once this is done, any groups assigned to the Front application will not only provision access to Front for the members of that group, but will also push the Microsoft Entra ID group to Front as a teammate group. See Part 3 of our Microsoft Entra ID article, for instructions on assigning an Microsoft Entra ID group to your Front application.
Part 6: Map the group description (optional)
Step 1
Navigate back to the Microsoft Entra admin center. Click Enterprise applications and select your app. In the left panel, navigate to Provisioning, then click on Edit provisioning.
Step 2
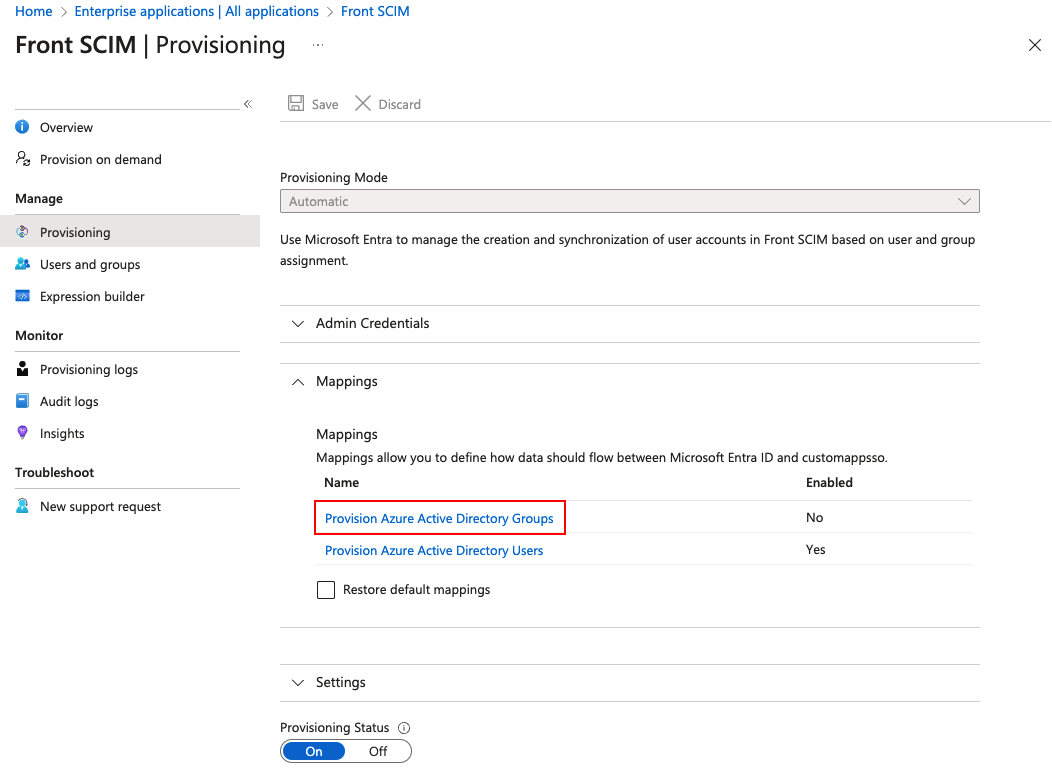
In the Mappings section, click Provision Azure Active Directory Groups.
Step 3
Scroll down the page, and select Show advanced options. Then click Edit attribute list for custommapsso.
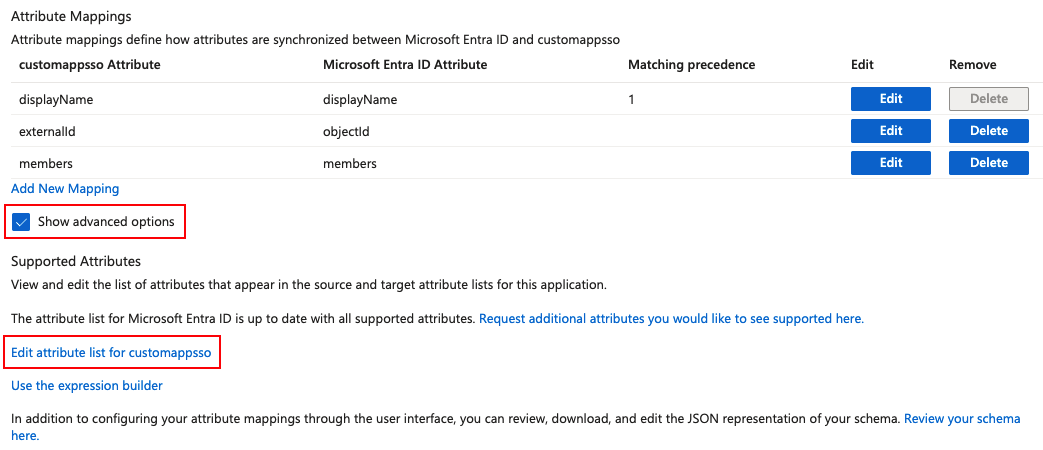
Step 4
At the bottom of the table, add a new item with the following fields:
Name: urn:ietf:params:scim:schemas:extension:frontapp:group:description
Type: String
All other fields: Leave blank
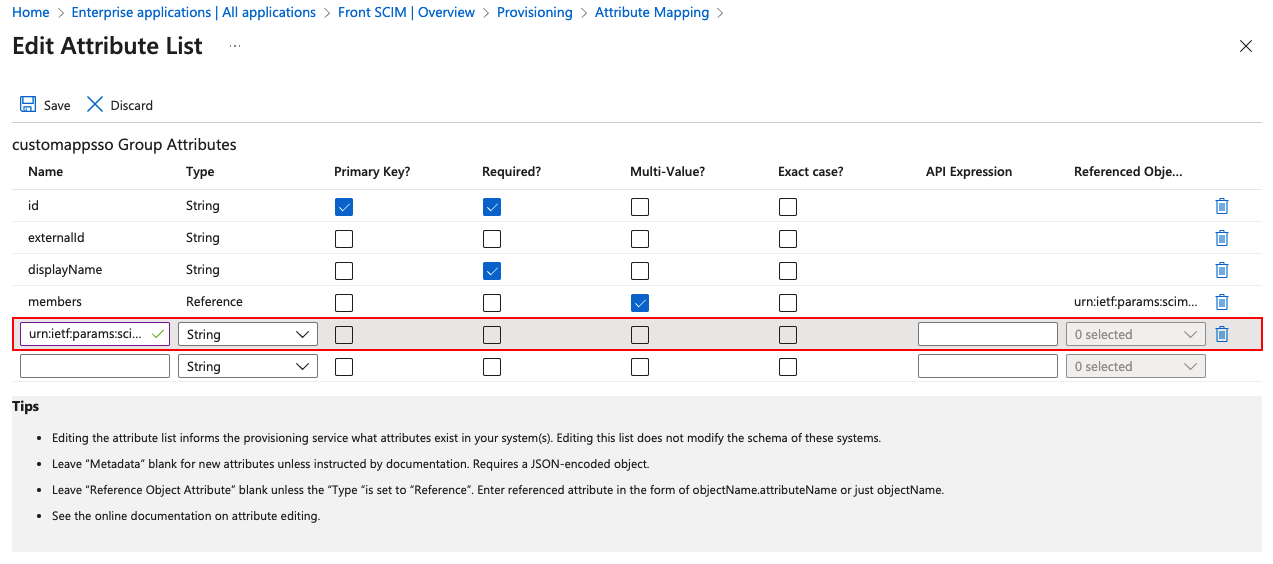
Step 5
Click Save to return to the attribute mapping page. At the bottom of the Attribute Mappings table, click Add New Mapping.
Step 6
In the Edit Attribute form, enter the following information:
Mapping type: Direct
Source attribute: description
Target attribute: urn:ietf:params:scim:schemas:extension:frontapp:group:description
Match objects using this attribute: No
Apply this mapping: Always
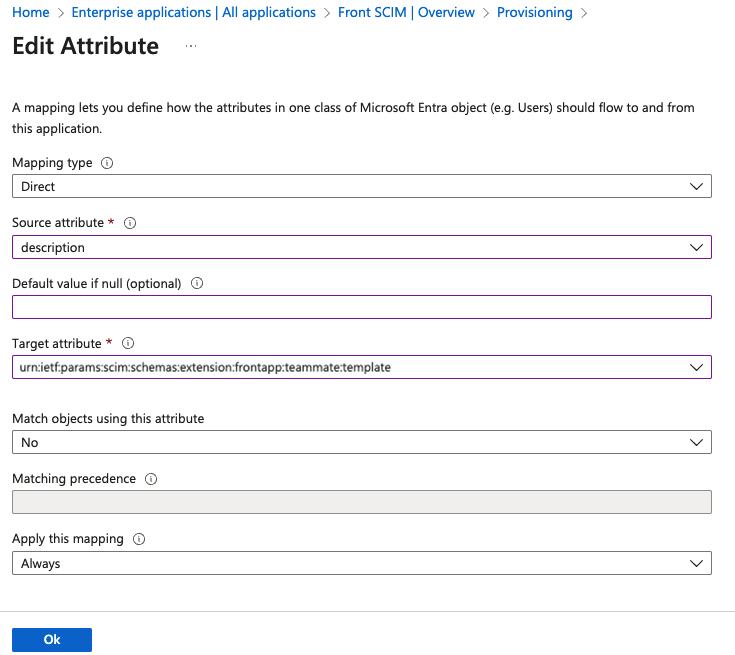
Step 7
Click Ok to save this new attribute and confirm. The attribute mapping is now complete.
Remove a user
You can remove a user from your custom application portal in Microsoft Entra ID. This will block the teammate account in Front.
Step 1
Open your enterprise application, then click Users and groups in the left panel.
Step 2
Check the box next to the user you’ve like to remove, then click Remove.
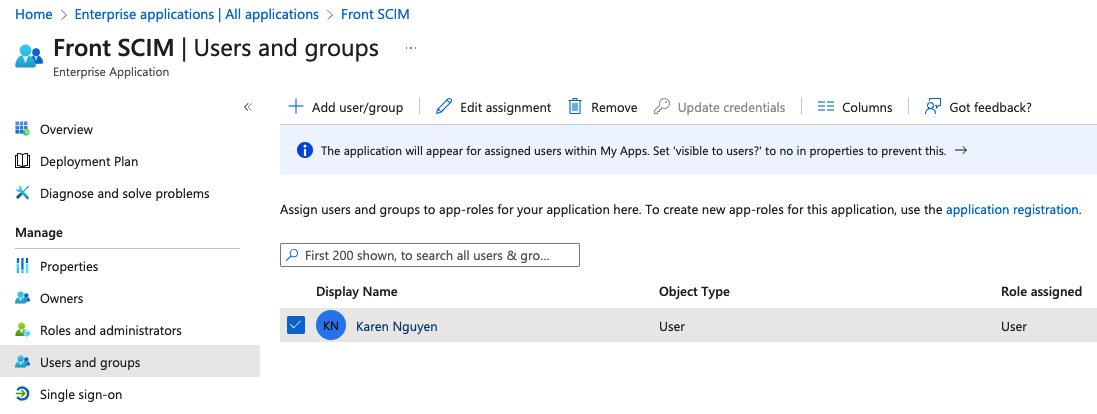
This is effectively a soft delete, so the user will appear as Blocked in your instance of Front and their session will be immediately invalid once the next provisioning cycle completes.
This user’s Front license can now be assigned to someone else.
Access and permissions
Once you’ve created users in Front via user provisioning, use Front teammate groups to configure inbox access and permissions for these users. See this article to learn more.
FAQ
What data does the integration access from Microsoft Entra?
When you configure Front's Microsoft Entra integration, only the following scopes/permissions are requested: 'user.read.all', 'group.read.all', 'directory.read.all', 'offline_access'.
In other words, this means the integration would only be allowed to:
See the list of users (names, email addresses)
See groups/teams in the directory
Use this to populate autocomplete when composing emails in Front
This is read-only information - no access to actual emails, calendars, or ability to send anything.
What happens when I remove access to Front from Microsoft Entra ID?
When you remove access to Front from Microsoft Entra ID for a specific teammate, that teammate will be blocked. Should you re-authorize access to Front, the teammate will be unblocked automatically. Microsoft Entra ID does not allow deleting via the integration, so users in Front are blocked, even if they are deleted in Microsoft Entra ID.
What happens when someone is deleted from Microsoft Entra ID?
Microsoft Entra ID does not allow deleting via the integration, so users in Front are blocked, even if they are deleted in Microsoft Entra ID.
Pricing
SCIM provisioning is available on the latest Professional plan or above. Some legacy plans may also have this feature.