Workforce Management
Overview
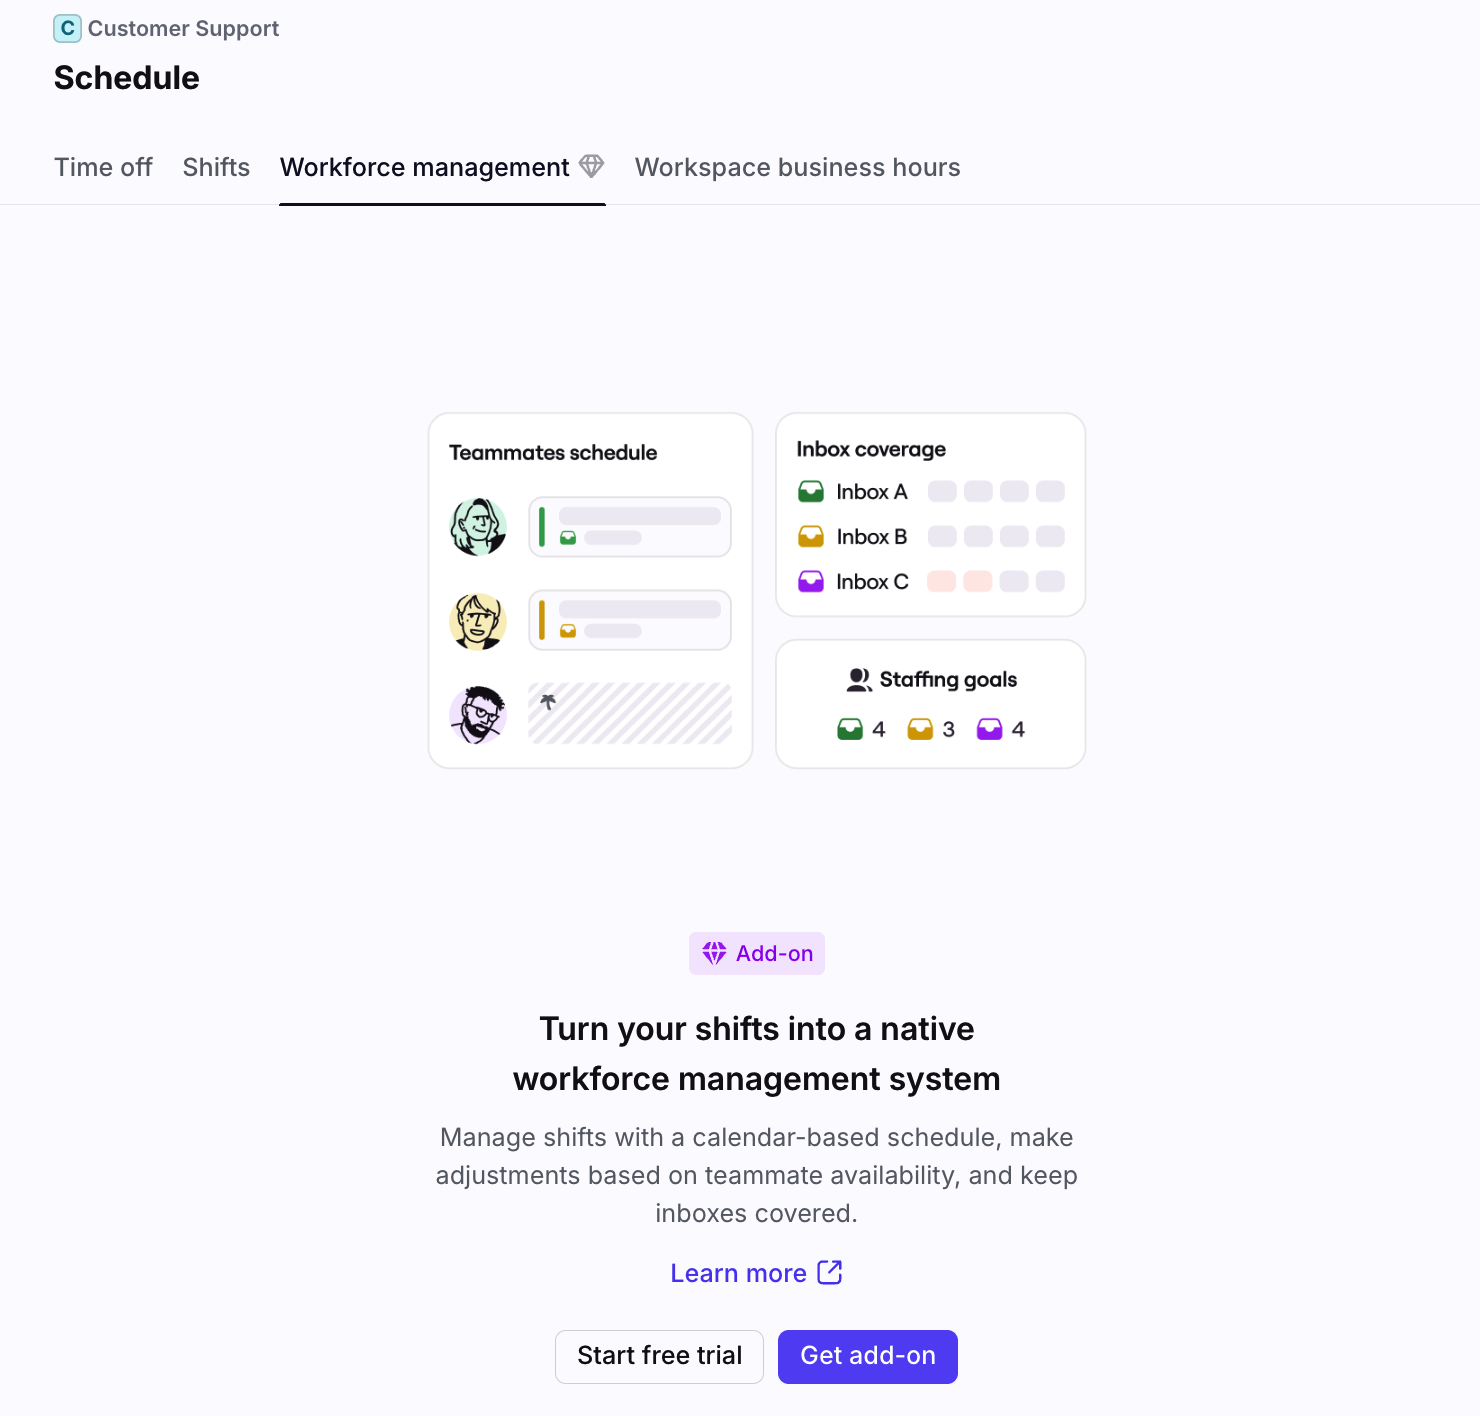
Front’s Workforce Management (WFM) feature ensures you have the right number of teammates, with the right skills, working at the right time. Plan shifts, manage time off, and automatically balance workloads. With real-time schedule visibility and conversation auto-assignment, your team stays covered and ready to deliver great service, every time.
You must have the Front company admin or workspace admin permissions to manage time off and shifts via the Workforce Management feature.
When to use Workforce Management
The Workforce Management feature is useful for admins who want to manage their inbox staffing directly in Front. With this feature, you can easily:
Streamline shift planning
Effortlessly create and customize recurring shifts, set staffing requirements per inbox, and manage time off all in one place.
Instantly identify coverage gaps
Get a complete picture of your team's availability so team leaders can quickly identify gaps and make fast, informed decisions that keep service levels high.
Improve team productivity
Keep your team operating at peak performance by giving them full visibility into their upcoming shifts and automatically routing conversations based on shift schedules and workloads.
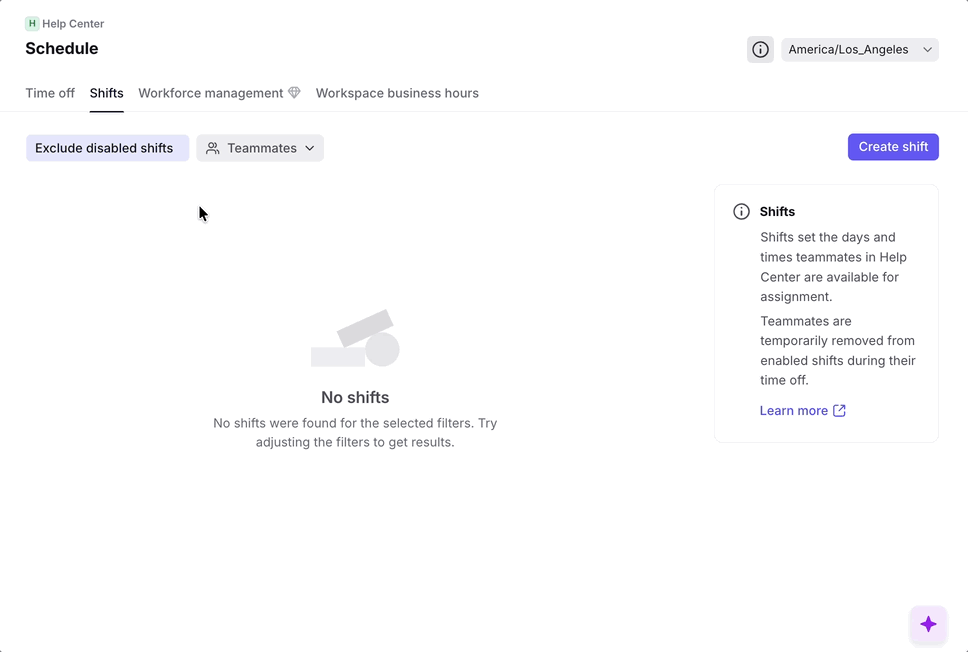
Creating shifts
Step 1
Click the gear icon, select the workspace you’re working in, then select Workforce management.
Step 2
In the Shifts tab, click Create shift.
Step 3
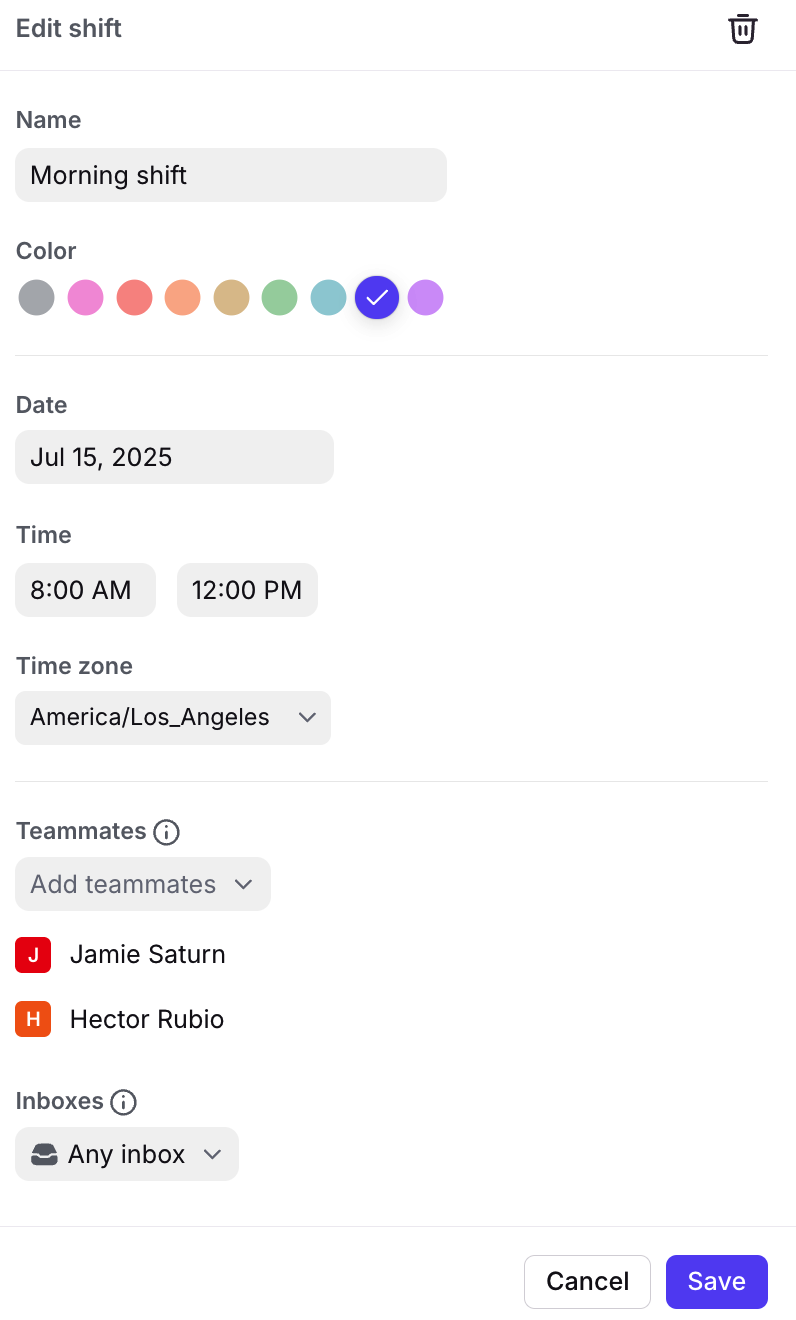
A Create shift panel will open on the right. Fill in the following fields:
Name: Enter a name for the shift.
Color: Select a color for the shift.
Days: Select the days of the week the shift applies to.
Time: Enter a start time and end time for each shift day. Toggle on the Same time each day setting to apply the start and end times to all selected days.
Time zone: Select the time zone for the shift.
Effective date: Select the calendar date the shift starts.
Repeats: Select how often the shift should repeat (weekly, doesn’t repeat, etc.).
Teammates: Select the teammate(s) assigned to the shift.
Inboxes: Select the inbox(es) the shift applies to.
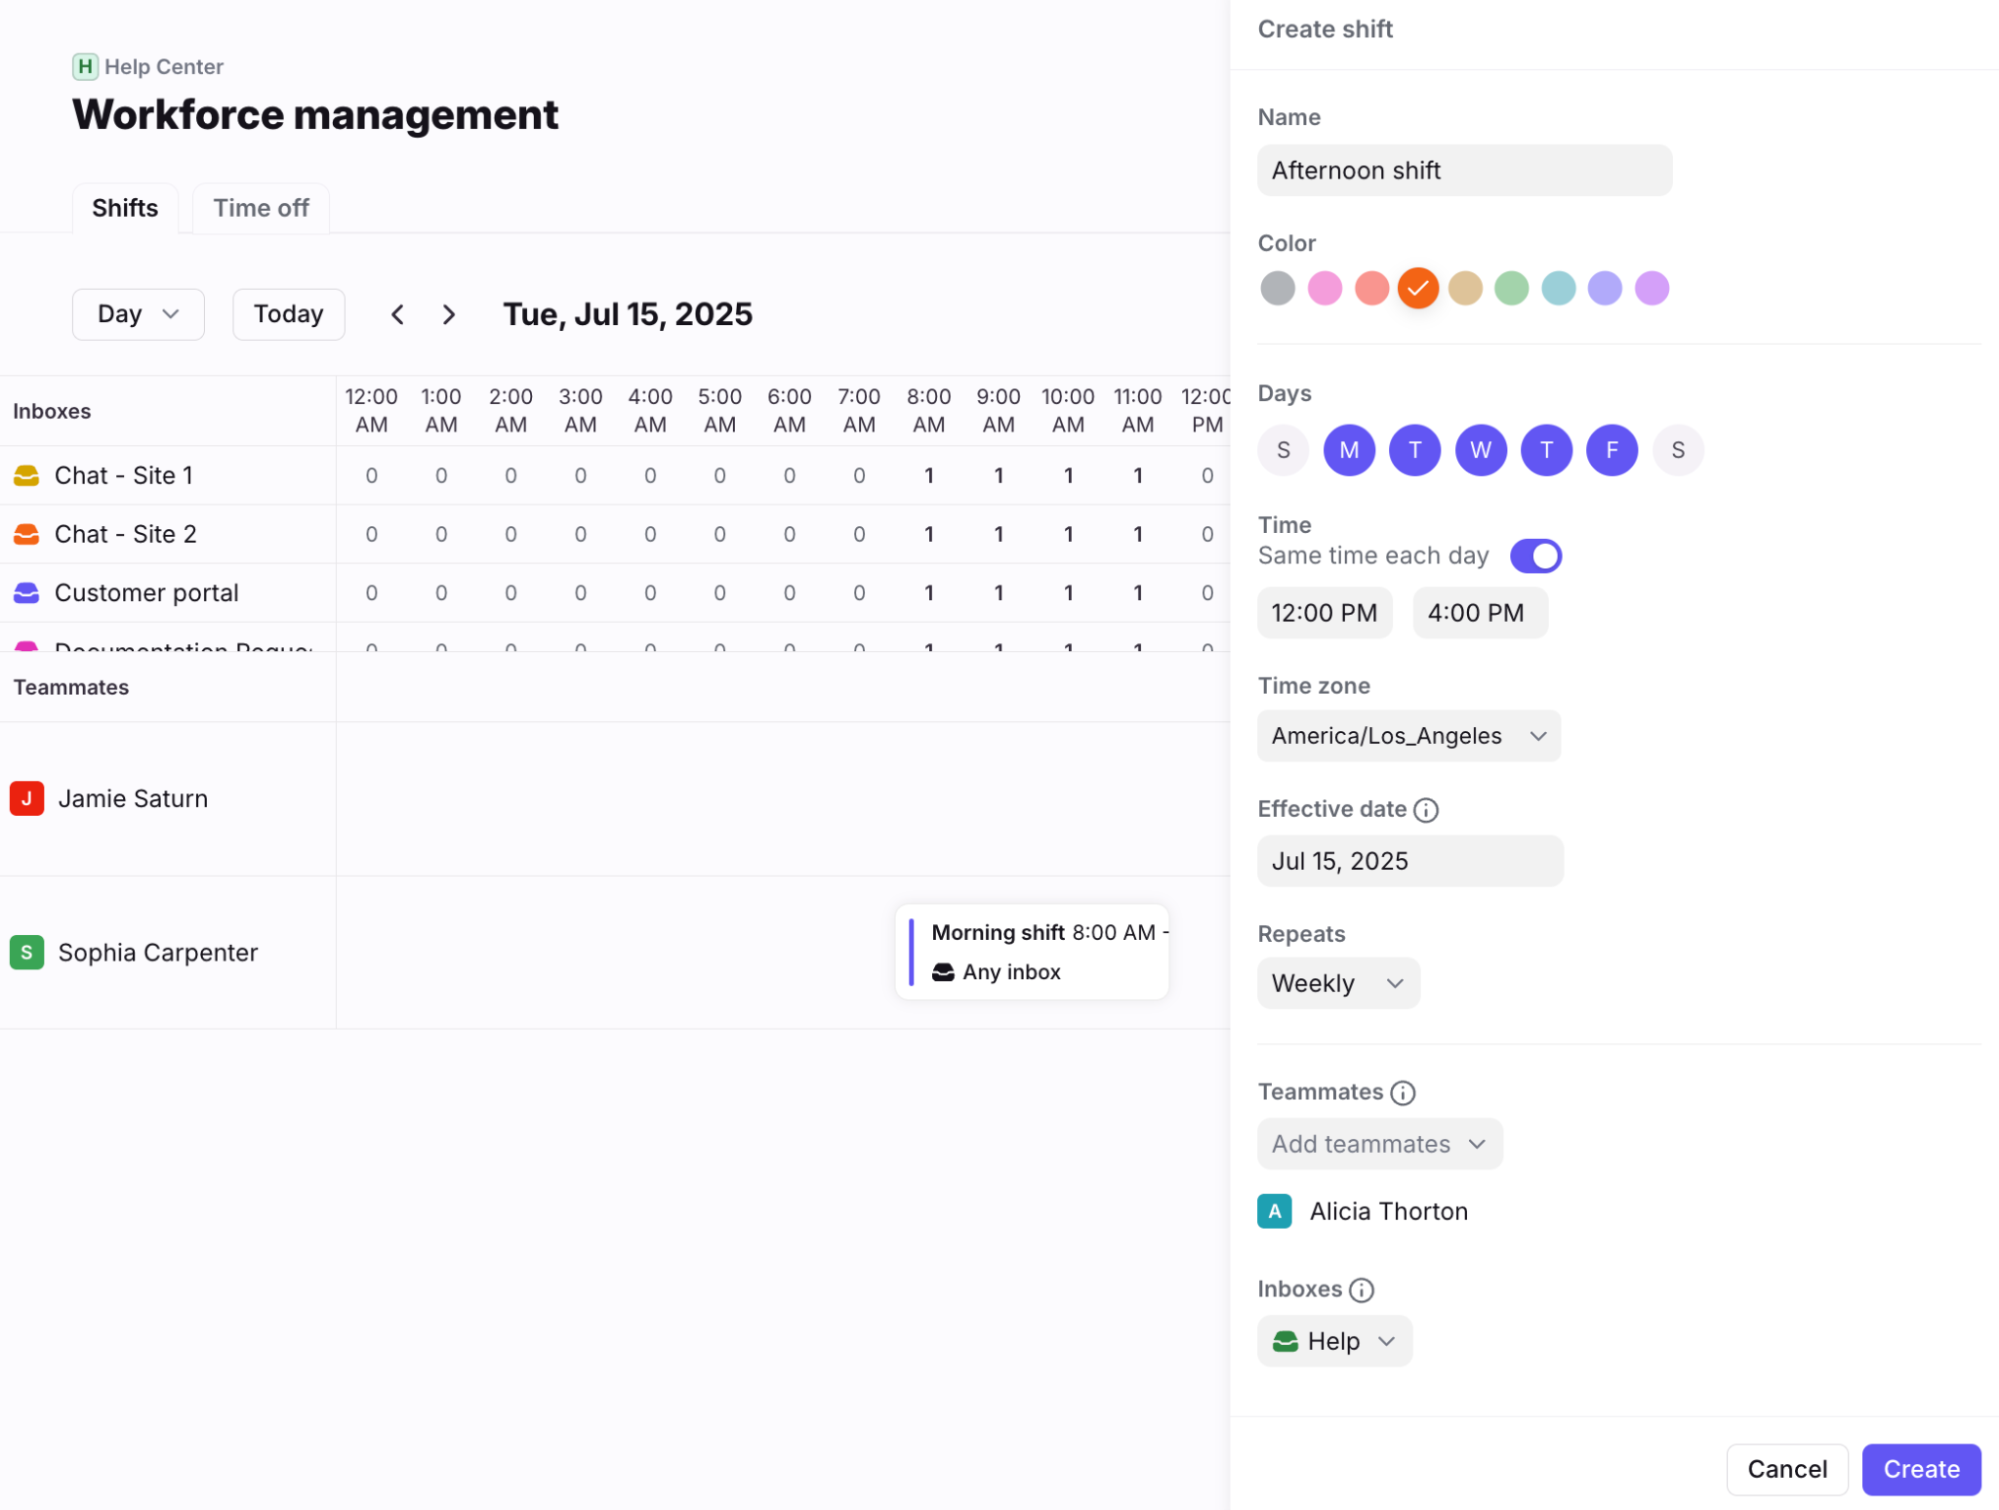
Step 4
Click Create. You’ll see the new shift in your shift timeline. Teammate assignments as configured in your assignment rules will now change based on this shift.
Editing shifts
After a shift is created, you can edit any current or upcoming occurrences. This is useful when you need to adjust your coverage hours due holidays, changes in message volume, and more.
All future occurrences
Step 1
In your timeline view, select the shift you’d like to edit.
Step 2
In the Edit shift panel, adjust your shift settings as needed. To delete the shift, click the trash can icon.
In this example, the current Friday shift and all future occurrences will end at 4:00 PM.
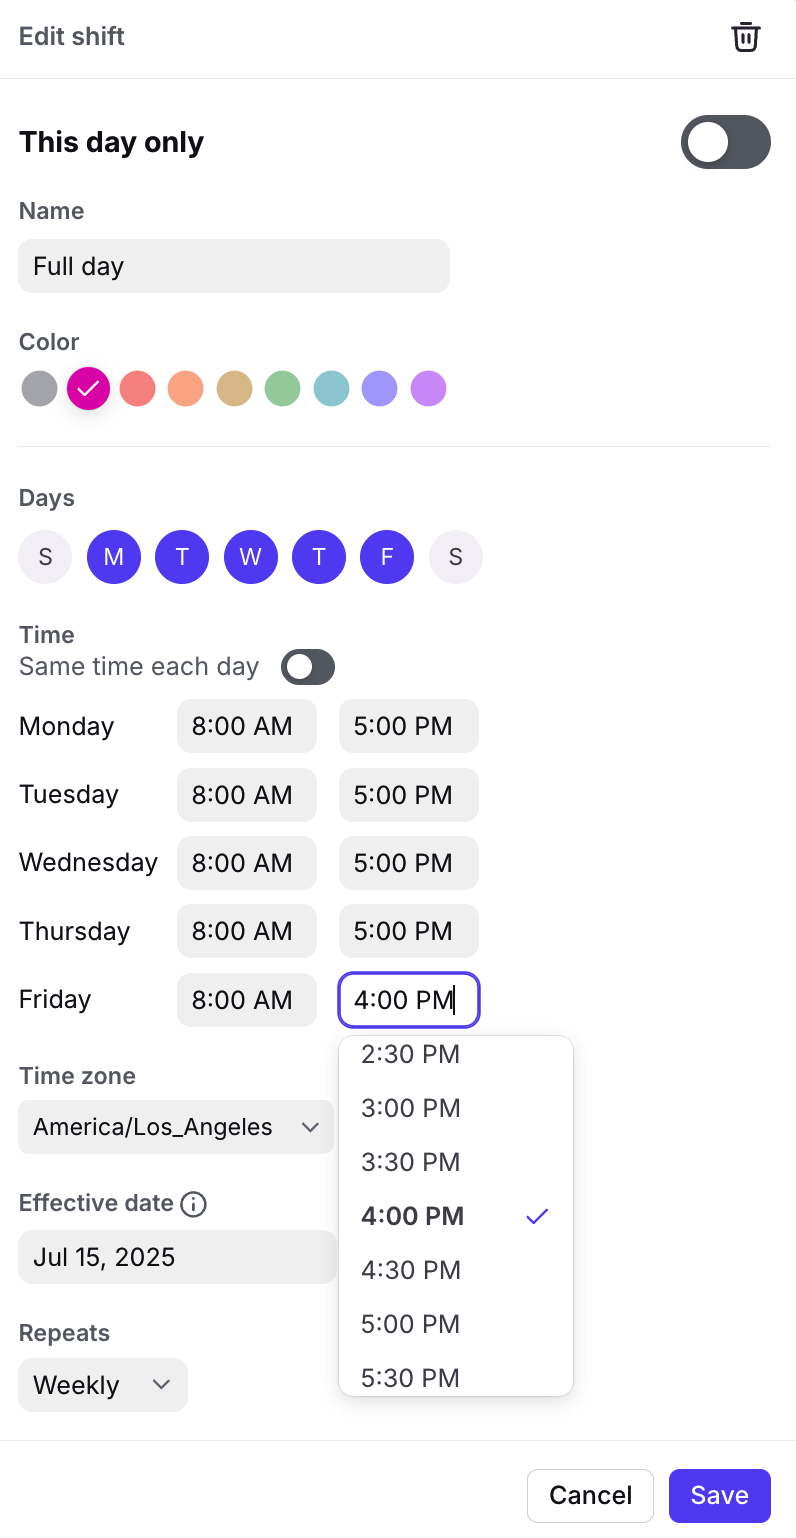
Step 3
Click Save. The timeline view will update with your changes.
One day only
Step 1
In your timeline view, select the shift you’d like to edit.
Step 2
In the Edit shift panel, enable the This day only toggle, then adjust your shift settings as needed. To delete the shift, click the trash can icon.
In this example, Jun 15 is a short day, so these updated hours will not affect future occurrences of this shift.
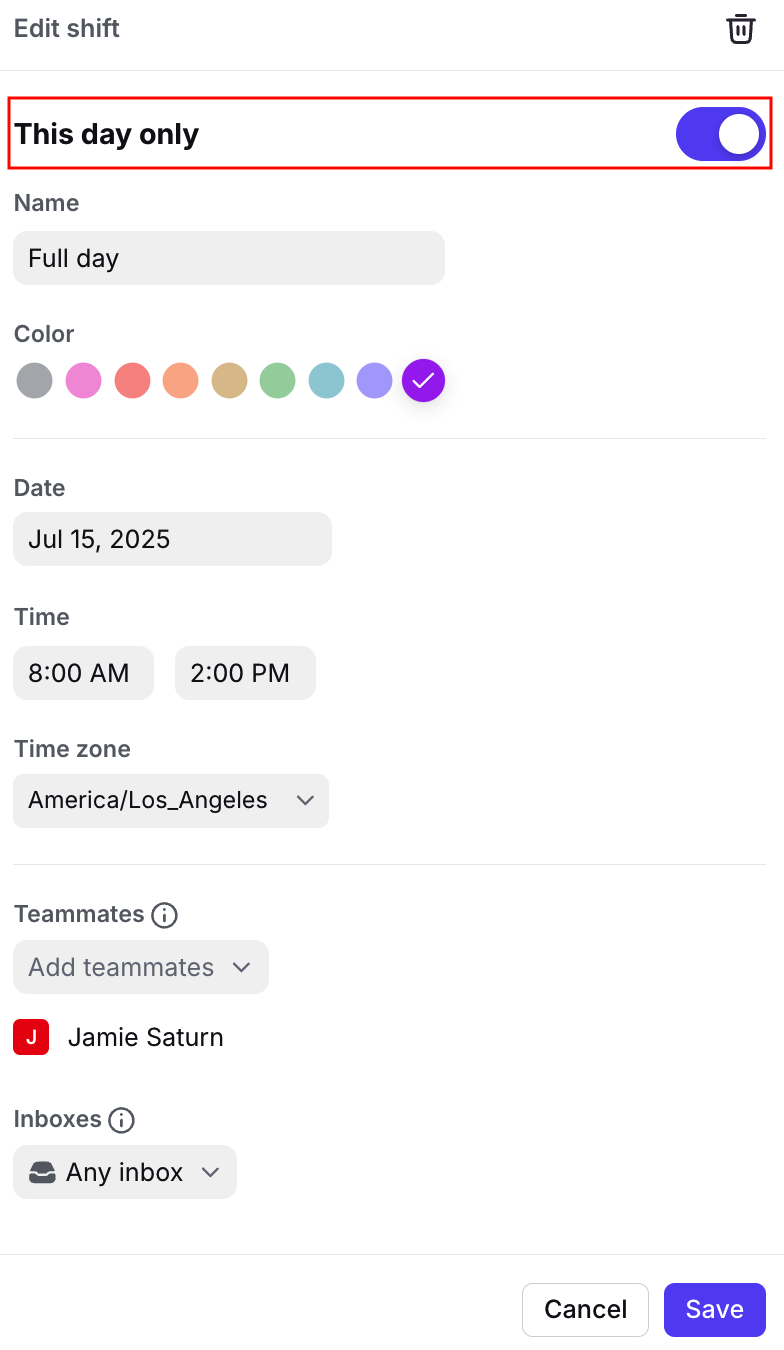
Step 3
Click Save. The timeline view will update with your changes.
Set staffing goals
Set staffing requirements per inbox to ensure each inbox has enough coverage, and to accurately highlight coverage gaps. You must have workspace or inbox-level business hours set up staffing goals.
Step 1
In Workforce management, click Set staffing goals.

Step 2
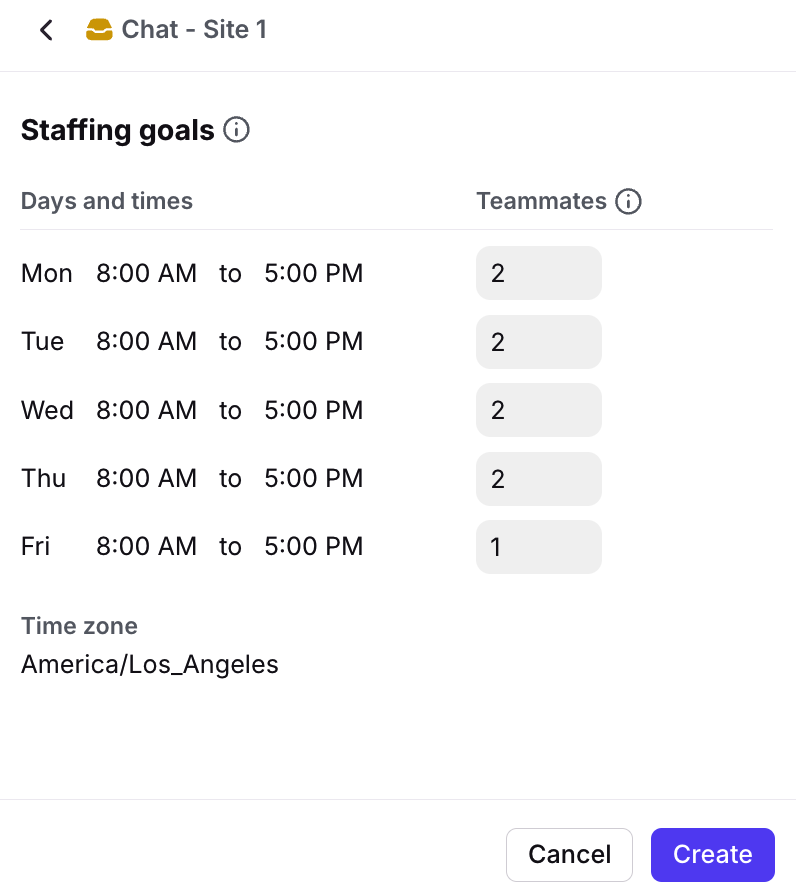
A panel will open on the right. Select the inbox you’d like to add staffing goals to.
Step 3
Enter the number of teammates required to work the shift for each time period. Click Create to finish.
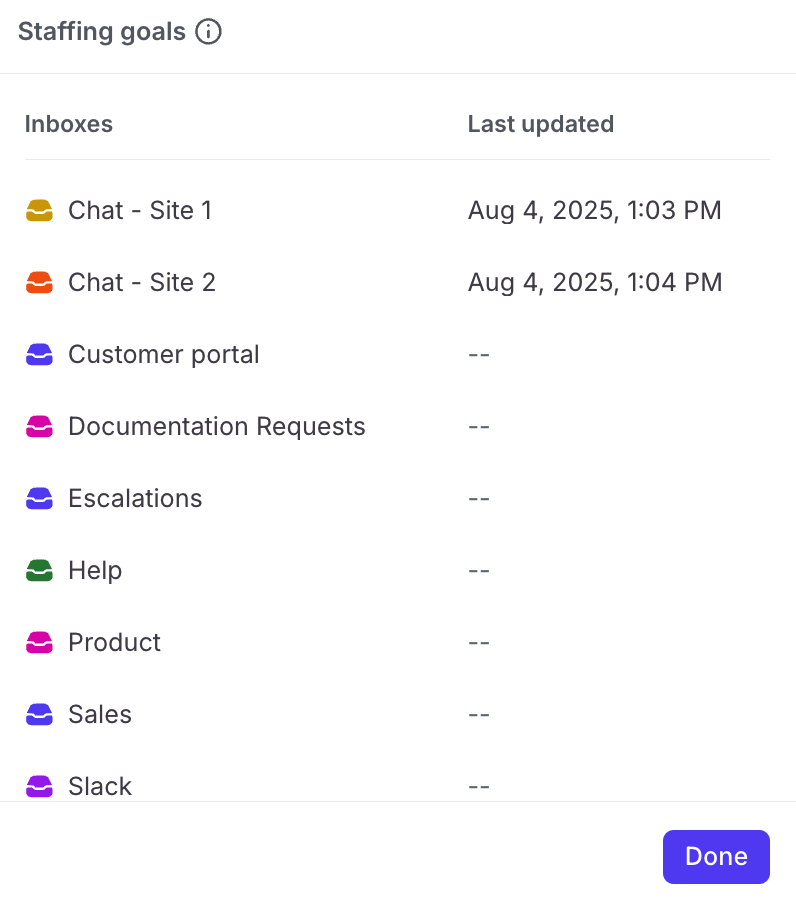
Step 4
Select another inbox to continue adding staffing goals for your other inboxes. Click Done.
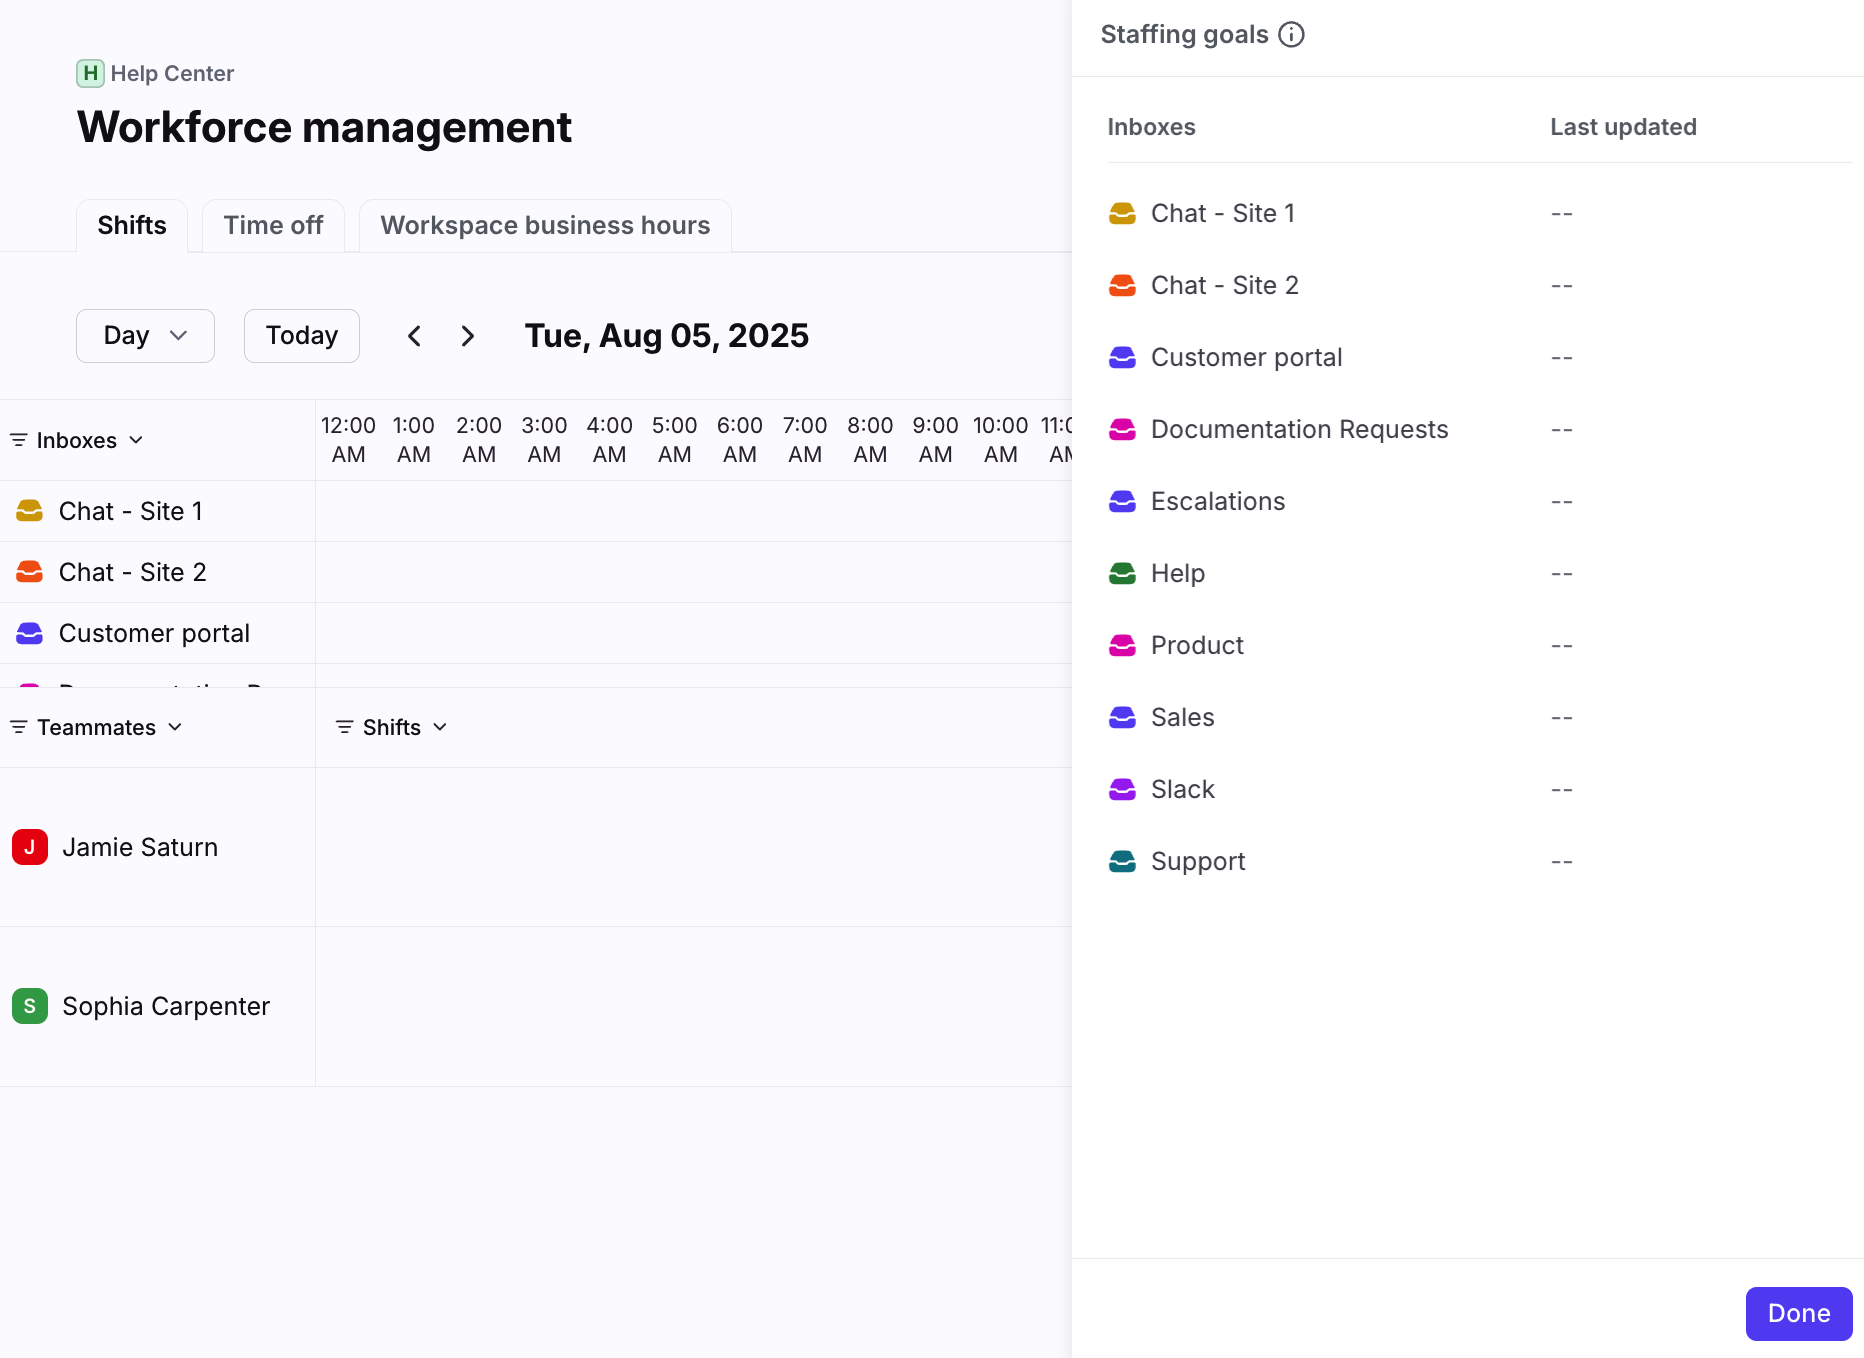
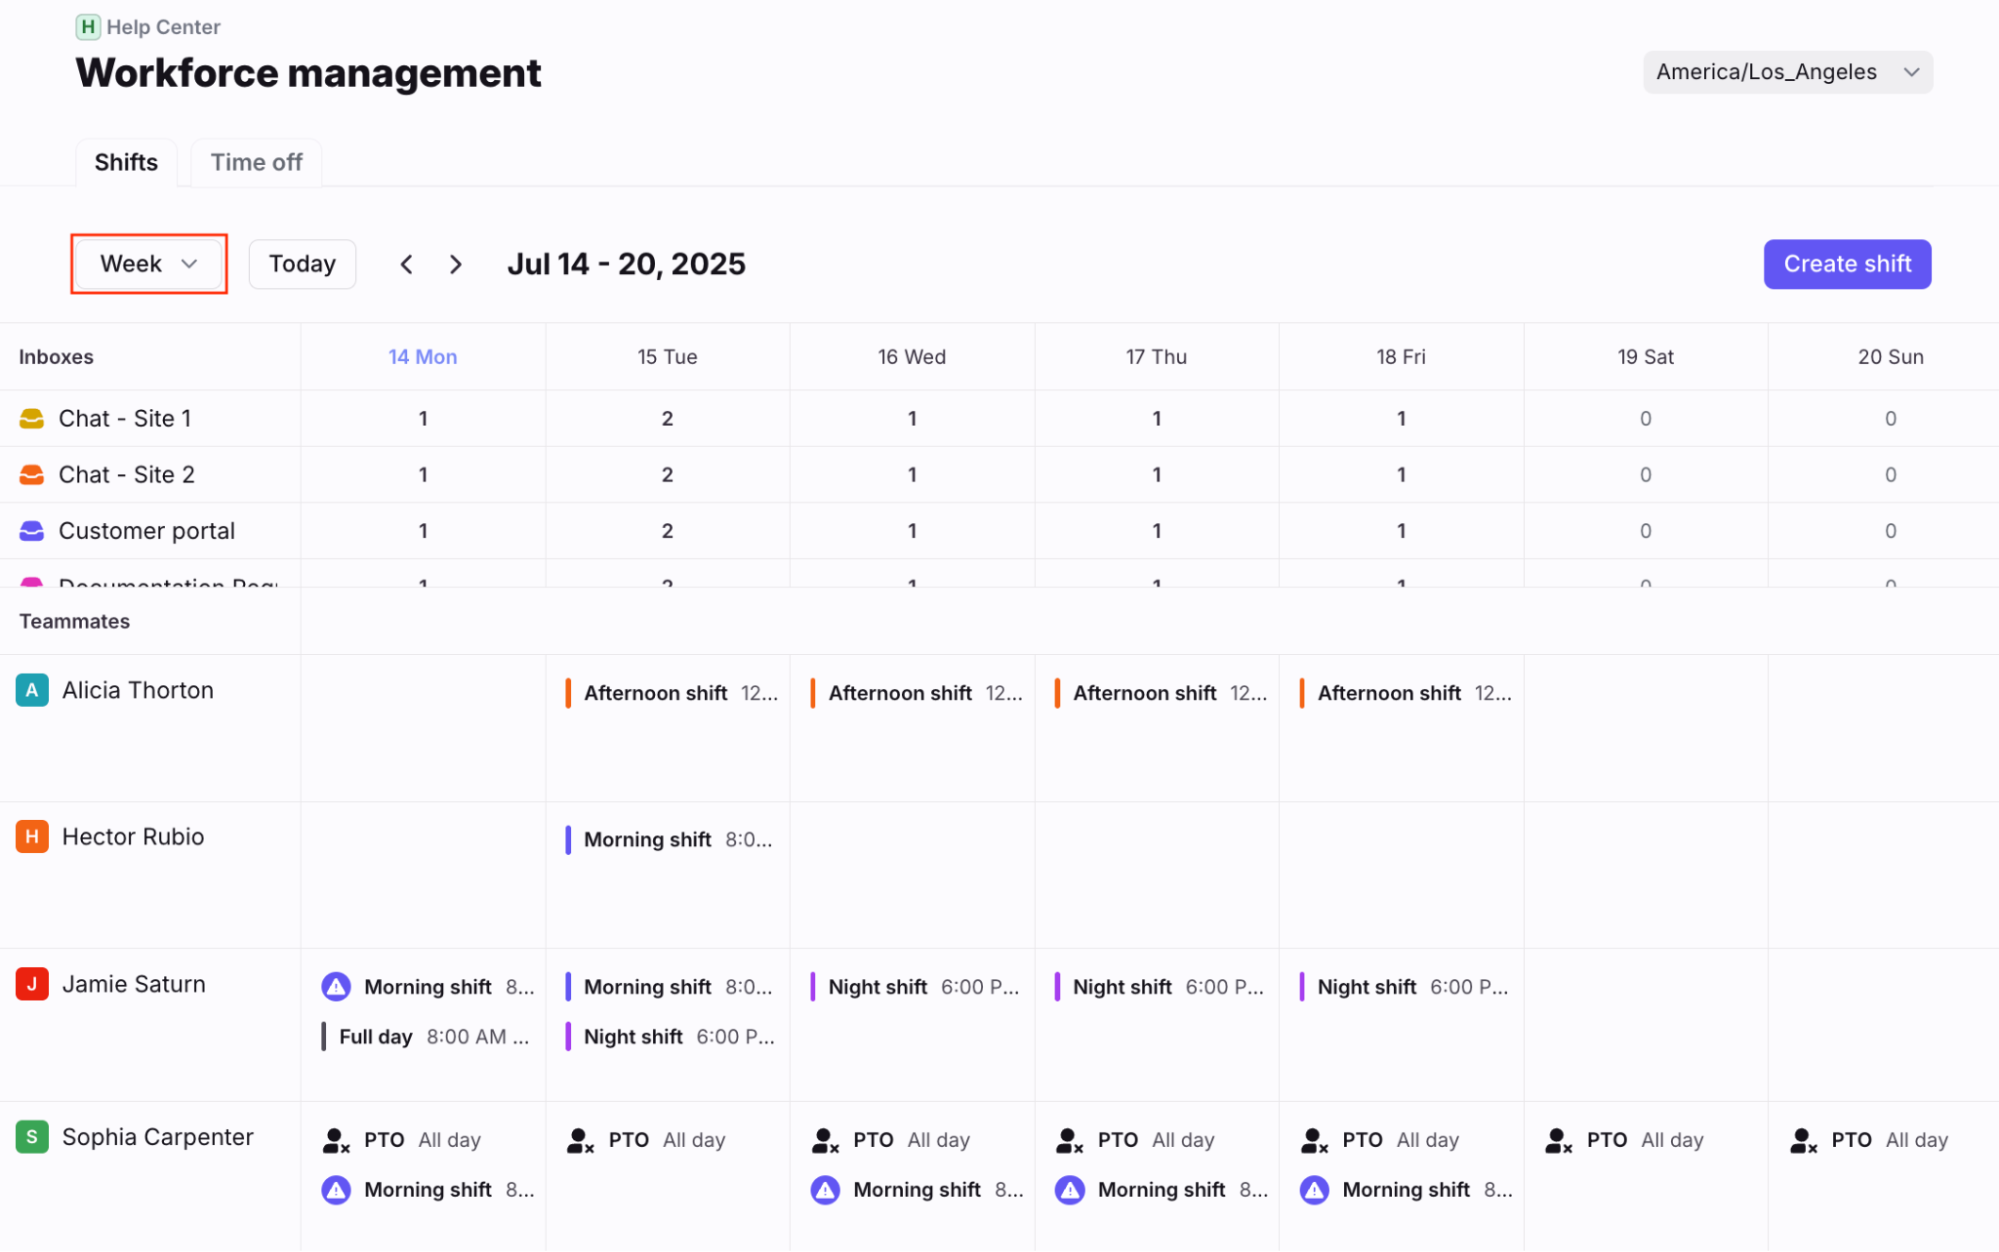
Step 5
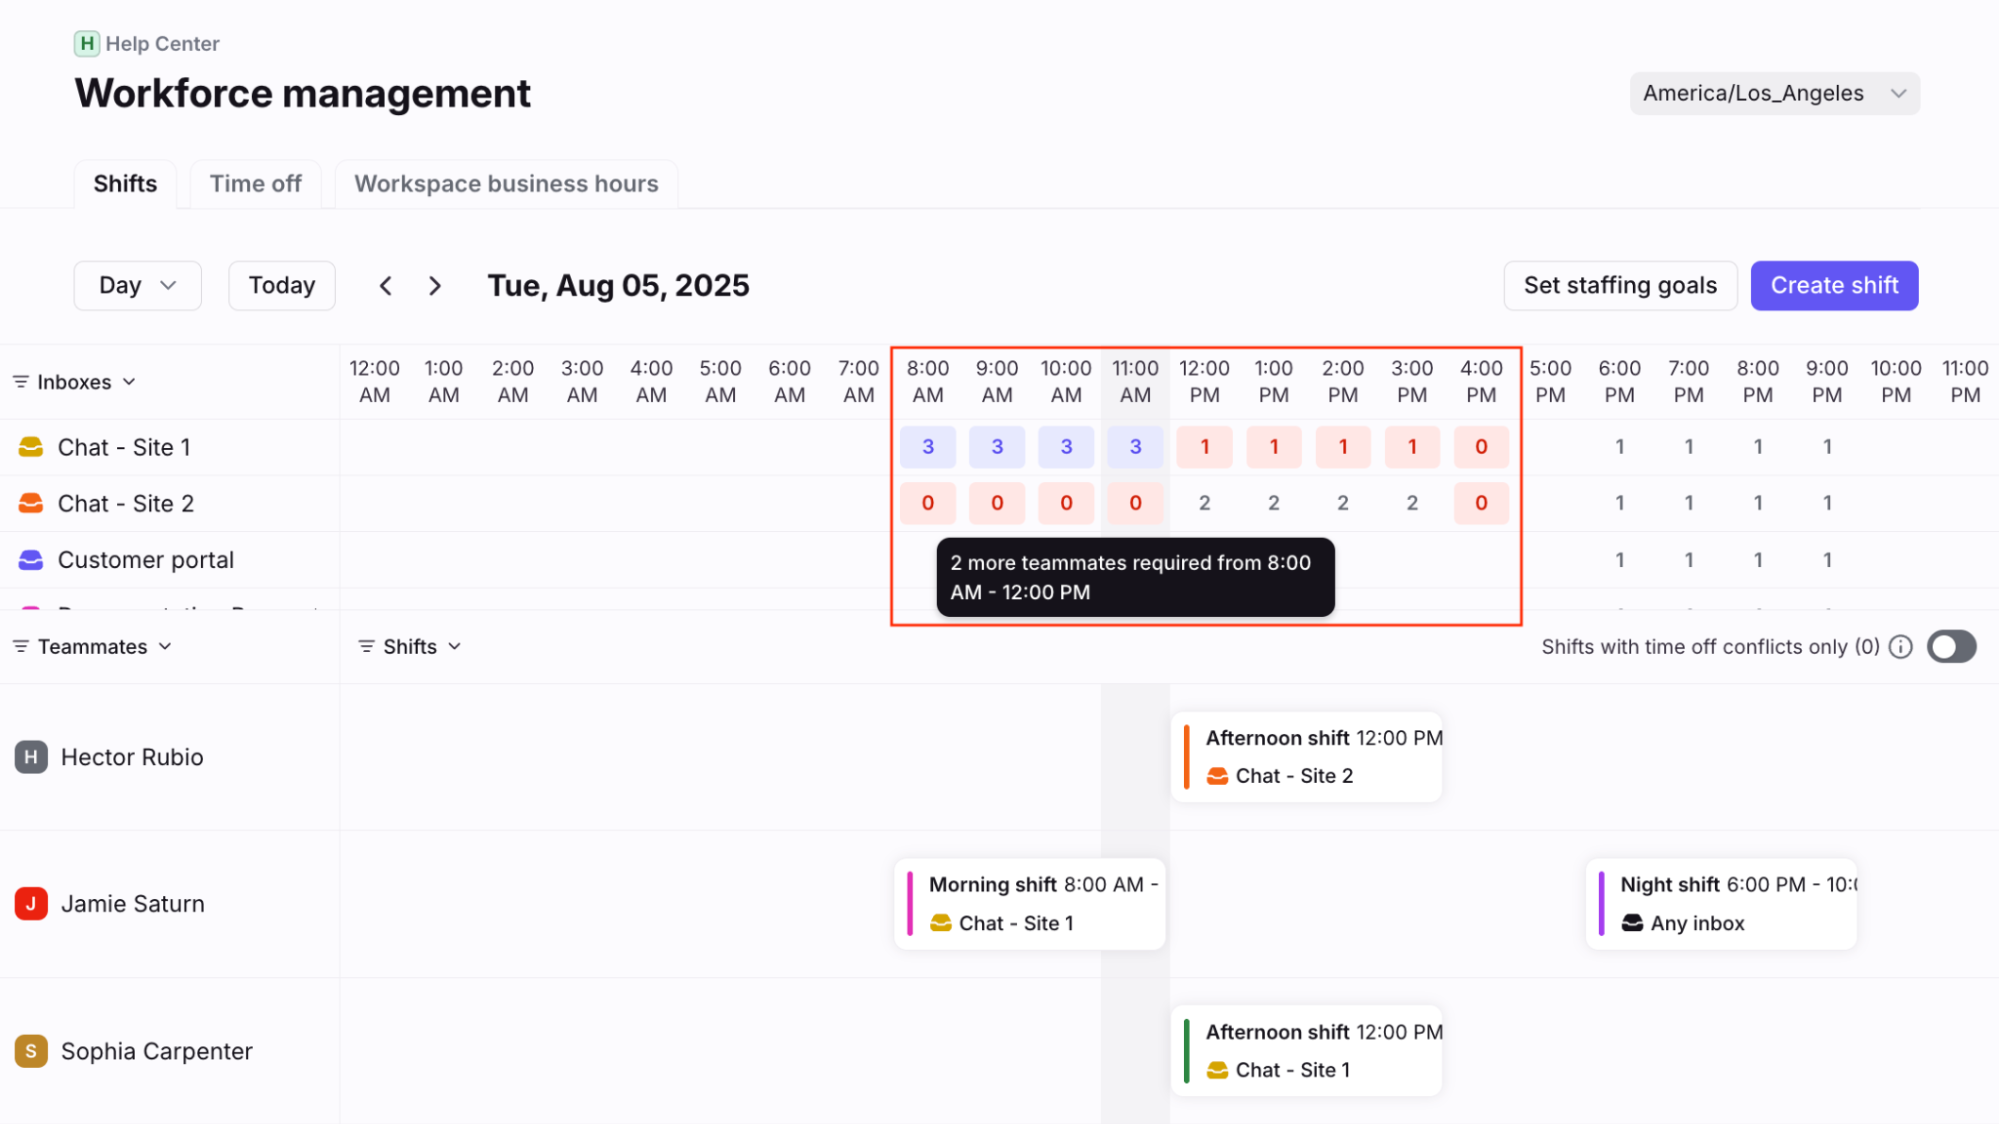
In the Inboxes section of your timeline view, you’ll see a staffing goal overview. The colors indicate the following:
Red: Below the staffing goal
Grey: Meets the staffing goal
Blue: Above the staffing goal
In the Day view, you’ll see the number of teammates assigned to each hour for that inbox. Hover over any number to see additional information.
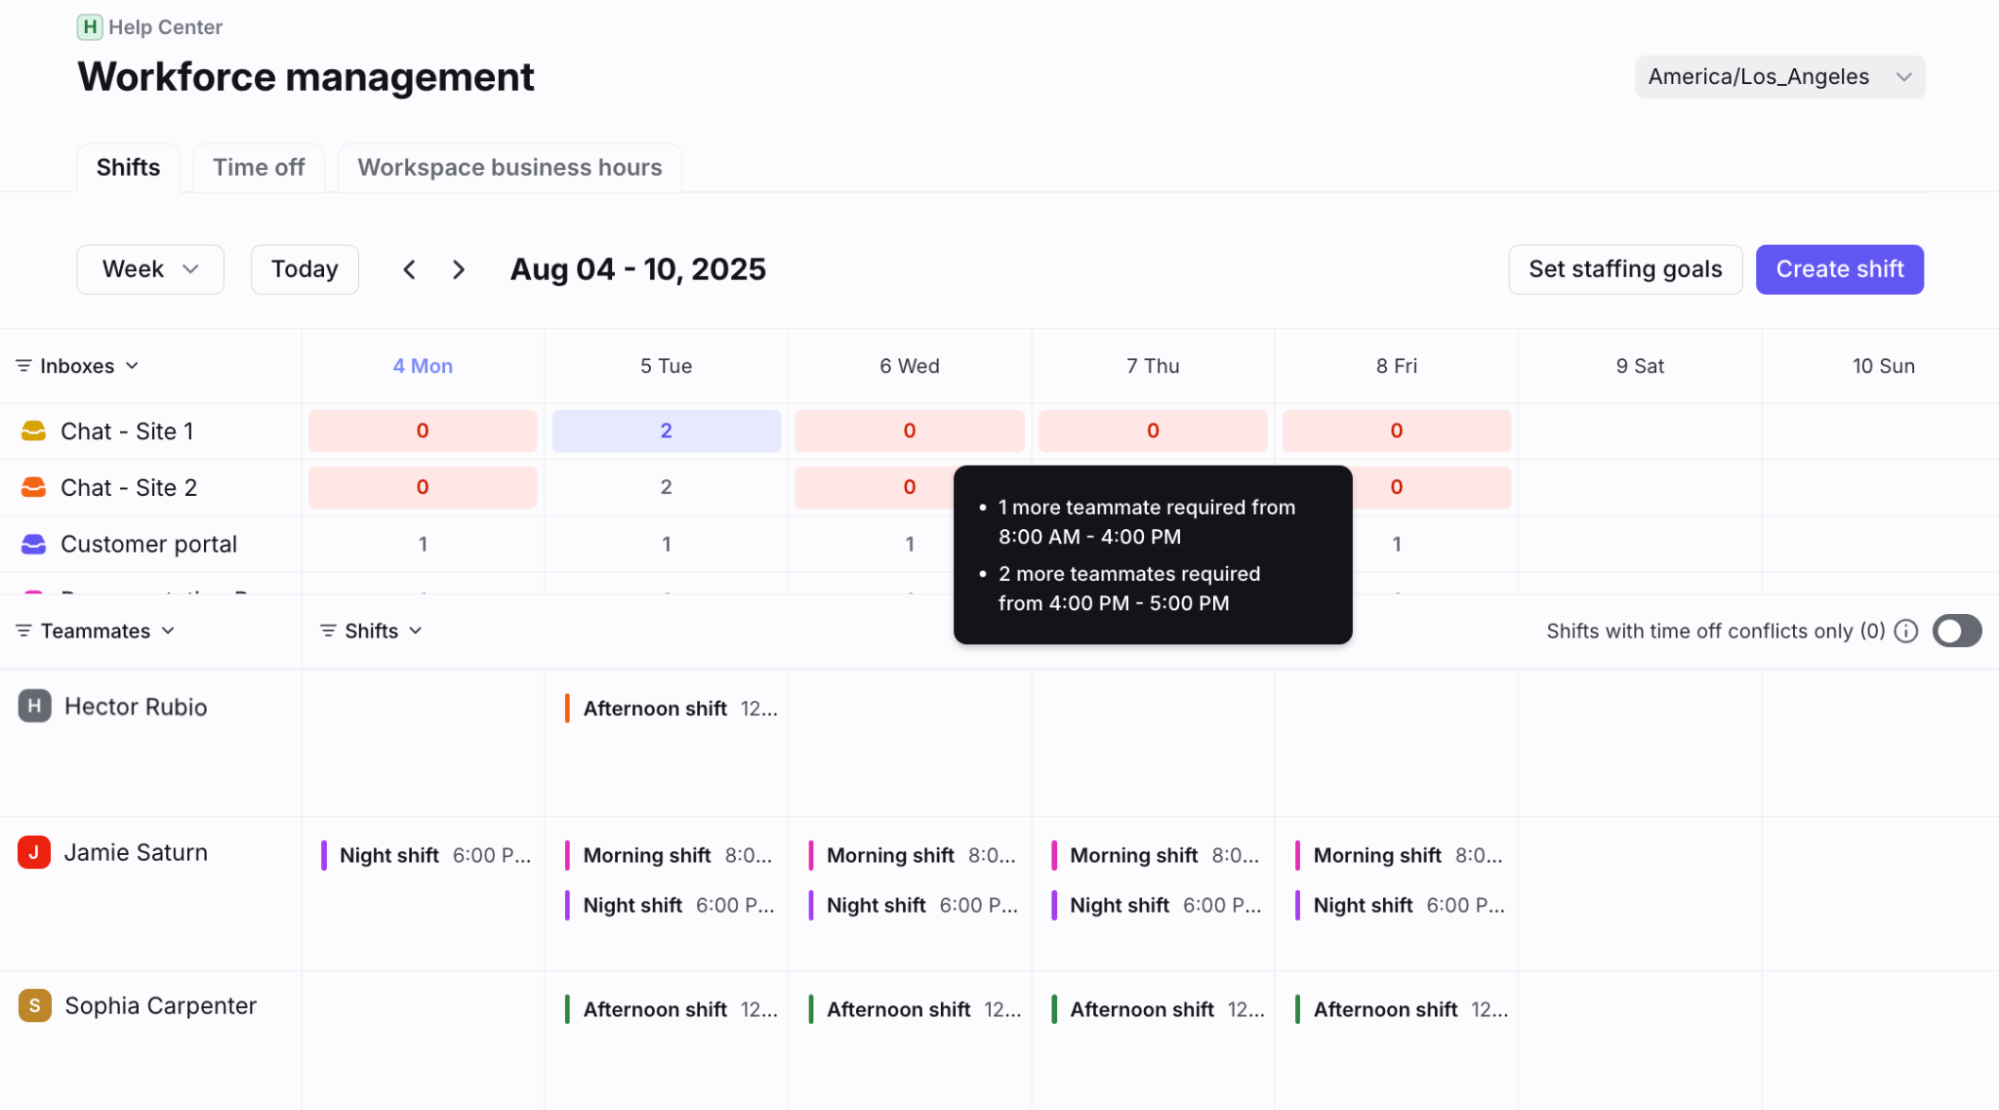
In the Week view, you’ll see the number of teammates for the lowest staffed shift for that inbox. Hover over any number to see additional information.
In the example below, any day with a “0” indicates there is at least one period where there are 0 required teammates scheduled.
Step 6
Add or edit shifts to ensure your inboxes have the required coverage. Your timeline view will update with any changes.
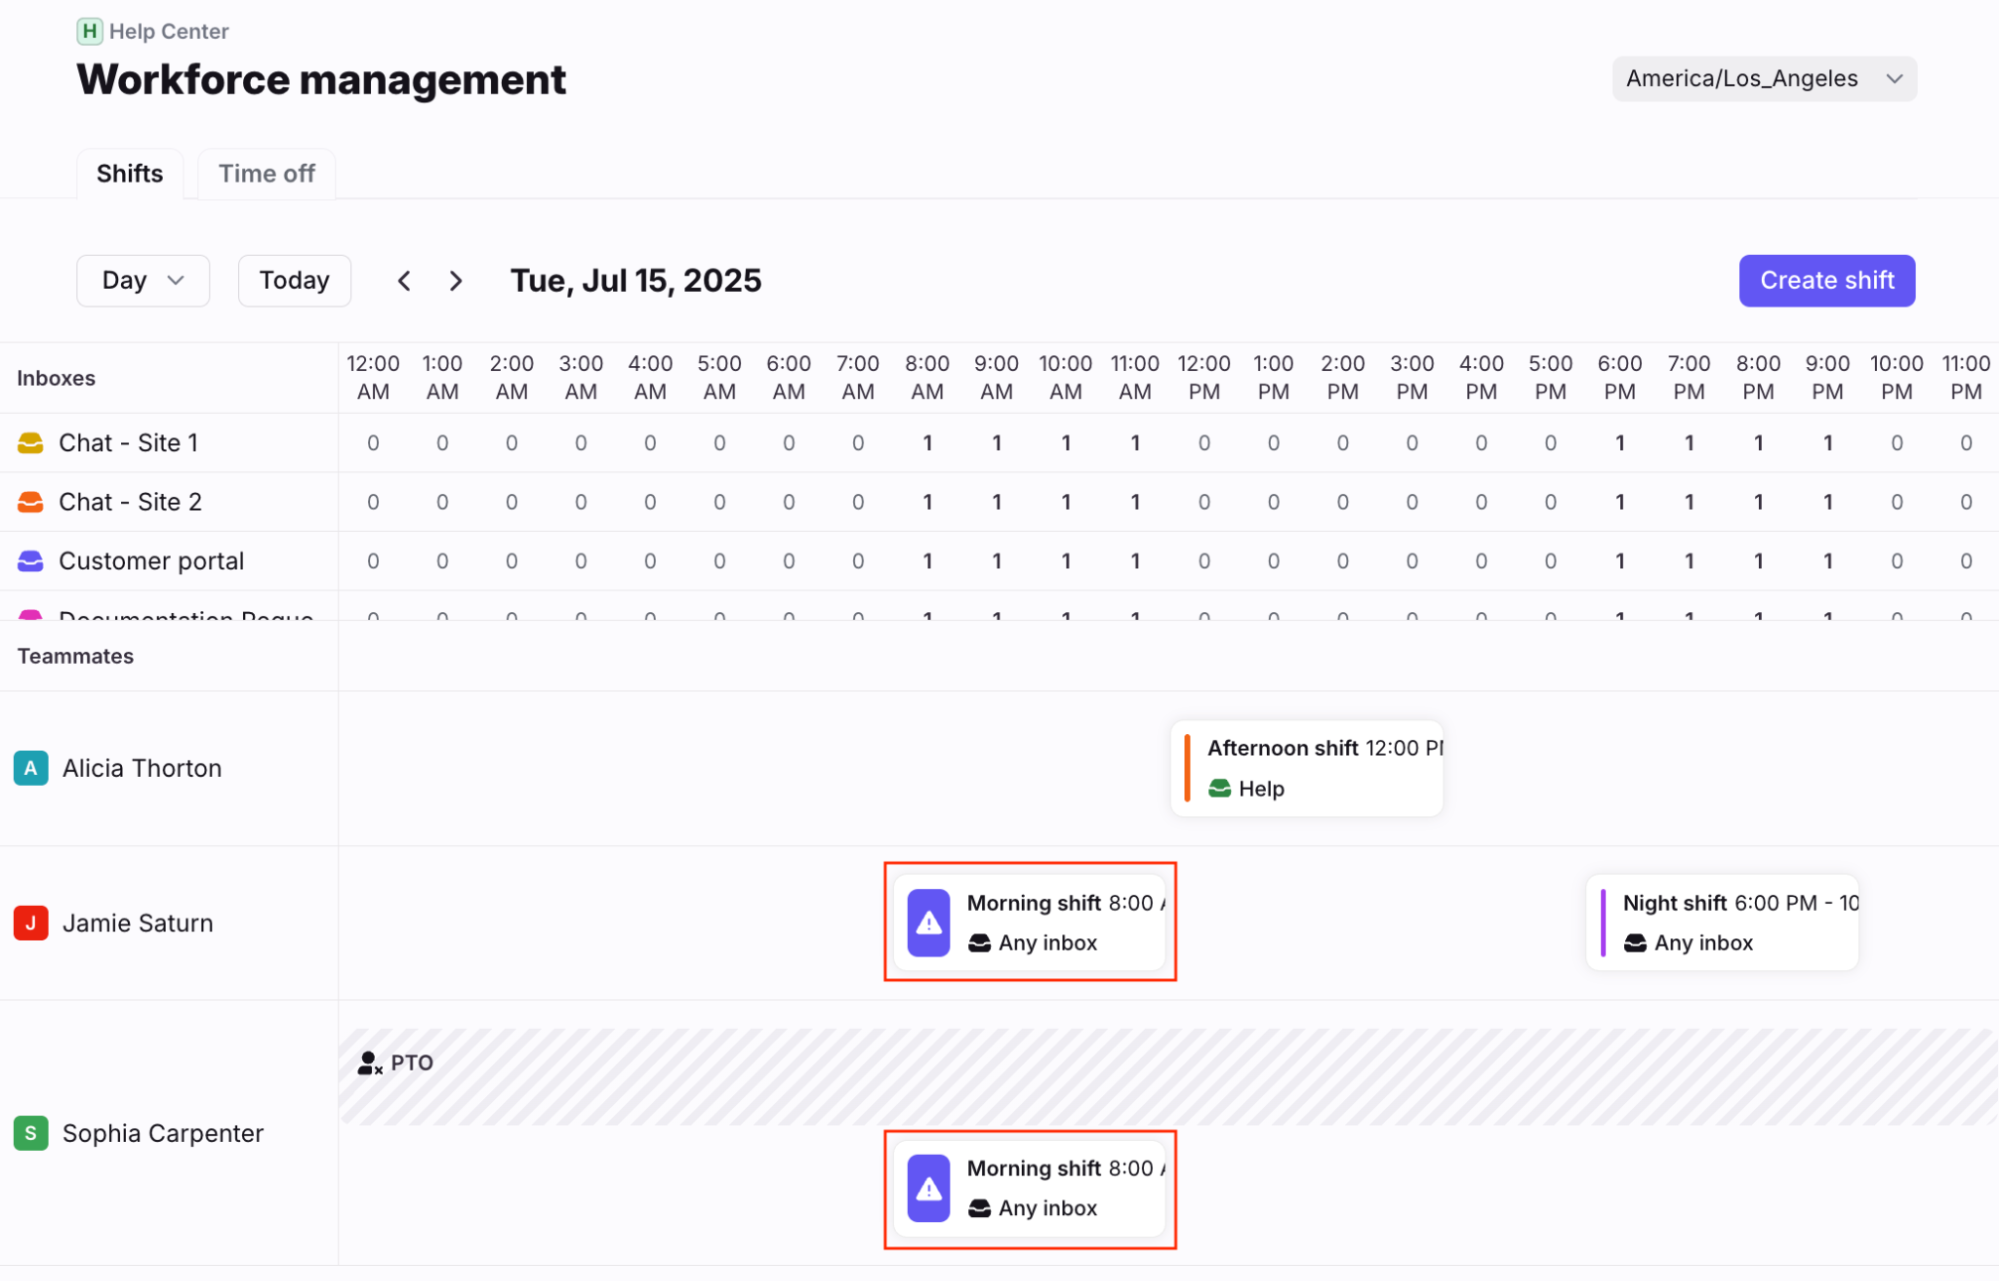
Managing coverage gaps
In your timeline view, any shifts with coverage gaps are indicated with an ⚠️ exclamation mark icon. You can edit the shift to ensure your inboxes are fully staffed.
Step 1
Select the shift to open its settings. In this example, there is a coverage gap due to a teammate’s time off.
Step 2
In the Edit shift panel, hover over the teammate you want to swap out, then click the X icon to remove them from the shift.
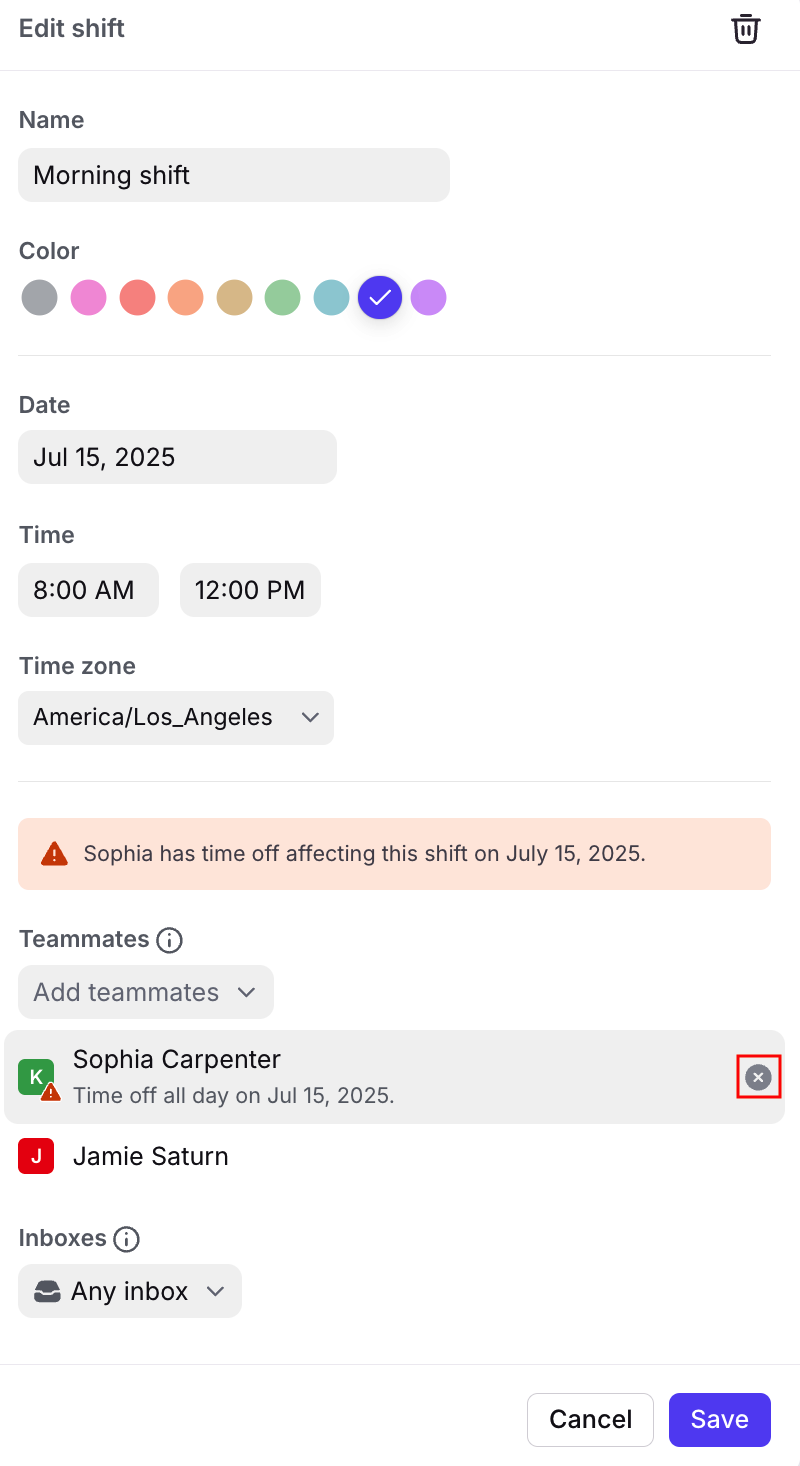
Step 3
Select a new teammate to add to the shift. Click Save.
Step 4
The timeline view will update with your changes.
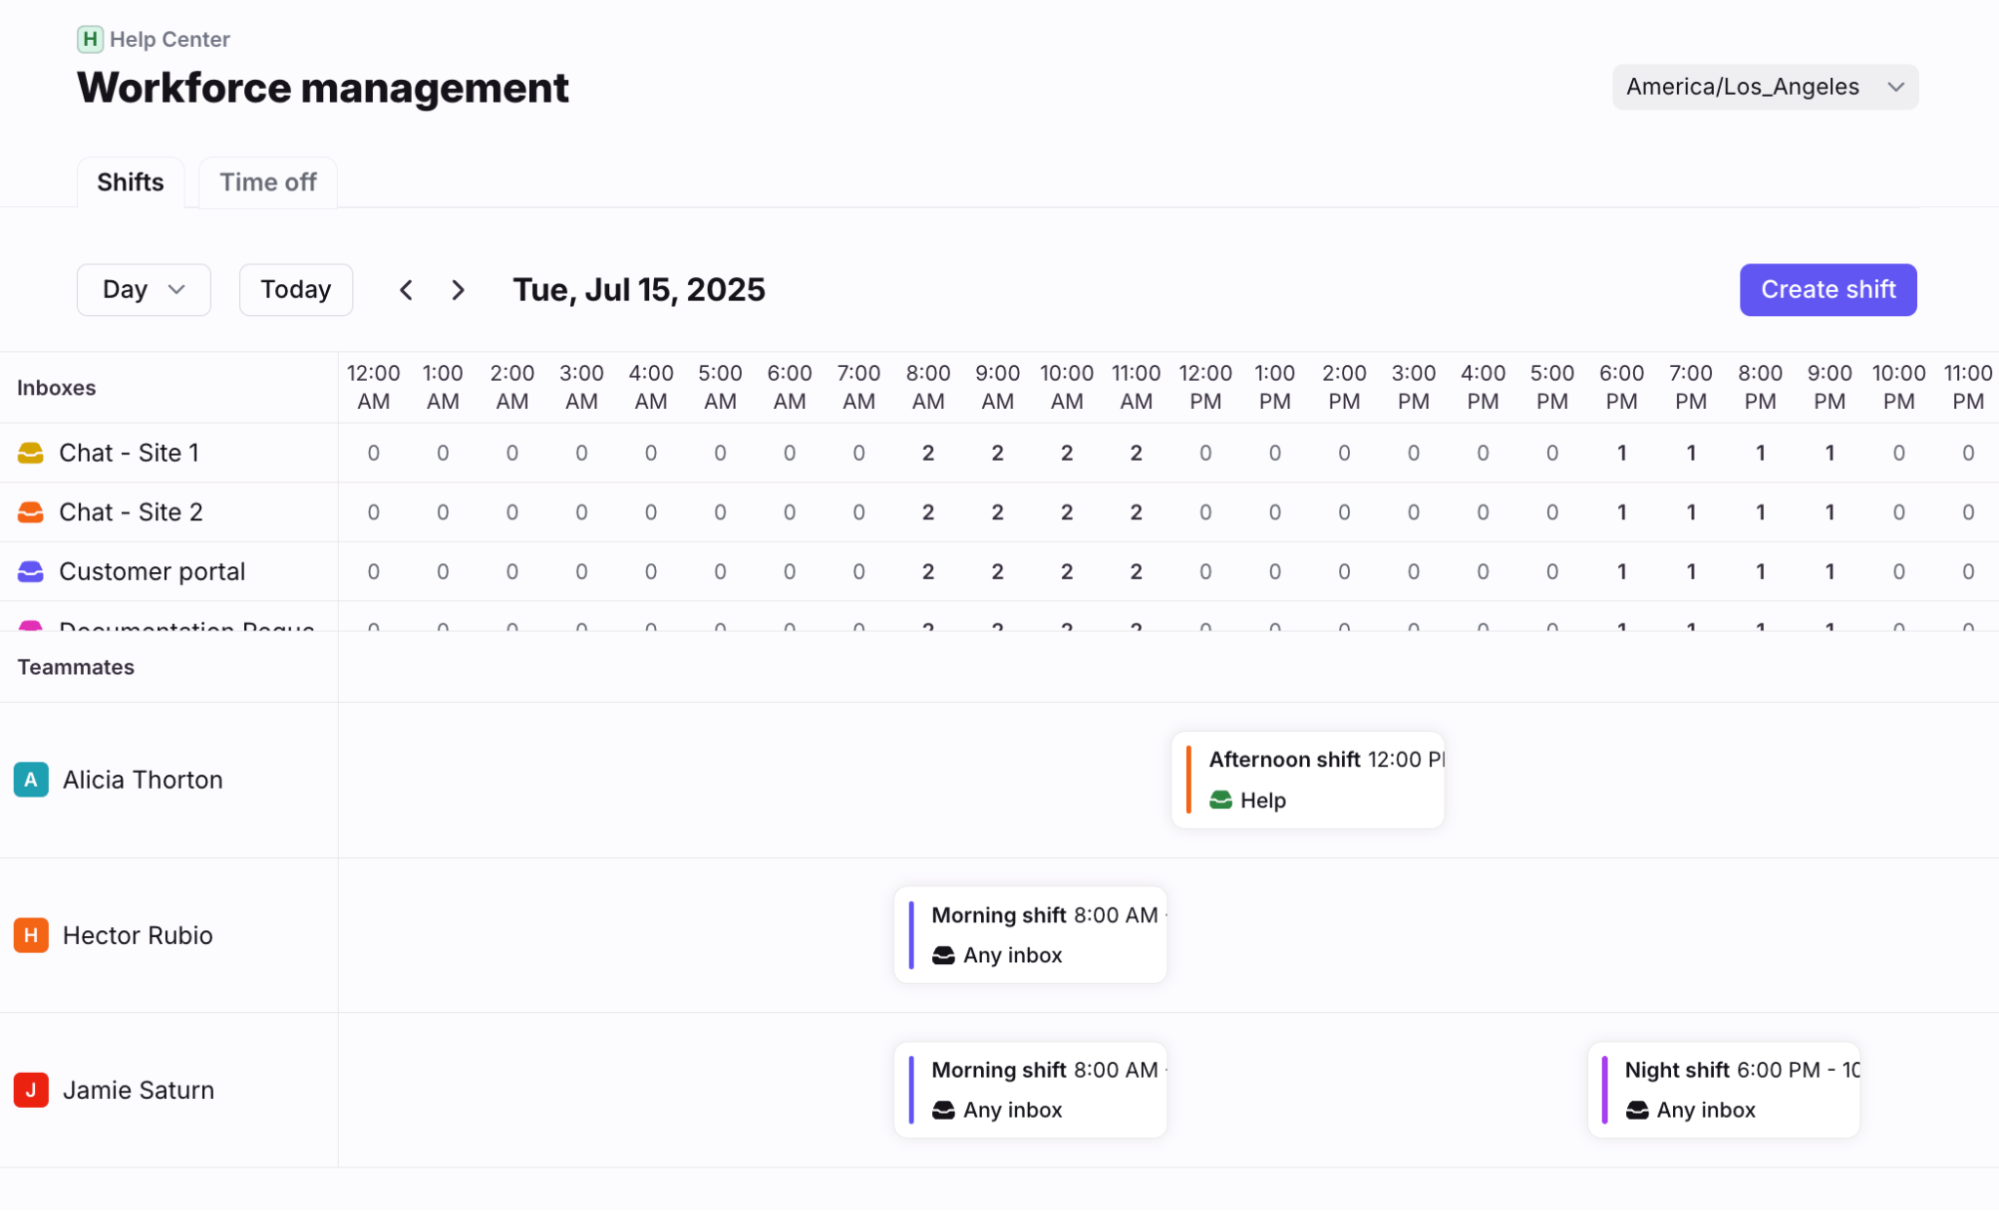
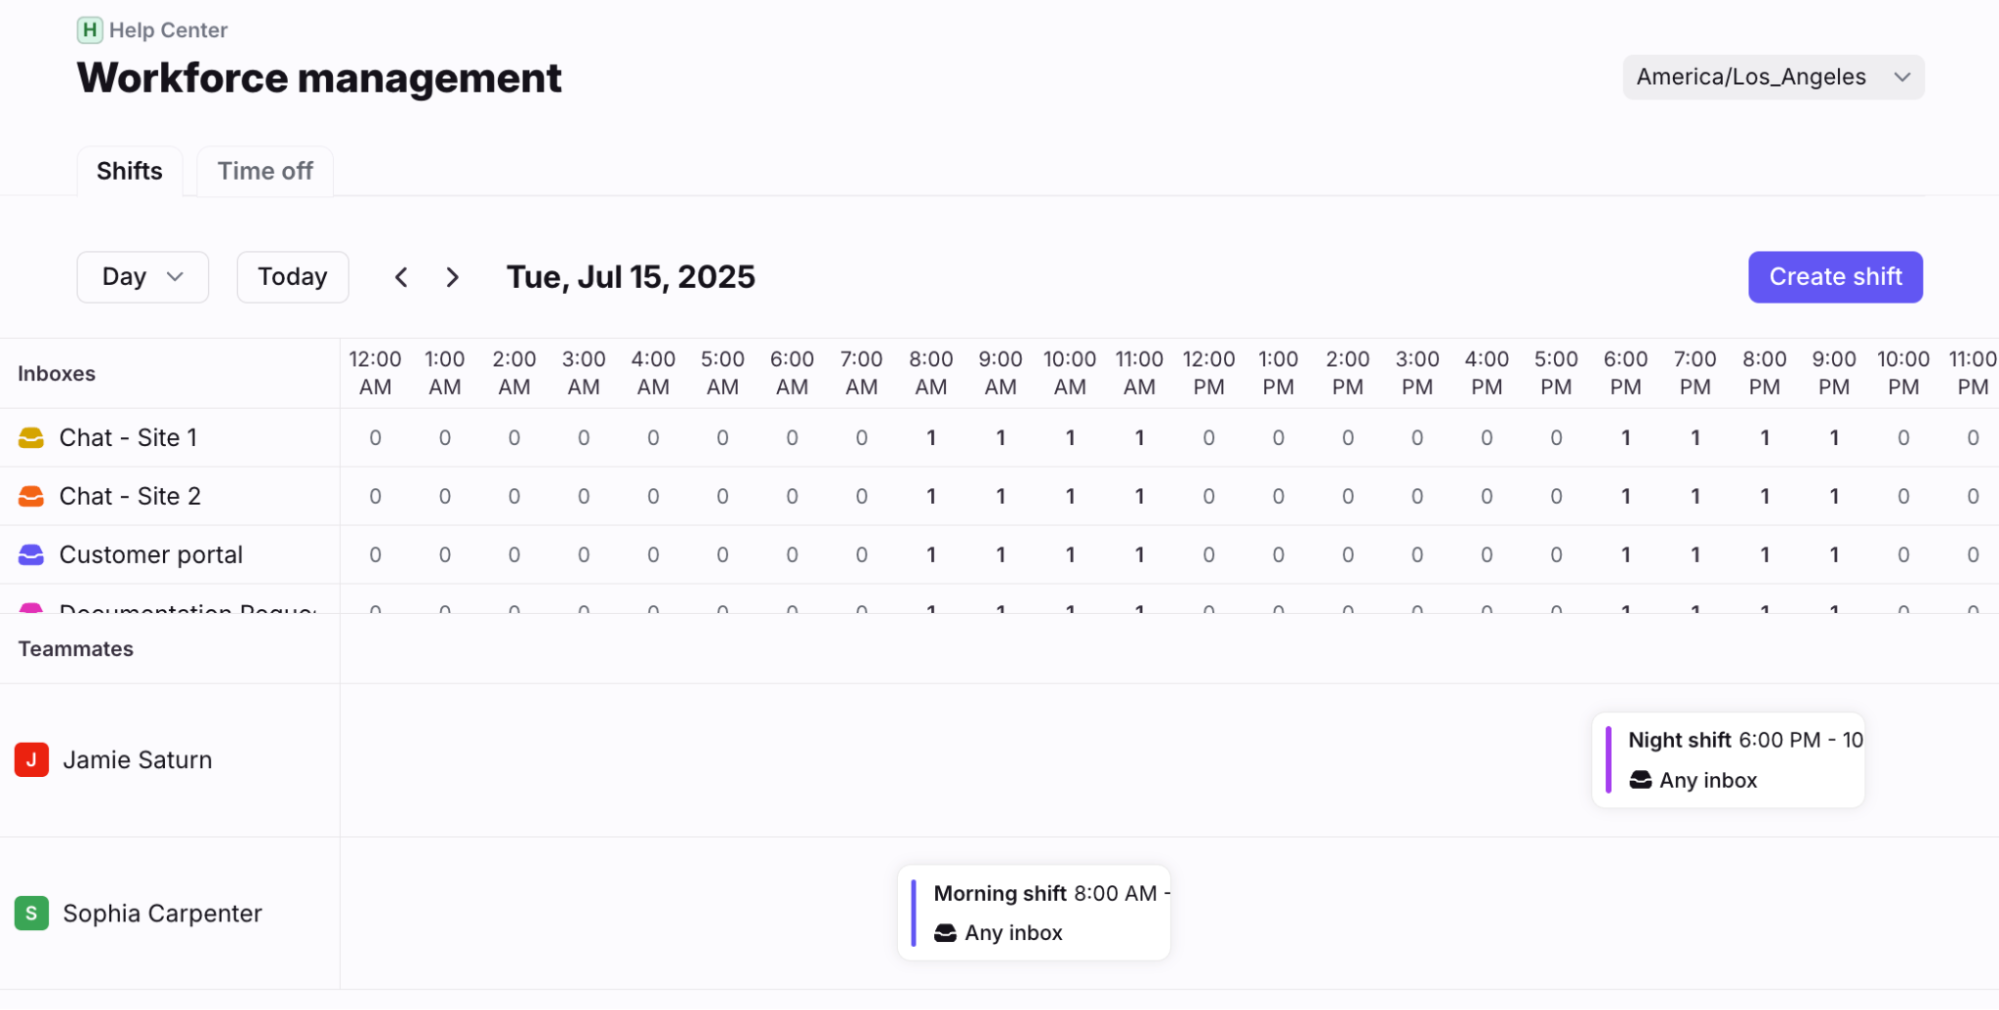
Viewing shifts
Admin view
Admins can view current and upcoming shifts in the timeline view. Choose between day or week view to focus on the current shift, or review upcoming shifts.
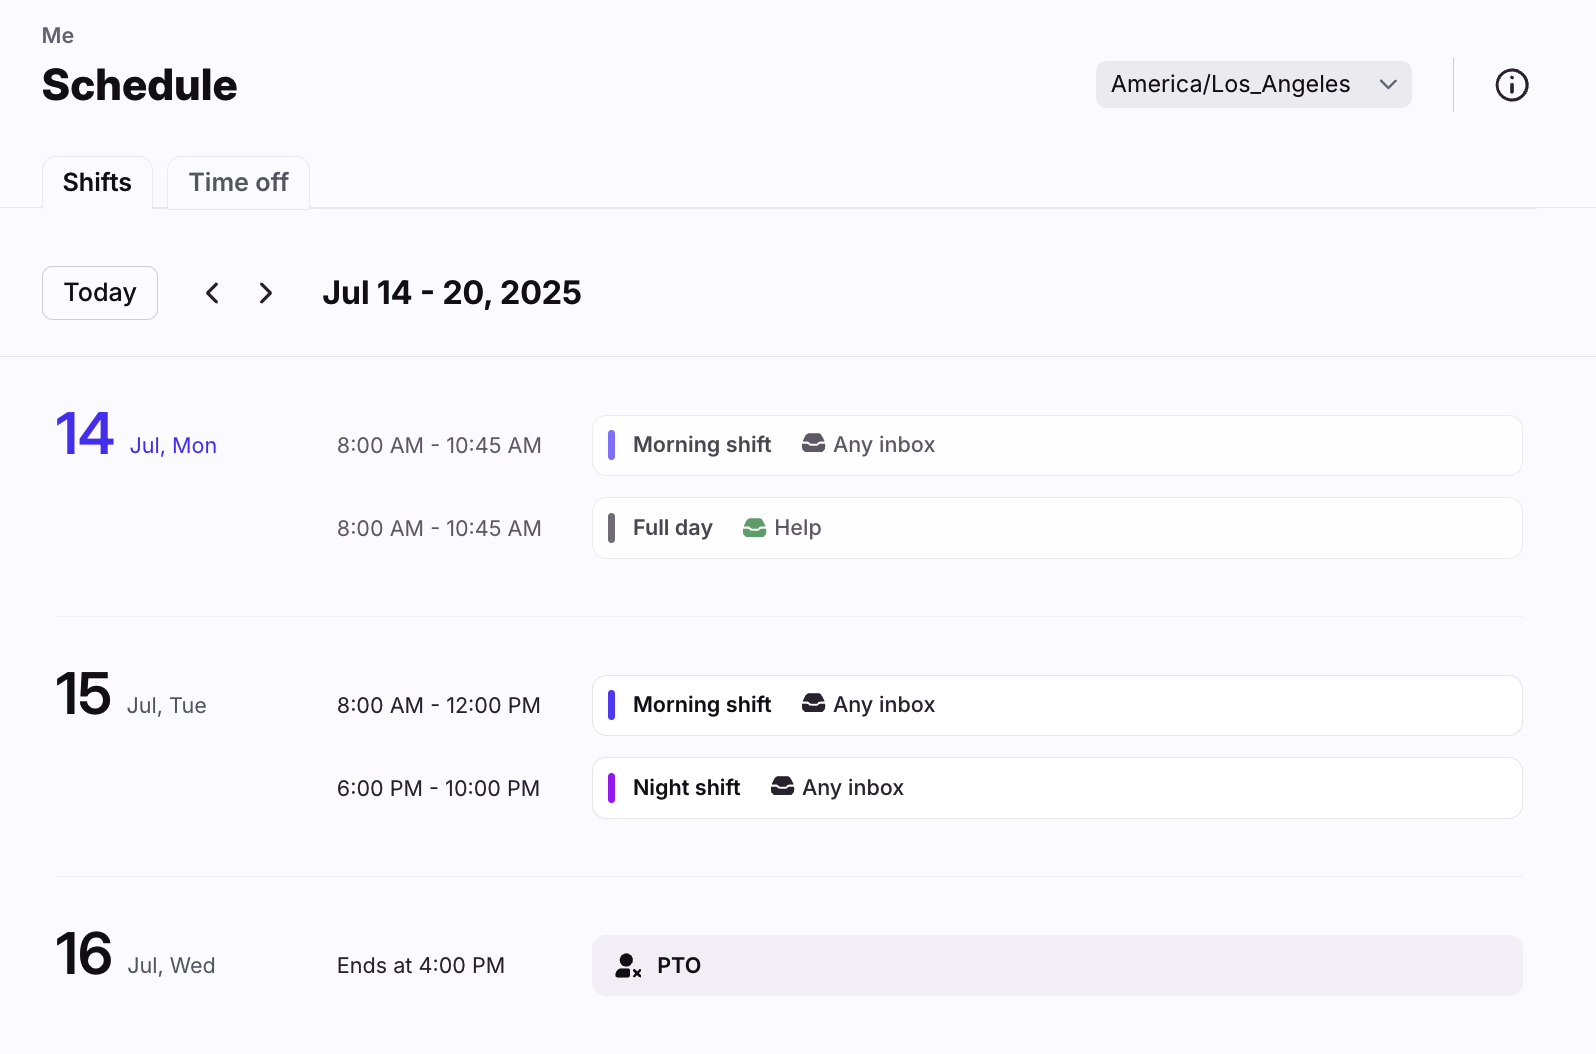
Teammate view
Teammates assigned to shifts via Workforce Management can view them by navigating to their personal settings (select the gear, then Me tab), then selecting Schedule.
In the Shifts tab, they can view past and upcoming shifts, in addition to any time off.
Assignment logic
When Workforce Management (WFM) is enabled, Front uses teammate WFM shift data—alongside their availability and assignment rules—to determine who gets assigned to incoming messages. If no valid shift applies, Front falls back to using the teammate’s global status.
How assignments work
When Workforce Management (WFM) is enabled in Front, it adds an extra layer of precision to how teammates are assigned incoming messages. Instead of relying solely on global status, WFM considers advanced shift schedules and inbox-specific rules to decide who should be assigned work.
As an example, let’s imagine that a company has WFM enabled for its Tier 1 inbox.
Check 1: Inbox eligibility
When an inbound message is received in an inbox, Front first checks whether the inbound is directed to the Tier 1 inbox.
If it’s not, the WFM system doesn’t apply—assignment falls back to the standard method based on global status (Available, Busy, Out of office).
If the inbox is Tier 1, Front evaluates each teammate included in the assignment rule(s) for that inbox. The first filter is availability: the teammate must have their global status set to Available to even be considered. If a teammate is unavailable, they are immediately excluded from assignment.
Check 2: WFM status
Next, Front checks whether WFM is actively enabled for the Tier 1 Inbox.
If it’s not, the teammate’s global status is used as the final determinant.
If WFM is enabled for Tier 1, Front then checks whether the teammate has WFM shifts turned on for any inbox. If they don’t, the system again falls back to global status.
Check 3: WFM shift schedule
If WFM is enabled at the inbox level AND active for the individual teammate, Front looks at the teammate’s WFM shift schedule. At this point, the system checks whether the teammate has an active shift scheduled specifically for Tier 1 at the moment the message arrives. If so, the teammate is marked as available for assignment.
Conversation assignment
Once all teammates have been evaluated, Front pools those who are considered available—whether based on WFM shift coverage or global status fallback—and assigns the conversation using load balancing.
In other words, WFM doesn’t replace assignment logic entirely—it layers in more precision. It ensures that only teammates who are both available and actively scheduled are assigned to inboxes that require specialized staffing, while still preserving flexibility when other assignment logics are in use.
Understanding enabled and active shifts
With Front's new Workforce Management add-on, it's helpful to understand two key terms related to your team's shifts: "Enabled” and "Active."
Enabled shift:
This refers to a shift schedule that you've set up, with a defined start date ("Effective date") and an optional end date ("End date").
For example, if you create a "Morning Shift" from Monday to Friday, effective July 20, 2025, that shift is "enabled" from July 20 onwards.
Active shift:
This refers to the specific time a teammate is actually working within an enabled shift on a given day.
When a shift is "active" for a teammate, Front uses this information to determine their real-time availability for conversation assignments.
For example, if your "Morning Shift" is enabled and set to run from 9:00 AM to 5:00 PM, a teammate assigned to that shift is on an "active" shift during those hours on any given day it runs.
Why this matters
This distinction ensures that while you can plan and configure your team's schedules over long periods (enabled shifts), Front is always using the most up-to-date information for real-time operations, like assigning conversations to available agents (active shifts). This helps you maintain efficient coverage and avoid gaps.
Workforce Management and global statuses
If you used Front’s basic shifts, you might notice a difference in how teammate availability is represented in Workforce Management (WFM) compared to basic shifts.
Understanding “availability”
It’s helpful to revisit what “availability” means in Front. Historically, global status (Available, Busy, Out of office) has served multiple purposes—indicating if someone is present, routable, or simply working. Basic shifts use this status to make teammates active or inactive to manage assignments across all inboxes.
Differences
Basic shifts determine availability for all inboxes: With basic shifts (not Workforce Management), Front only uses the global status to determine if a teammate should have conversations assigned to them.
This makes global status a stand-in for availability across all inboxes at once.
If a teammate’s global status is set to Available, they’ll be assigned conversations from all assignment rules they’re included in.
WFM shifts determine availability for specific inboxes: WFM shifts use both global status and shift data to determine whether a teammate should be considered routable—and does so on a per-inbox basis.
This means a teammate can be on shift in one inbox but not another, depending on their shift configuration.
e.g. If a teammate’s global status is set to Available, they’ll only be assigned conversations from the inboxes with active WFM shift, even if they’re included in assignment rules for multiple inboxes.
This more granular approach enables better coverage management and reflects the actual structure of team responsibilities more precisely. It also allows for more flexibility—for instance, someone can be online (Available) in Front but not currently on shift.
Impacts
For teammates: There’s no change in how conversations are assigned. WFM handles routing based on shift data, not on an automatic global status change.
For managers: Global status is no longer the most reliable way to see shift-based availability.
WFM becomes the new source of truth for understanding who is on shift and available to be routed conversations.
Assuming a teammate did not manually change their global status, if teammate is Available they have at least one active WFM shift. If the teammate is Out of office, they are not in an active WFM shift.
Automatic status changes
Similar to basic shifts, WFM shifts automatically change teammate global statuses at the start and end of a shift.
When all the WFM shifts end for a teammate in all workspaces, their global status will change to Out of office.
When a new shift starts and the user was previously set to Out of office by WFM, their global status will change to Available.
Time off events take precedence over WFM shifts, so a teammate’s status will not change to Available if they are included in a shift during their time off.
If a teammate manually changes their status to Out of office, their status will automatically change to Available when their next shift starts.
Manual status changes
While WFM shifts determine shift-based routing, manual status changes still matter. If a teammate sets themselves to Busy or Out of office, Front will respect that status and exclude them from conversation routing accordingly.
For example:
If a teammate steps away briefly and sets themselves to Busy, they won’t be assigned new conversations during that time.
If a teammate sets themselves Out of office, they’ll be treated as unavailable, even if their shift is technically active. They won’t be assigned any conversations.
Once the teammate’s next shift starts, Front will automatically set their status as Available.
This ensures teammates still have control over their short-term availability while WFM manages the broader shift context.
FAQ
How does this compare to the basic shifts feature?
The Workforce Management add-on replaces the basic shifts feature once it’s enabled.
What happens if I have existing shifts?
If you were previously using basic shifts and enable Workforce Management, the add-on will automatically migrate your existing shifts to the new system to ensure uninterrupted service.
If you later deactivate Workforce Management, any shifts used prior to activating the add-on will appear as disabled and will need to be manually re-enabled, as shown below.
Can I edit past shifts?
No. You can only edit current or future shifts.
Can I ignore teammate statuses when assigning conversations?
Yes. Toggle on the inbox setting Keep assignments when teammate is out of office or busy to ignore teammate availability statuses when assigning conversations. See this article to learn more.
Can I integrate external calendars?
Not at this time. Shifts will only use Front’s native time off feature to determine teammate availability.
Can non-admins adjust their shifts?
No. Non-admins assigned to shifts cannot modify their own shifts.
Is Workforce Management compatible with analytics?
Yes. Workforce Management (WFM) integrates with Front Analytics for metrics that rely on shift data. Here are the metrics that will take into account WFM shifts:
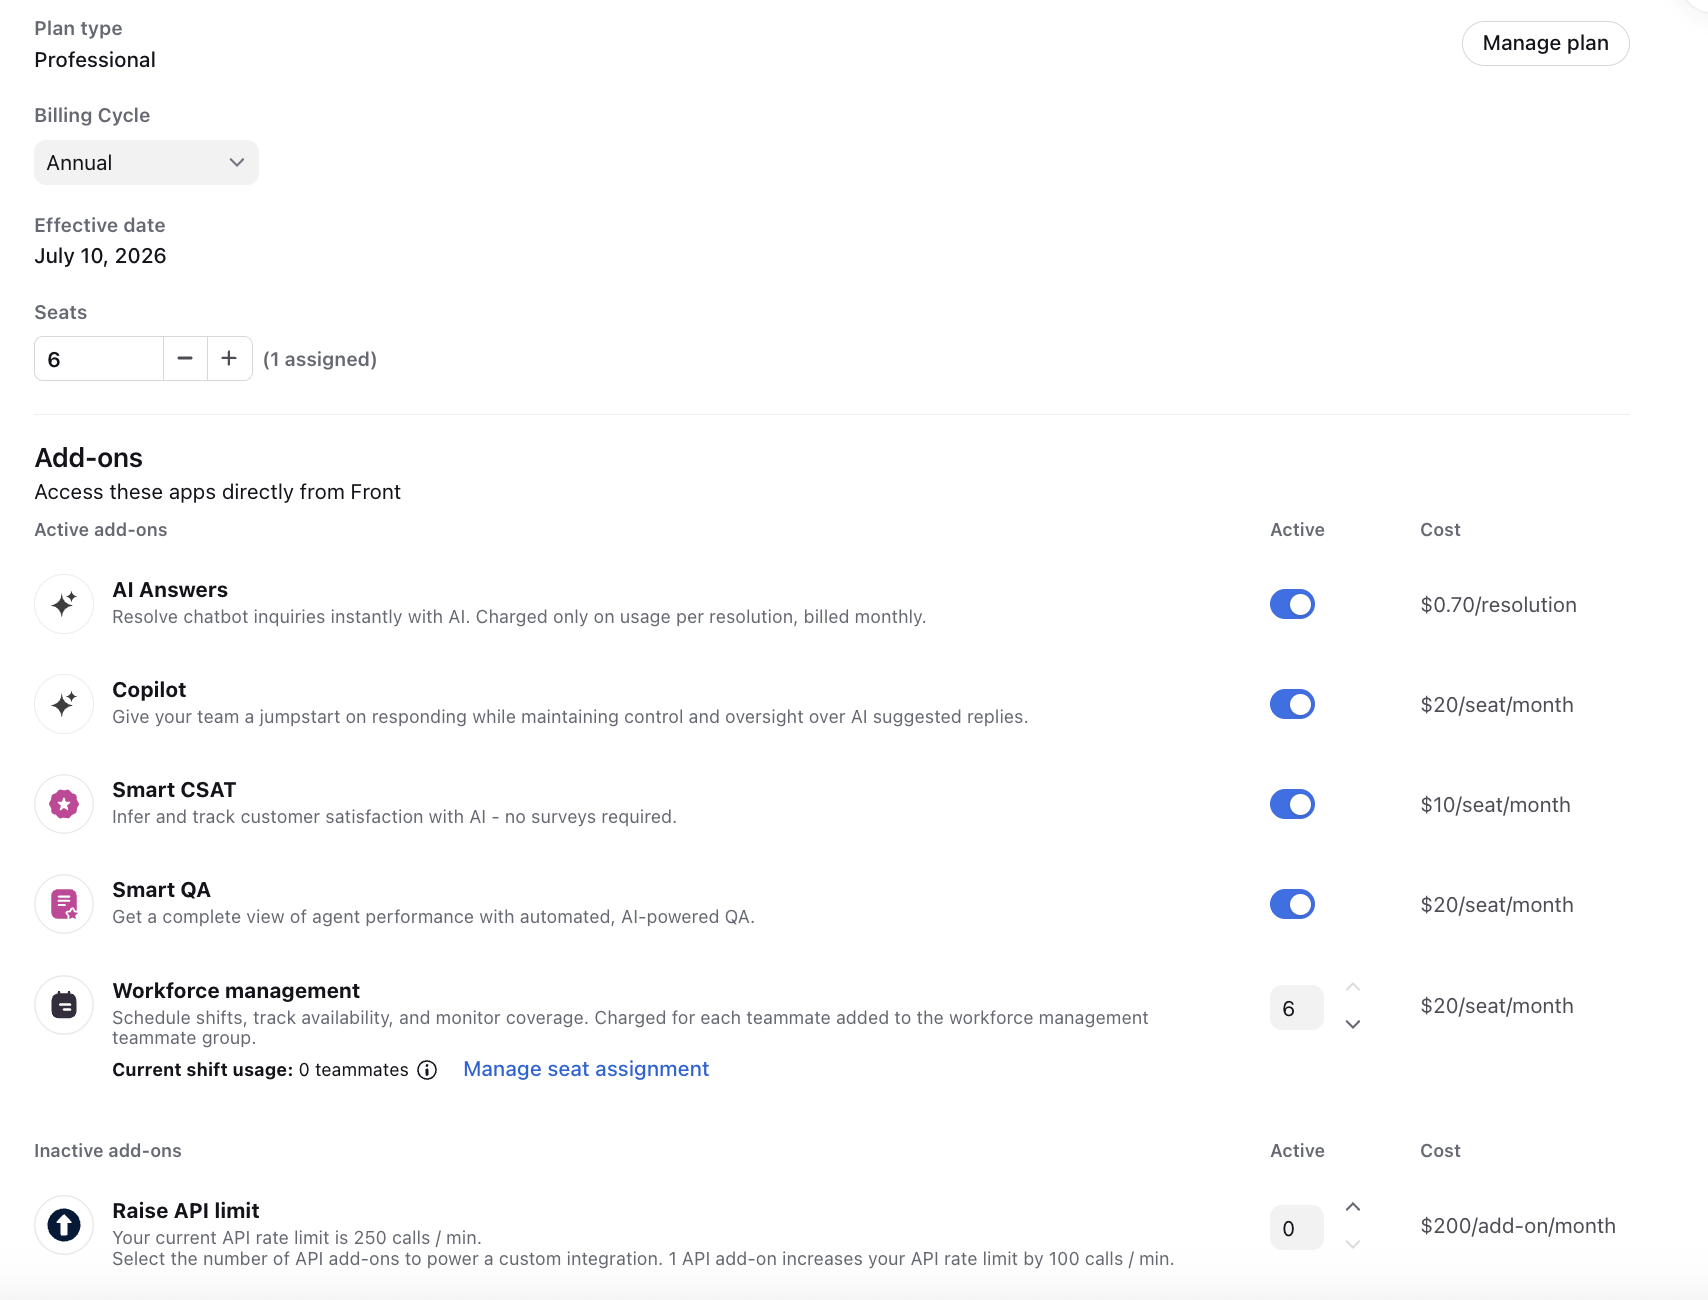
Pricing
The Workforce Management add-on is $20/seat/month and added to your invoice based on your billing cycle, available to the following plans:
Latest plans: Starter, Professional, Enterprise
Legacy plans: Growth, Scale
Billing information
To purchase the Workforce Management add-on, navigate to your billing settings page to activate it.
You can purchase the add-on for a subset of users. Each teammate that needs to be assigned a shift must be included in the add-on purchase and be added to the Workforce Management teammate group. Admins/managers creating the shifts do not need to be included in the add-on purchase.
The add-on will remain on your subscription and will auto-renew unless updated within the Upcoming plan at renewal tab in your billing settings. To learn more about plan changes related to add-ons, see this article.
Start a free trial
To try the Workforce Management add-on for free, click Start free trial in the Workforce management tab in the Schedule page. This will start a 30-day trial.