
Views
Overview
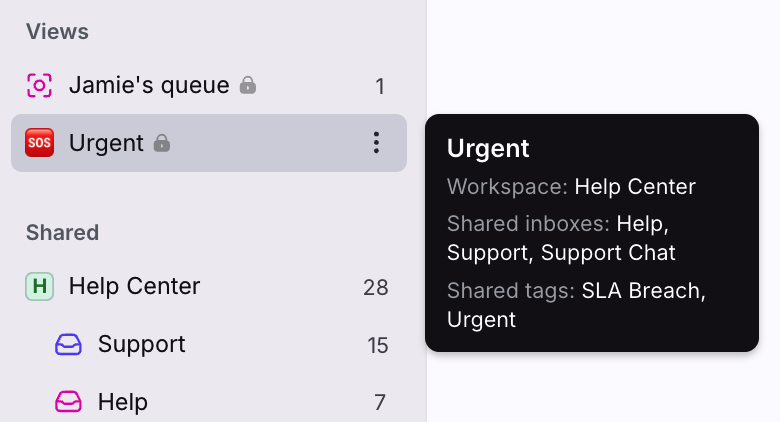
Views create a tailored work queue in users’ sidebars, making it easy to track and manage high-priority, categorized messages. They can be set up at a private or workspace level by saving a refined set of criteria that’s customized across specific inboxes, tags, and assignees.
This is most helpful when users need to track a collection of important conversations that meet specific criteria. For example, if it’s part of a user’s daily workflow to handle conversations with all tags pertaining to overdue time goals for a certain set of accounts, they can create a view to see an aggregate of all “Overdue” tags across multiple shared inboxes.
Additionally, views can be used for their message counters, so that no conversation goes unanswered, or if managers want to track the workload of their reports.
This is the new version of our legacy views feature.
When to use views
Creating custom work queues
You can use views to focus on conversations in specific shared inboxes and tags. Examples:
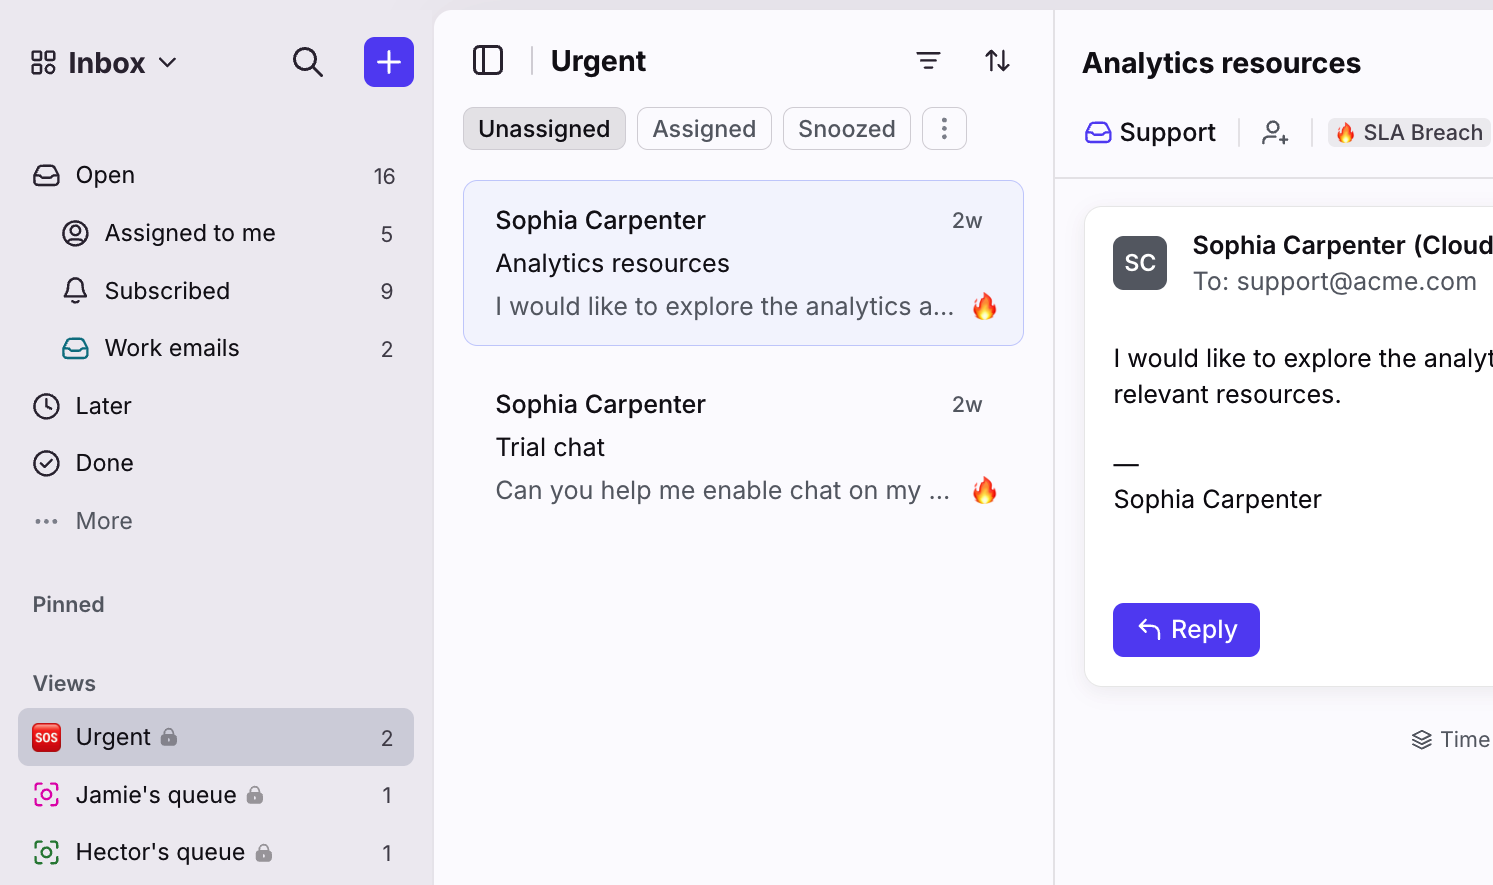
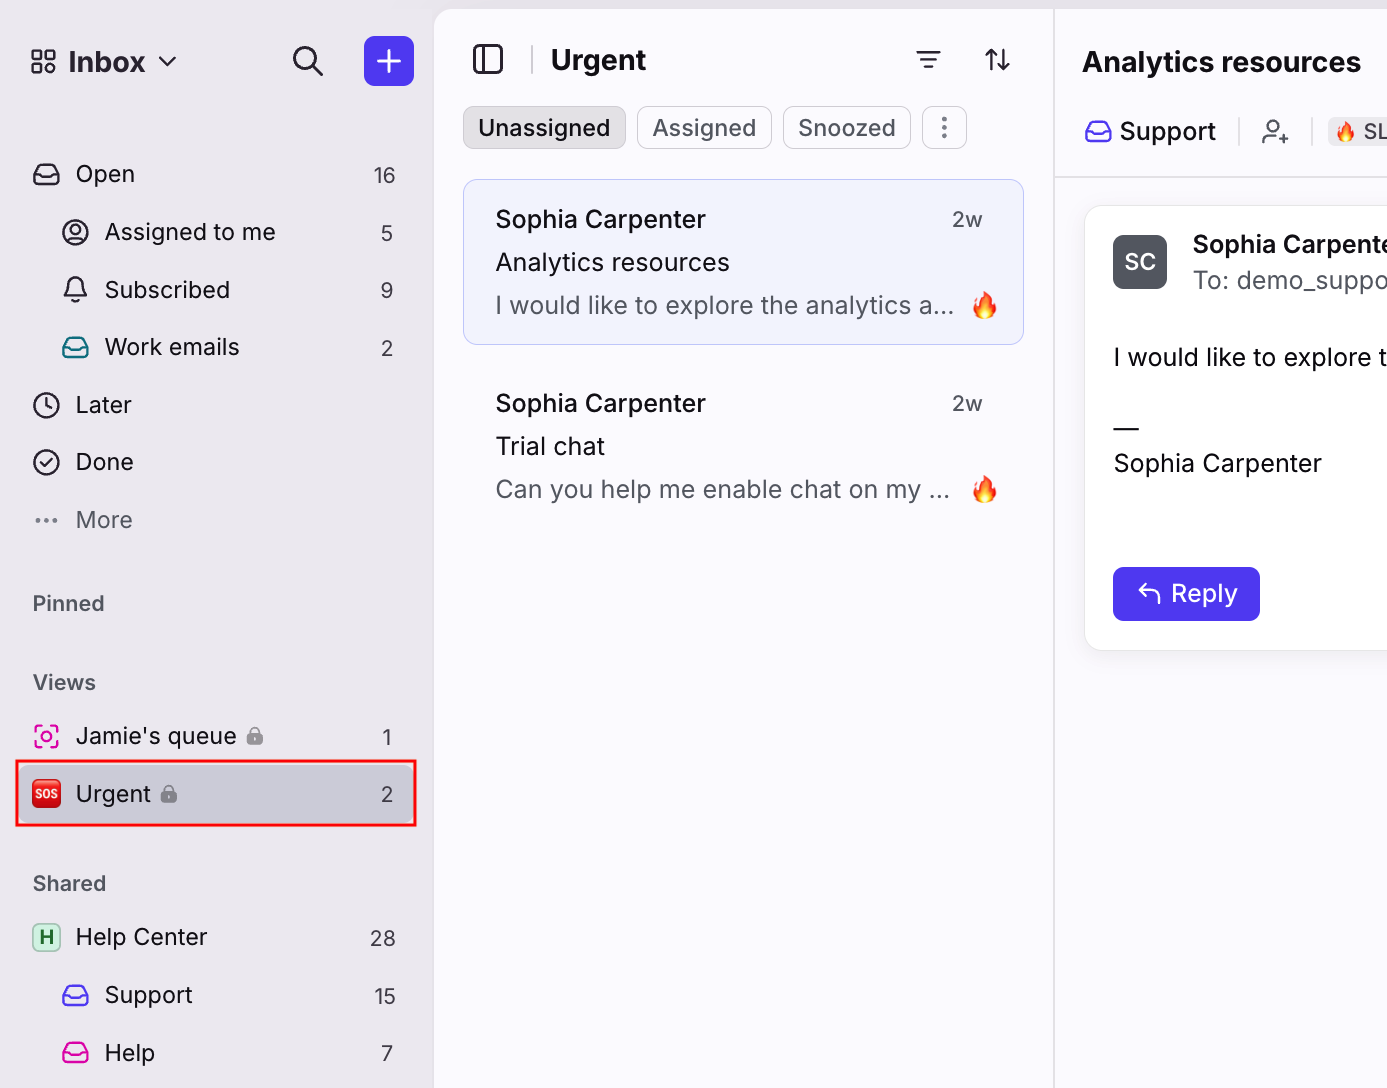
Focus on one topic at a time, by selecting one tag and multiple inboxes. E.g. Select the Urgent tag and the Tier 1 and Tier 2 inboxes.
Aggregate high-priority conversations across multiple sources, by selecting multiple inboxes and tags. E.g. Select 3 inboxes and 5 critical tags like Overdue time goal, At risk time goal, Urgent, Angry customer, and Escalation.
Monitoring team workloads
As a manager, you can use views to monitor a team member’s or team’s workload. Examples:
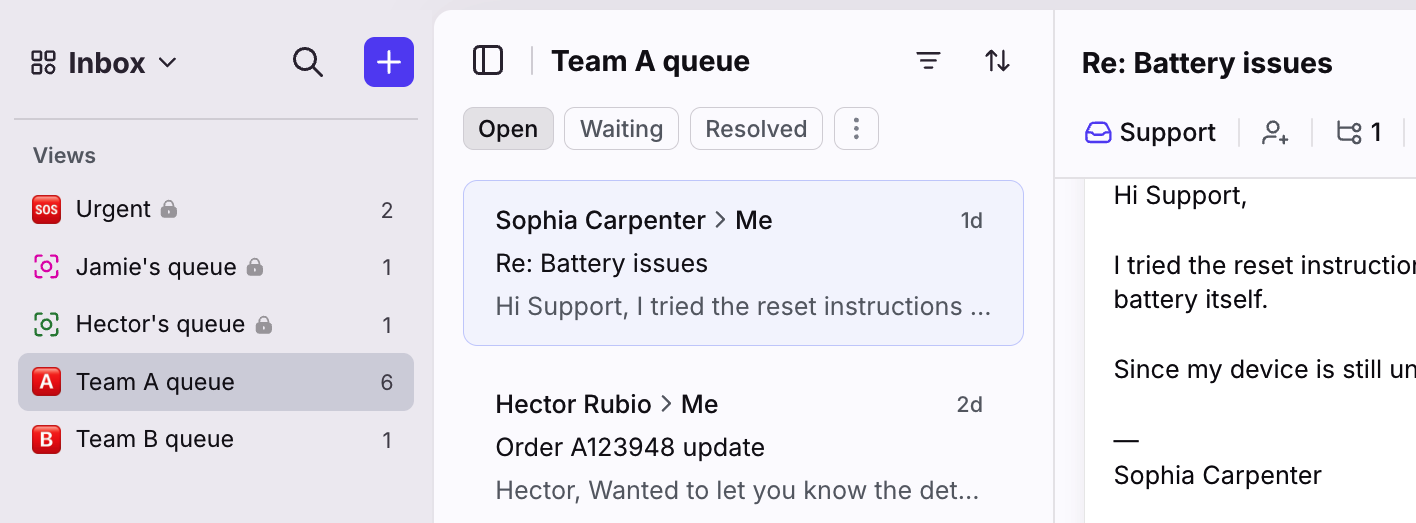
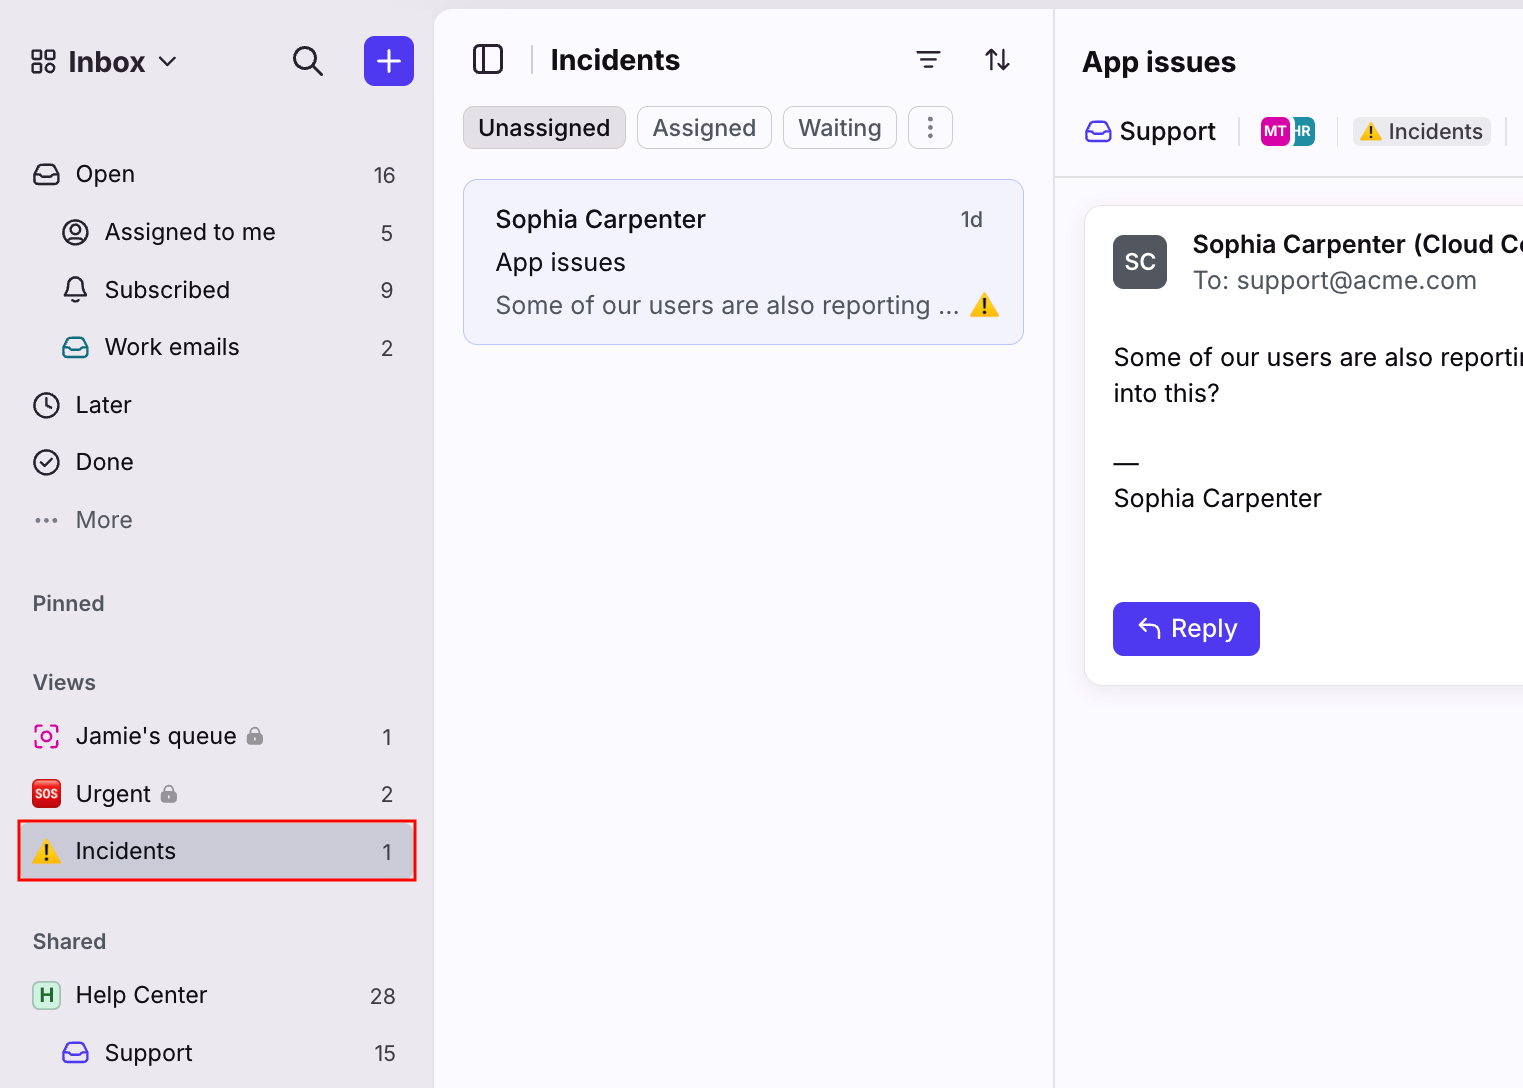
View conversations assigned to specific teammates, by creating a view per teammate. E.g. Jamie’s queue, Hector’s queue.
View conversations assigned amongst a team, by creating a view with multiple teammates selected. E.g. Team A queue, Team B queue.
Prerequisites
Private views: None
Shared views: You must have the Shared inboxes - create / edit / delete / manage access permission to create shared views. By default, workspace admins have this permission.
Private views
Creating private views
Step 1
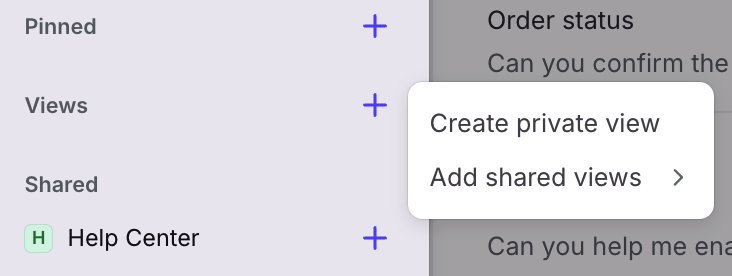
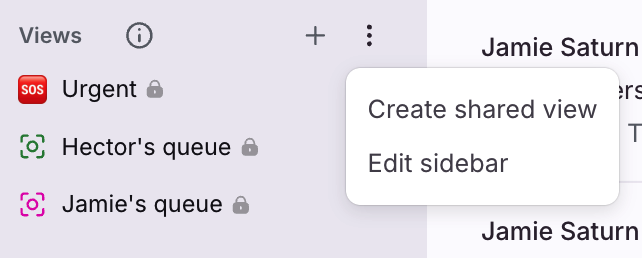
Option 1: Hover over the Views section in your sidebar. Click the three-dot icon, then click the plus icon (+).

Option 2: If you don't have any views added to your sidebar, hover over any section in your sidebar, click the three-dot menu, then select Edit sidebar. In the edit sidebar menu, click the plus icon (+), then select Create private view.
Step 2
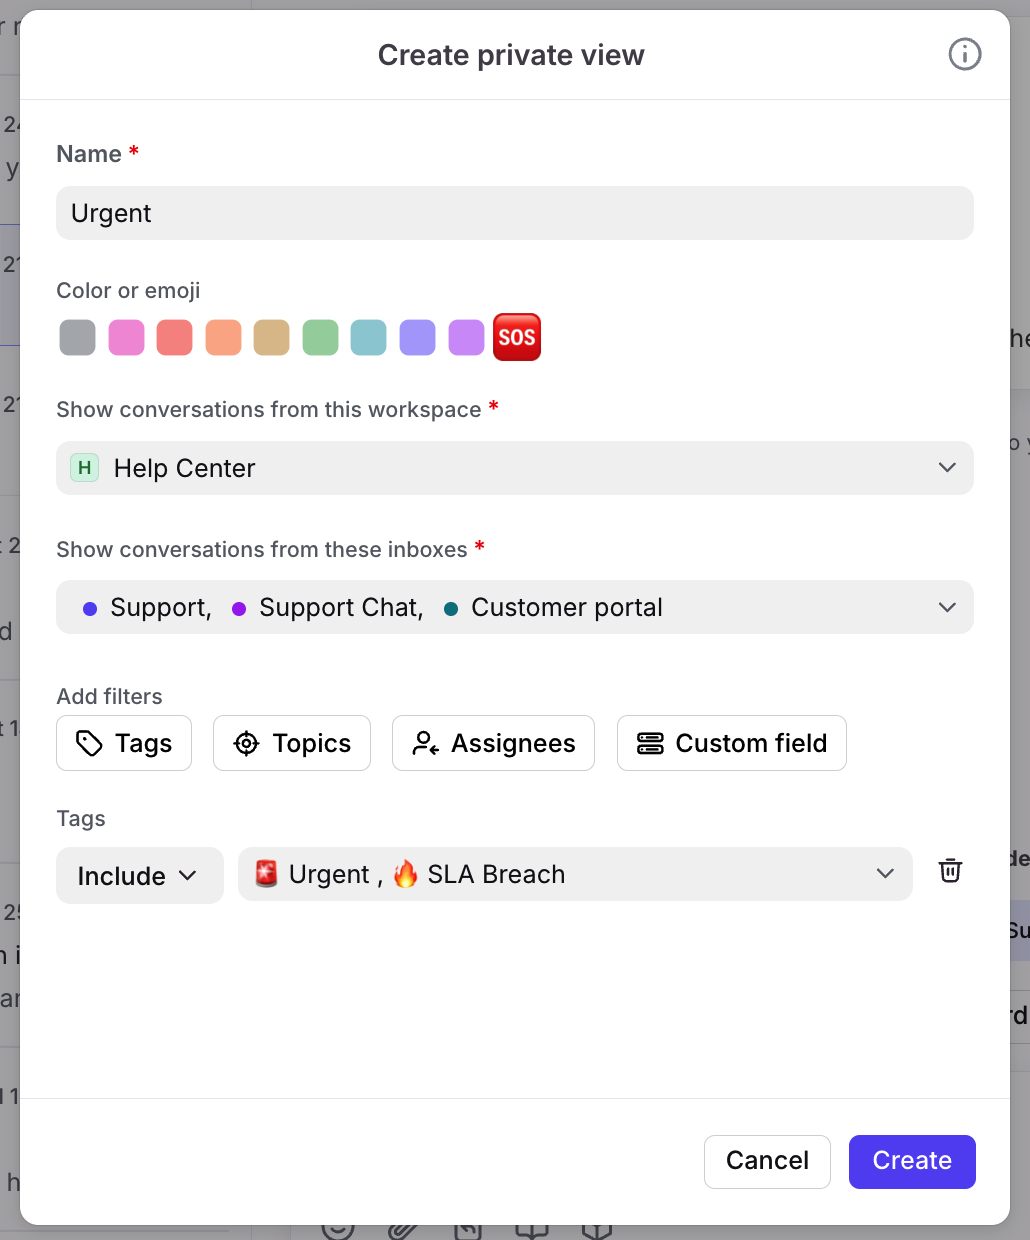
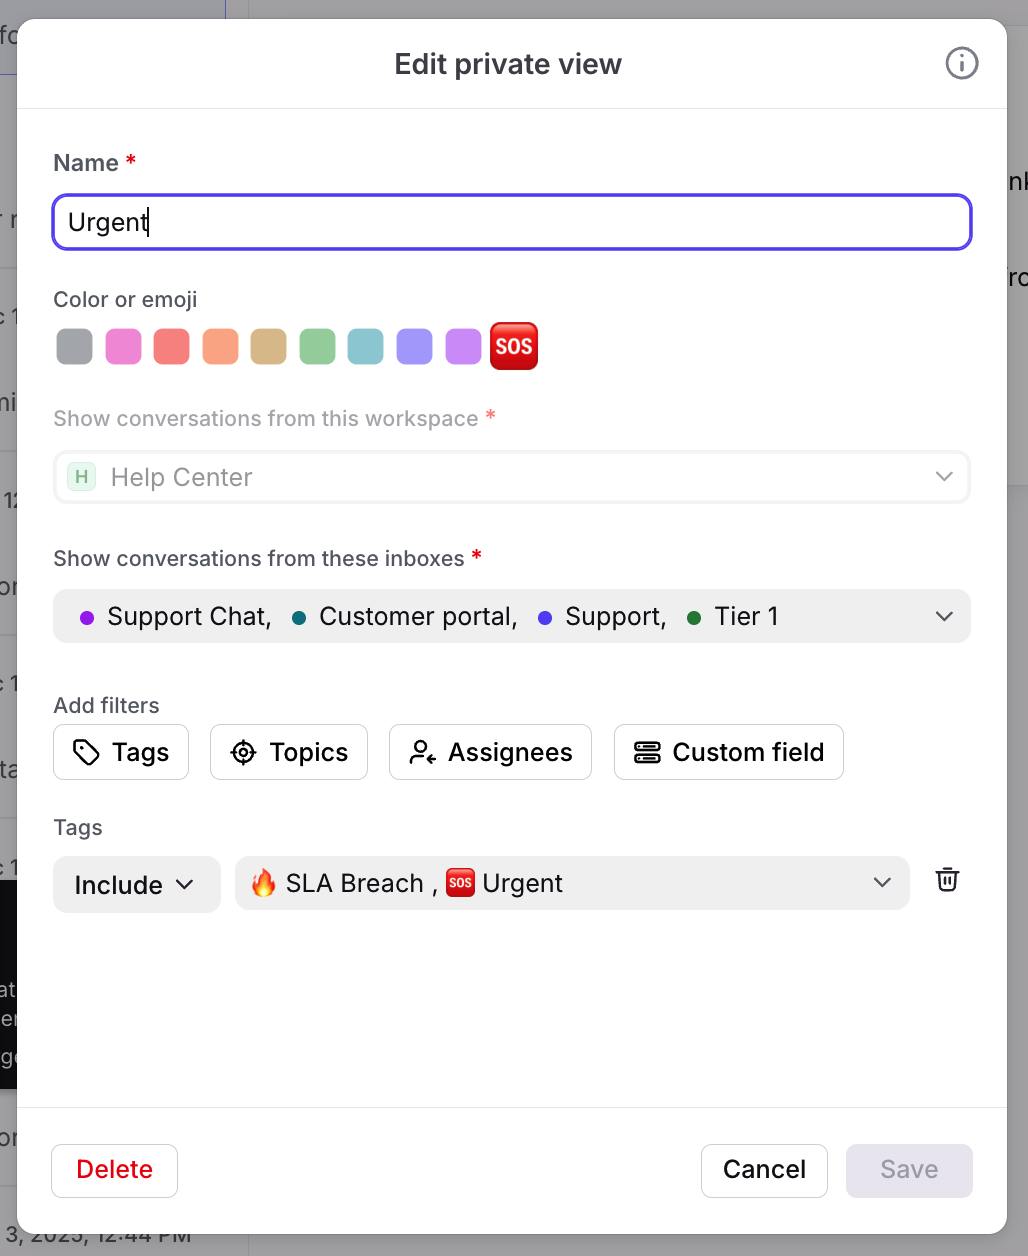
A pop-up will appear. Fill in the following fields:
Name: Enter the name of the view, which displays in the sidebar.
Color or emoji: Select a color or emoji, which displays in the sidebar.
Workspace: Select the workspace where the conversations are located. Only one workspace can be selected per view.
Inboxes: Select shared inboxes to focus on.
Tags (optional): Select shared tags focus on OR tags to exclude from the view.
Topics (optional): Select Topics to focus on OR Topics to exclude from the view.
Assignees (optional): Select assignees to focus on OR assignees to exclude from the view.
Custom fields (optional): Select conversation custom fields to focus on.
Step 3
Click Create to finish creating your view. The view will be added to your sidebar.
You can also hover over the view to quickly see its settings.
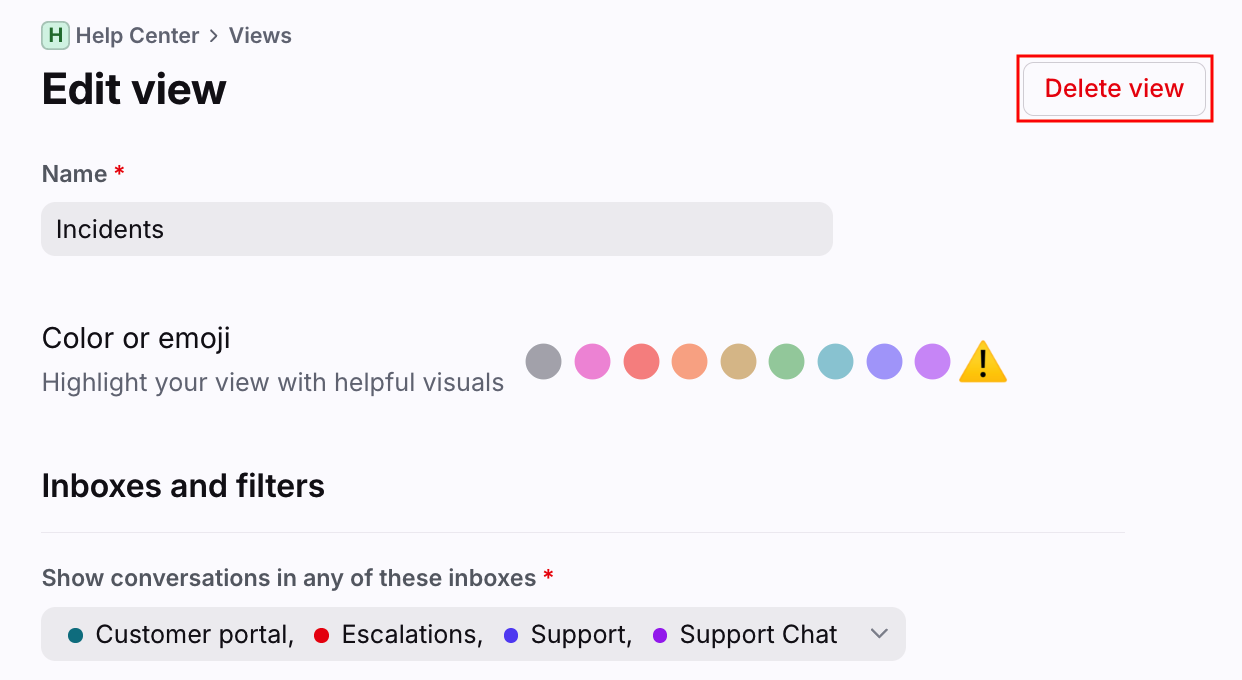
Editing or deleting private views
Step 1
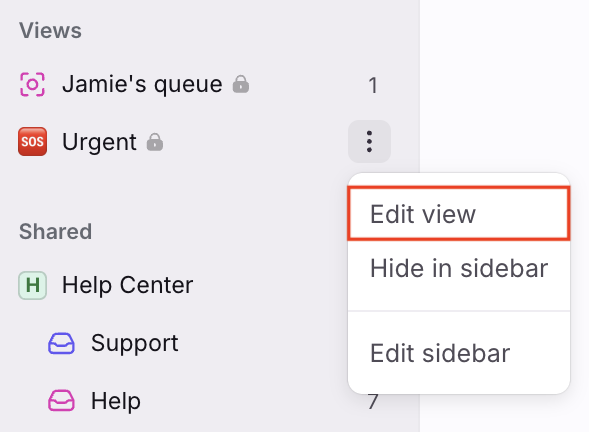
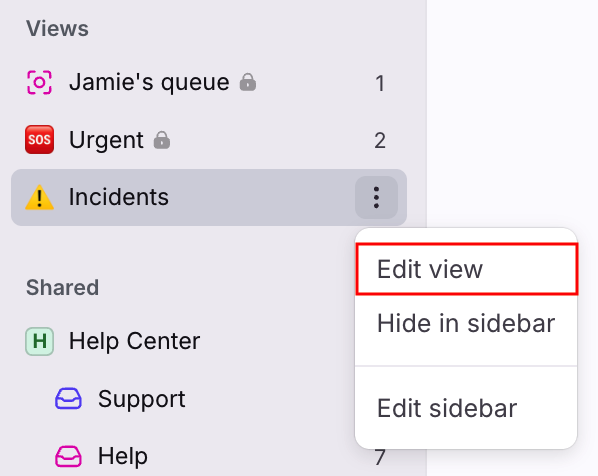
Hover over the view you’d like to manage in your sidebar. Click the three-dot menu, then click Edit view.
Step 2
You can adjust any field except the workspace field. Click Save when finished, or Delete to remove the view.
Shared views
Creating shared views
Step 1
Option 1: Hover over the Views section in your sidebar. Click the three-dot icon, then Create shared view.
Option 2: Click the gear icon and navigate to your workspace settings. Click Views in the left sidebar. Click Create view.
For companies with multiple workspaces, views are set up per workspace.
Step 2
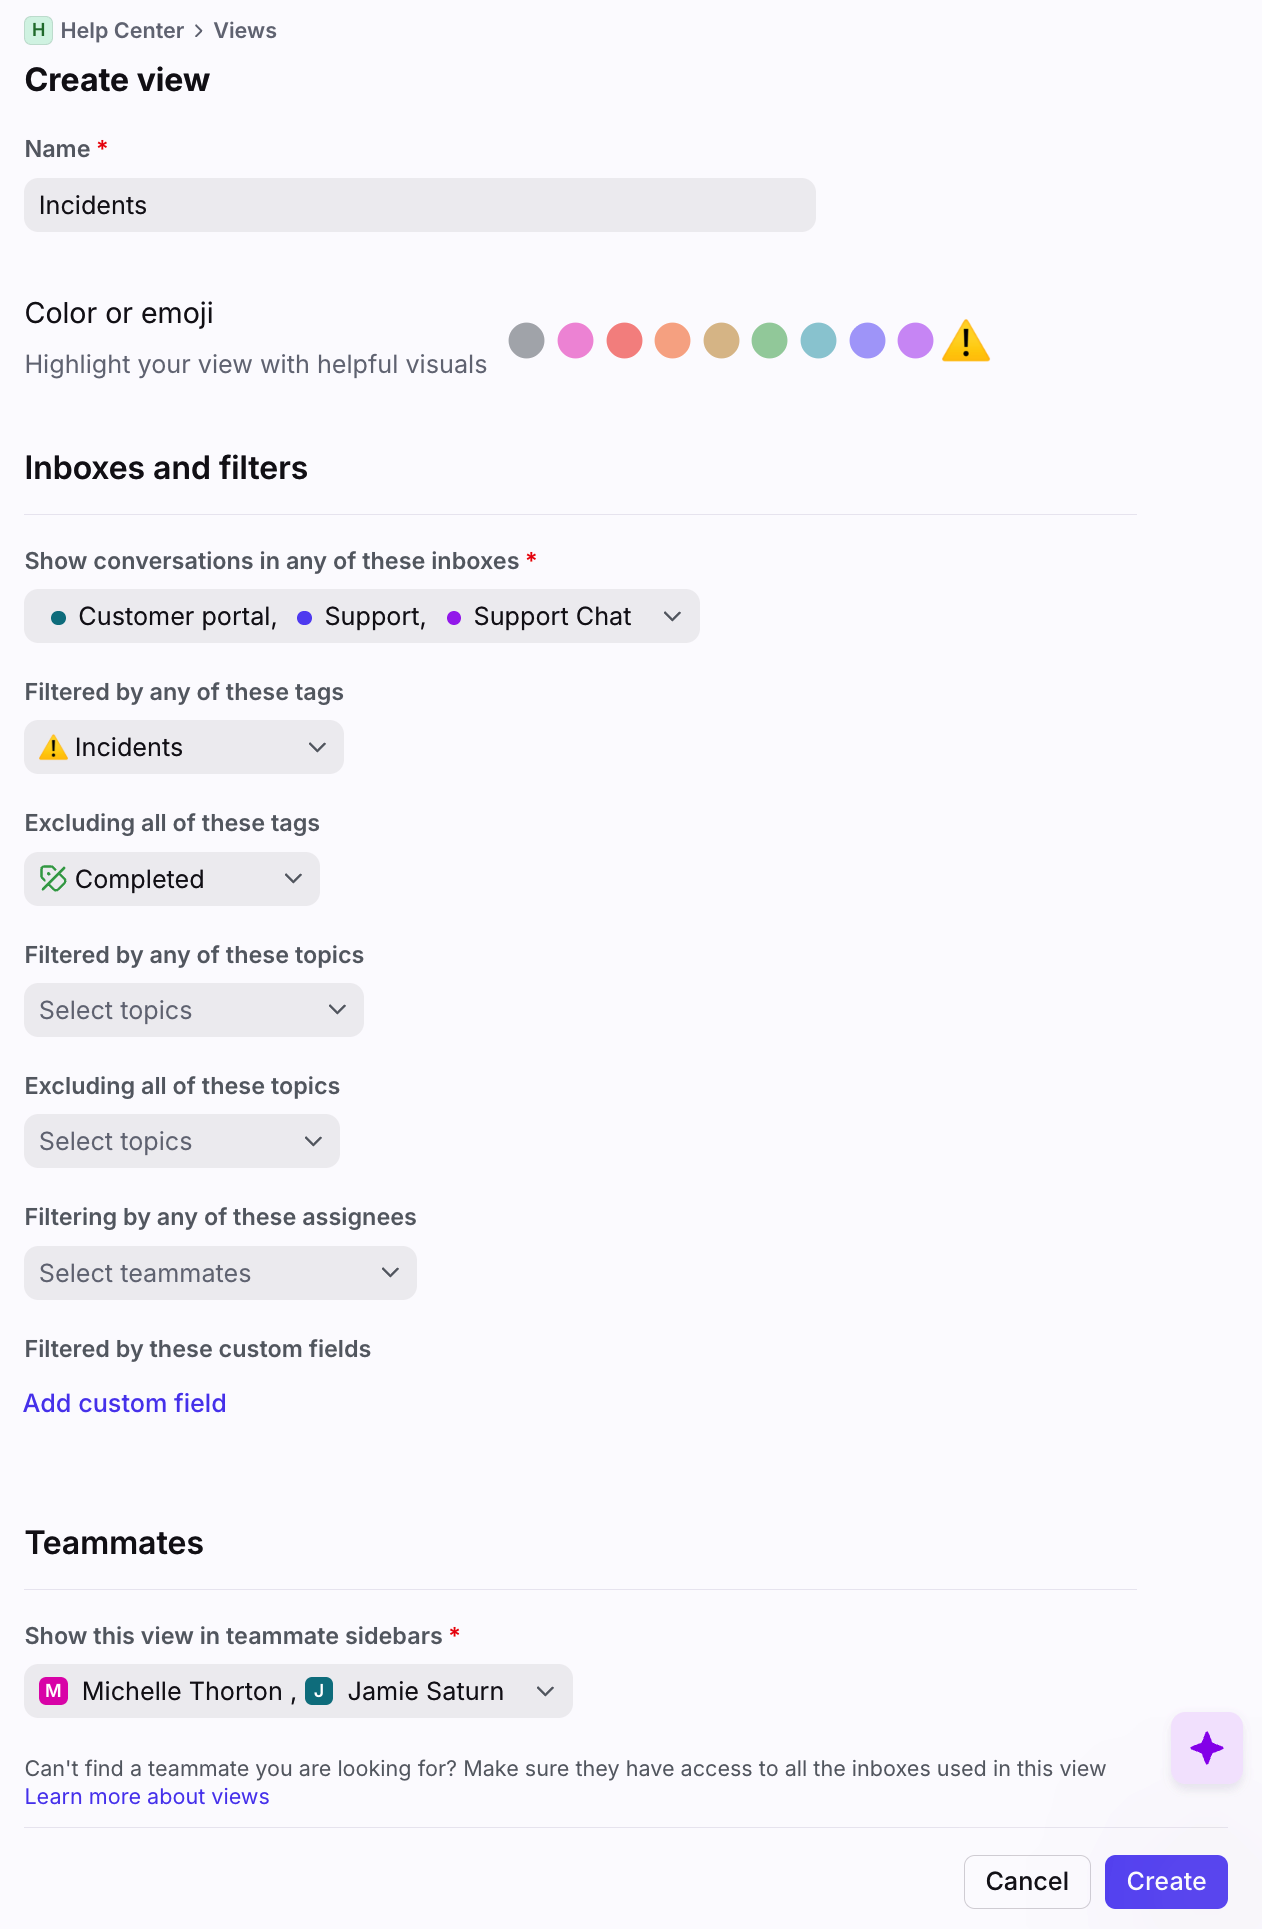
Fill in the following fields:
Name: Enter the name of the view, which displays in the sidebar.
Color or emoji: Select a color or emoji, which displays in the sidebar.
Inboxes: Select shared inboxes to focus on.
Include tags (optional): Select shared tags to focus on.
Exclude tags (optional): Select shared tags OR conversations with no tags to omit from the view.
Include Topics (optional): Select Topics to focus on.
Exclude Topics (optional): Select Topics OR conversations with no Topics to omit from the view.
Assignees (optional): Select teammates to focus on OR assignees to exclude from the view.
Custom fields (optional): Select conversation custom fields to focus on.
Teammate sidebars: Select which teammates you want to proactively push the view to. Only teammates with access to the selected inboxes are listed. This new view will automatically appear in the selected teammates' sidebars. Teammates with access to the selected inboxes can add the view to their sidebar even if they are not selected here.
Step 3
Click Create. Your new view will be listed under the Views section in the sidebars for all teammates you selected to share to view with.
Editing shared views
Step 1
Option 1: In your sidebar, hover over the view you'd like to edit. Click the three-dot icon, then Edit view.

Option 2: Click the gear icon and navigate to your workspace settings. Click Views in the left sidebar, then select the view you want to edit.
Step 2
Make any adjustments to your view, then click Save. Any changes will be visible to all teammates with access to the view.
If you make a change to which inboxes are included in the view, and one of the teammates you previously shared the view with does not have access to an added inbox, they will lose access to the view and see an error message.
Deleting shared views
Step 1
Option 1: In your sidebar, hover over the view you'd like to edit. Click the three-dot icon, then Edit view.
Option 2: Click the gear icon and navigate to your workspace settings. Click Views in the left sidebar, then select the view you want to delete.
Step 2
Inside the view settings, click Delete view.
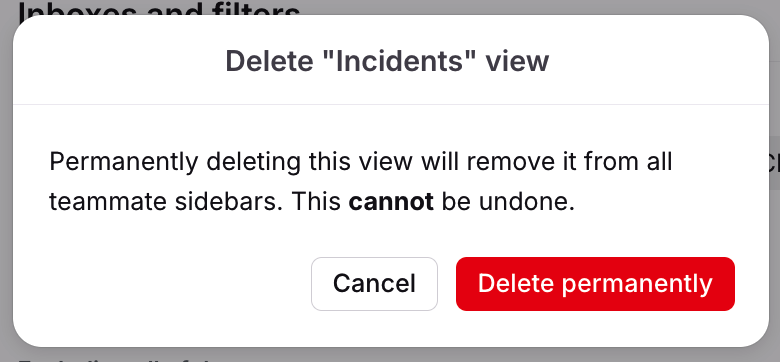
Step 3
Click Delete permanently to confirm. This will delete the view for all teammates who had access.
FAQ
Can I add and hide views from my sidebar?
Yes. Like tags or inboxes, you can hide views from your sidebar. You can also add views not currently in your sidebar by editing your sidebar.
How many views can I add to my sidebar?
You can add up to 50 views to your sidebar. This limit includes both private and shared views.
Can I select my personal inbox or tags when creating a view?
Not yet. Views are currently limited to shared inboxes and shared tags.
Can I select more than one workspace?
No. A single view can only support shared inboxes from one workspace at a time.
How many inboxes, tags, or teammates can I select in a view?
You can select up to 50 shared inboxes, 50 shared tags, and 50 teammates per view.
Why can't I see conversations in my individual inbox in a view?
Views only include conversations that live in shared inboxes. If you apply a shared tag to a conversation in your individual inbox, then build a view that filters for that tag, the conversation is not included in the view.
For a conversation appear in a view, it needs to be in one of the shared inboxes selected in the view.
Can I see which teammates have access to a view?
No. Admins won’t be able to see which teammates they previously shared a view with, nor can they see which teammates actively have the view added to their sidebars.
Can I use teammate groups with views?
Not yet. Teammate groups cannot be used in the assignee or teammate sharing fields.
Can I move the Views section in my sidebar?
Yes. The Views section can be reordered alongside your other sidebar sections. See this article to learn more.
Pricing
This feature is available on all the latest plans.