
Building a QA workflow using Front rules and Zapier
Overview
Companies choose Front to help them provide exceptional customer service. One way to ensure you maintain exceptional service is to provide coaching and identify opportunities for improvements with your team. Front's award winning support team does this with the help of a QA process similar to what is described in this article.
Helpful to know
This article will discuss how to create a QA process for your team using Front rules and Zapier.
Note: this requires a paid Zapier plan in order to utilize multi-step Zaps and the Webhooks action.
This example will use some custom fields in rules, so this will require the Scale plan or higher.
This should take around 20-30 minutes to configure.
Step 1: Preparing Front
Let's start by creating two Custom teammate fields to help determine which teammates should be included in the QA process;
Include in QA (Type: Boolean - yes/no)
- Used to opt a teammate in/out of the QA workflowManager (Type: Teammate)
- Used to identify who should perform the QA for "this" teammate
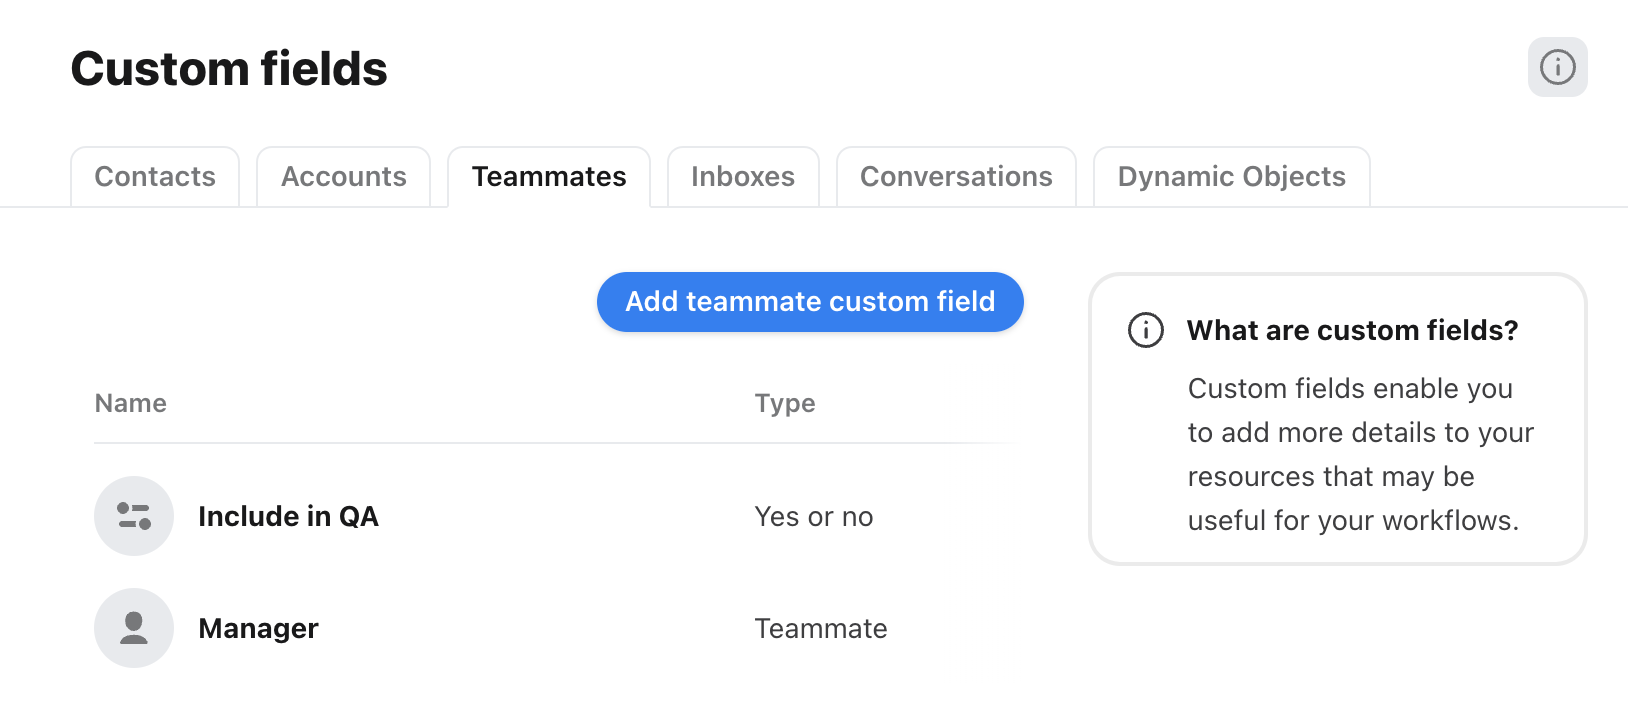
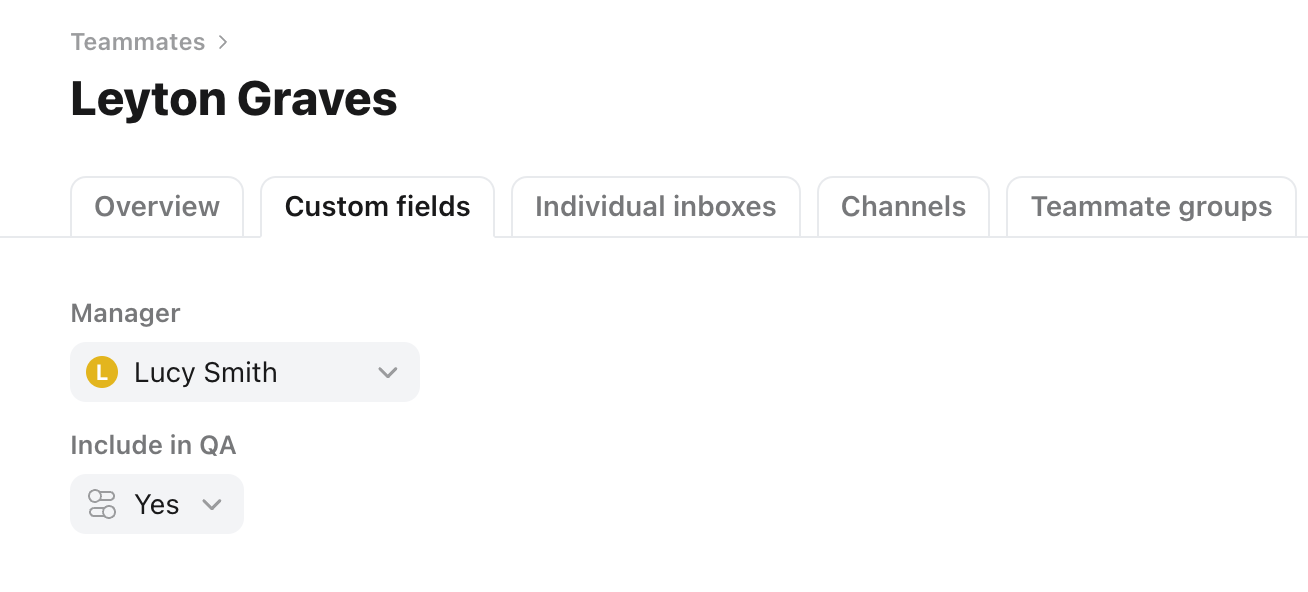
Next, click into your teammates list and ensure each teammate who you want to include in the QA process has the Include in QA field marked as "yes", and has a Manager assigned.
Step 2: Building the Front rule
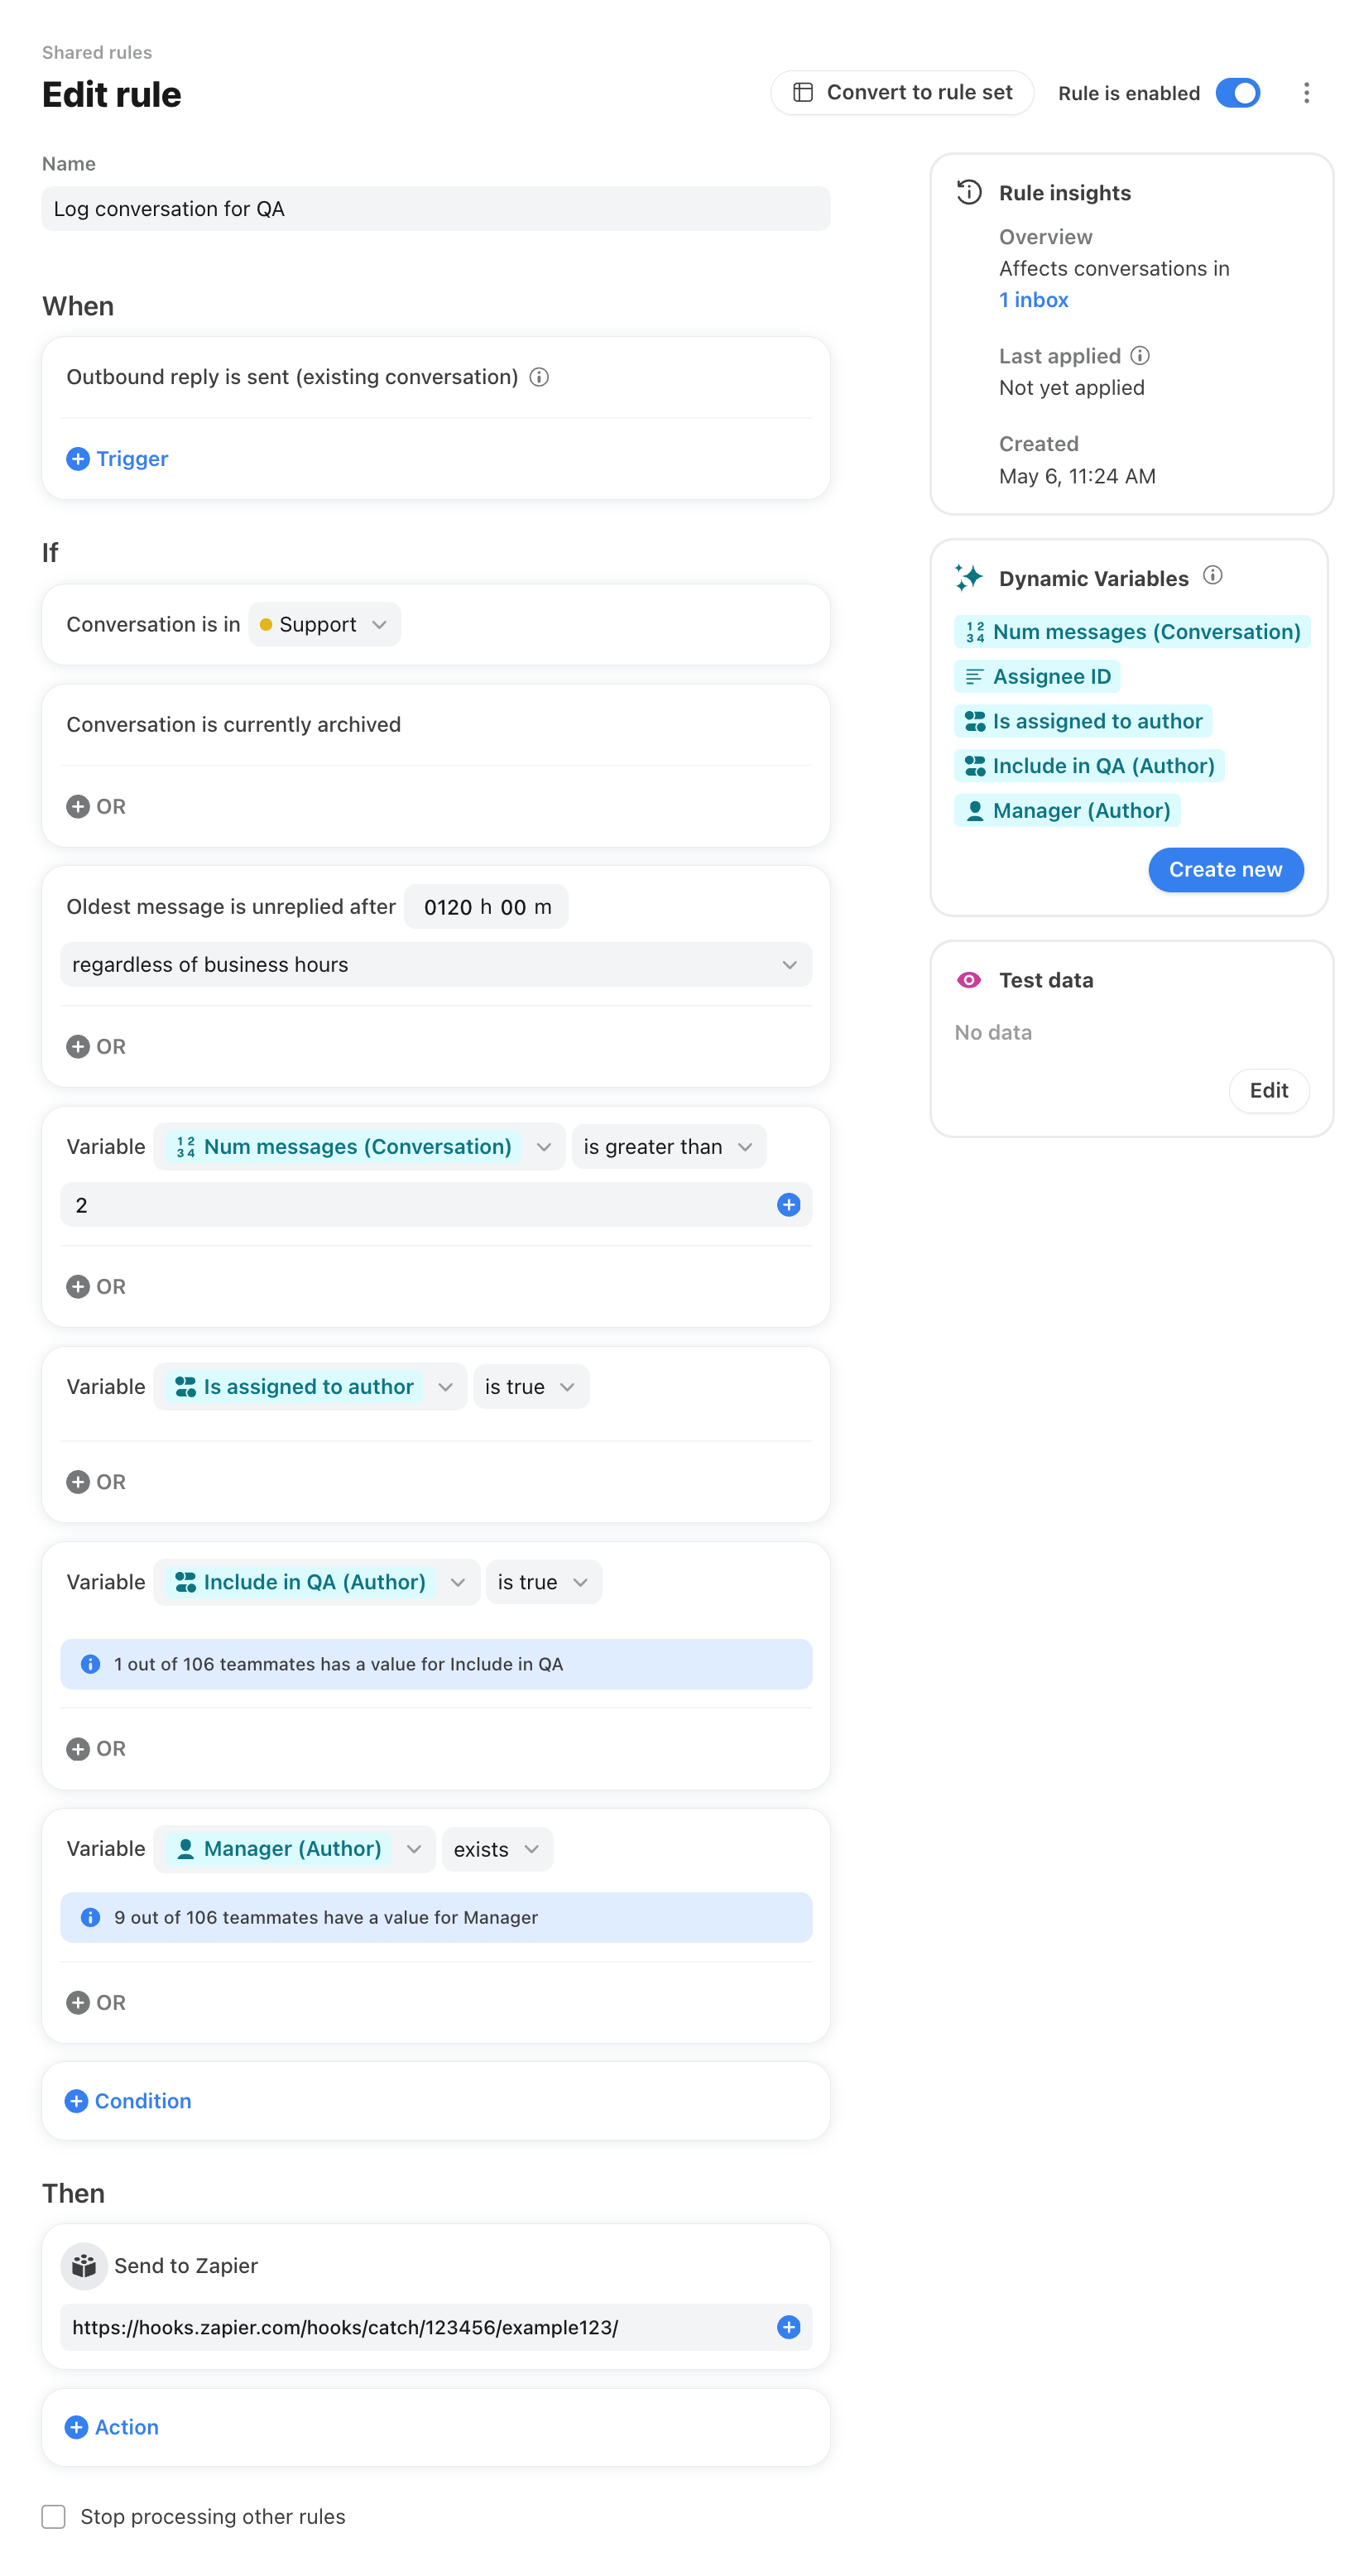
We will use a rule in Front to identify "closed" conversations. For this example, we will assume a conversation is closed when an outbound reply has been sent, and no inbound response has been received for five days.
Start by creating a few Dynamic Variables;
Num messages: Conversation -> Number of messages
Assignee ID: Conversation -> Assignee -> Teammate ID
Is assigned to author: Message -> Author -> Teammate ID -> test if value is equal to Assignee ID
Include in QA: Message -> Author -> Get custom field "Include in QA"
Manager: Message -> Author -> Get custom field "Manager"
Now, build a rule that looks like the following;
Trigger
Outbound reply is sent (existing conversation)
If conditions
Conversation is in [ List of inboxes you want to include in the QA process ]
Conversation is currently archived
Oldest message is unreplied after 120 hours (5 days)
Variable Num messages is greater than 2
Variable Is assigned to author is true
Variable Include in QA is true
Variable Manager exists
Action
Send to Zapier (We will fill out the Zapier webhook URL in the next step, part #3)
This gives us a rule which will run 5 days after the last outbound message was sent in a conversation, where the conversation is currently archived, remains assigned to the author of the last message, that author is opted-in to the QA process, and there were three or more messages in the conversation (change or omit this condition as you see fit).
The rule should look something like this;
Step 3: Zap #1 - Logging the QA conversations
We will create two Zaps - one to record candidate conversations for the QA review, and a second which runs on a recurring schedule and performs the QA assignments.
Log in to Zapier, and create the first Zap. Let's name it "QA Review - [Step 1] Record Closed Conversations". Have the trigger event be Webhooks by Zapier -> Catch hook. Click through the steps to create this step, and copy the webhook URL Zapier generates for you. It should look something like;
https://hooks.zapier.com/hooks/catch/123456/abcd123/Paste that webhook URL into the "Send to Zapier" step of your new rule in Front, and Save the rule.
During testing, you may want to update your Front rule to omit the "Oldest message is unreplied for 5 days" condition, or edit the wait time to something much shorter like 1-minute; this allows you to trigger your Zap quickly on a qualified teammate sending an outbound reply in a conversation, and will give you an event to analyze in Zapier.
After getting a test event into Zapier by triggering your Front rule, create an Action step in the Zap; Code by Zapier -> Run Javascript.
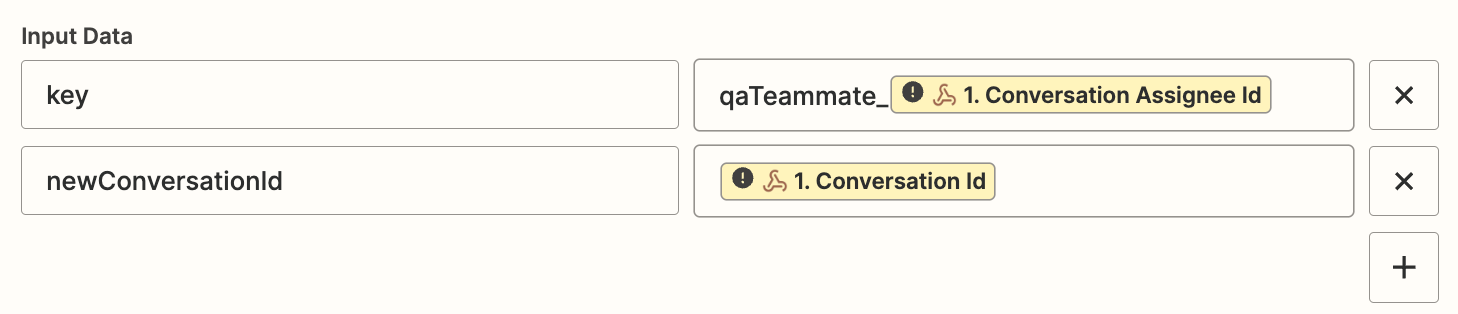
We will create two Input Data entries;
The dynamic parts of these fields should be extracted from step 1 of the Zap (the Webhook step)
The Zap will use the Storage by Zapier feature. First, you will need to follow Zapier's instructions to set up a Storage account.
Once your Storage account is ready, we'll use the following Javascript code in the Code section;
// It's important to manage the length of the list stored under
// each Key to prevent exceeding Zapier's Store limits
// See: https://help.zapier.com/hc/en-us/articles/8496197365389-Storage-examples-in-Zaps
//
// As this Zap adds a new item to the QA Review list, it ensures the
// length of the list is not more than 3, by removing the oldest entry
//
// This works by creating a "queue" for each teammate by ID, and storing
// a list of conversation IDs in that queue.

const {key, newConversationId} = inputData;

// Initialize the store client with the UUID you created when setting up your Storage account
const store = StoreClient("<YOUR_UUID_SECRET>");

// Fetch the list content
let listContent = await store.get(key);
if (!listContent || !listContent.list) {
  await store.listPush(key, newConversationId, 'tail');
  const updatedValue = await store.get(key);
  return {
    added: newConversationId,
    list: updatedValue.list
  }
}

let list = listContent.list;

// If list contains less than 3 items, Add new item to list and return
if (list.length < 3) {
  await store.listPush(key, newConversationId, 'tail');
  const updatedValue = await store.get(key);
  return {
    added: newConversationId,
    list: updatedValue.list
  }
}

// Else, clear the list, and re-add the two tail items + new one.
await store.deleteMany(key);

await store.listPush(key, list[list.length - 2], 'tail');
await store.listPush(key, list[list.length - 1], 'tail');
await store.listPush(key, newConversationId, 'tail');

// Fetch current (updated) value of the list, and return.
const updatedValue = await store.get(key);
return {
  added: newConversationId,
  list: updatedValue.list
}
In summary, what this does is automatically create a "List" in Zapier Storage for each Front teammate included in the QA process, and adds up to three recent conversation IDs to their list. In the next Zap we will "pop" one of these recent conversations from the list to perform the QA review.
Save and publish your Zap.
Step 4: Zap #2 - Creating QA review discussions
So we are now in a position where teammates in Front will complete conversations, and a record of these will be logged in Zapier. This next step will be fetching those conversations, and creating discussion conversations between the teammate and their manager in Front.
Create a new Zap. Let's name it "QA Review - [Step 2] Generate QA Review Conversations". Have the trigger step be Schedule by Zapier, and pick the cadence you want it to generate QA review discussions. Having it run once a week is a great place to start.
Next, create a Code by Zapier -> Run Javascript step. We will use this to fetch a list of teammates to check for QA review discussions.
The following JS code can be used to fetch and filter a list of teammates who should be included in the QA review.
Note you will need to generate a Front API key and replace the "YOUR_FRONT_API_TOKEN" string with the actual value of your API key
// This calls Front's List Teammates API endpoint to fetch a
// list of teammates in your company. The list is then filtered
// to return only those teammates included in the QA process.
//
// API Docs: https://dev.frontapp.com/reference/list-teammates
/* Fetch all teammates */
const response = await fetch('https://api2.frontapp.com/teammates', {
method: 'GET',
headers: {
Authorization: 'Bearer YOUR_FRONT_API_TOKEN'
},
});
const json = await response.json();
// Filter for teammates included in your QA process.
// It is important the custom_field keys ("Include in QA" and "Manager")
// **exactly match** the custom field names you use in Front.
const allTeammates = [...json._results];
const teammates = allTeammates
.filter((teammate) => {
return teammate.custom_fields['Include in QA'] == true && teammate.custom_fields['Manager']
});
// Add a 'manager' teammate object to each teammate
teammates.forEach((teammate, index) => {
const manager = allTeammates.find((t) => {
return t.email == teammate.custom_fields['Manager']
});
if (manager) {
teammates[index].manager = {
id: manager.id,
email: manager.email,
username: manager.username,
first_name: manager.first_name,
last_name: manager.last_name,
}
}
});
// Returns all Teammates with a manager
return {
teammates: teammates.filter((t) => { return !!t.manager }),
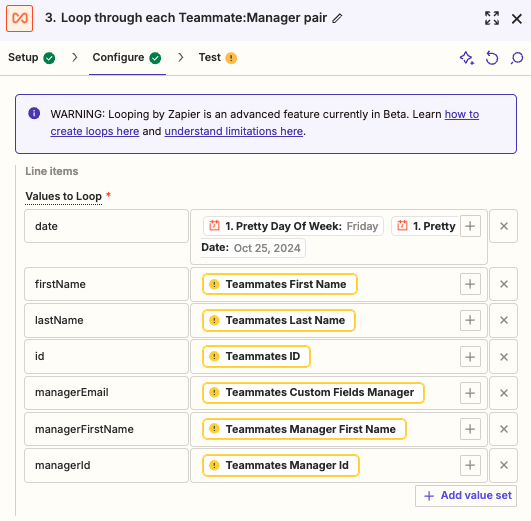
}For the next step in the Zap, given we need to perform the same process for multiple teammates, we'll use the Looping by Zapier -> Create loop from line items action.
In the Action tab, we need to configure a few data items to pass into each loop from the result of the previous code step.
Something like the following will pass the current date, teammate information and the teammate's manager information into each loop:
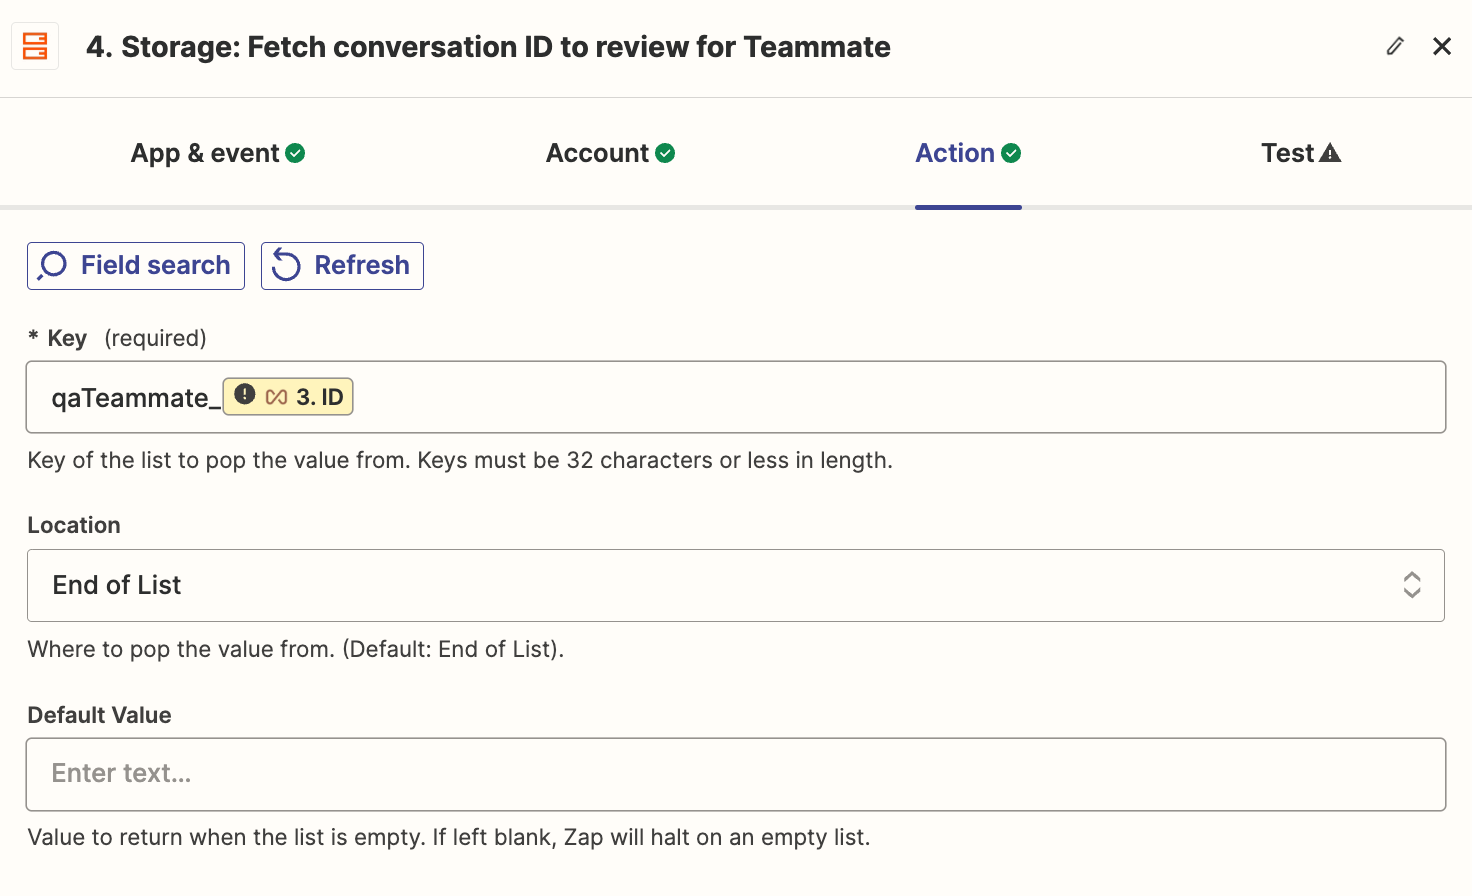
Next, in the loop create a Storage by Zapier -> Pop value from list step. Select the Storage account you created earlier, and ensure the Key you use to access data matches the one you used earlier. We will pop the conversation from the end of this list as that should be the most recently inserted conversation ID.
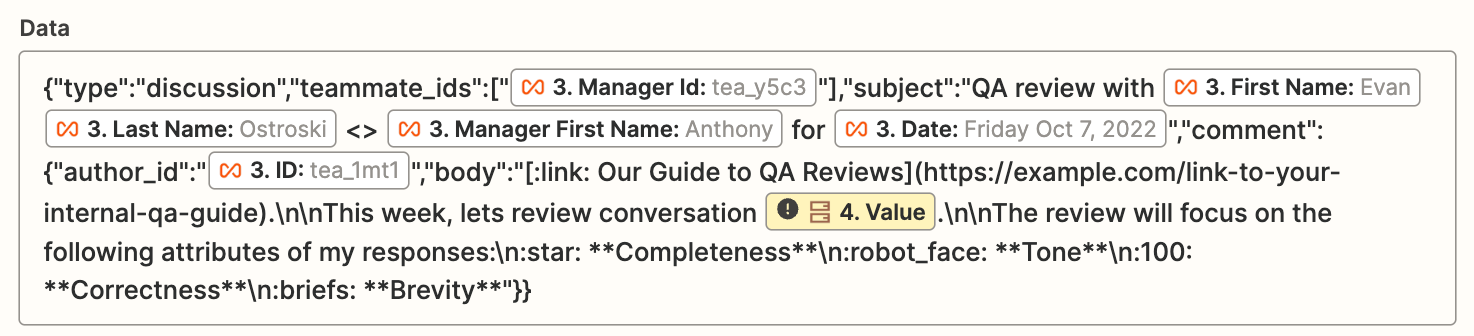
Finally, create a Webhooks by Zapier -> Custom Request step.
We will use the Create Discussion Conversation API endpoint to create an internal discussion between the teammate and their manager, asking for a review on the selected conversation.
Set the Method field to POST and the URL to "https://api2.frontapp.com/conversations".
For the Data field, you need to pass a JSON object which represents the message you want to create. It must be formatted according the the included API doc link above. By setting the author_id as the teammate to be reviewed, and the teammate_ids including the ID of the manager, this will create a private discussion in Front between the reviewee and their manager.
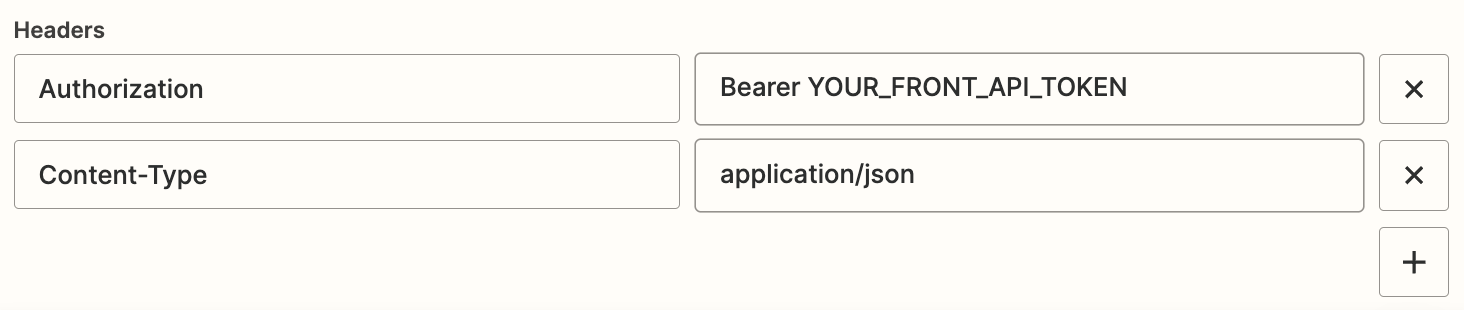
You will need to pass two headers to authenticate the request, and specify the format of the request (JSON).
Save and publish your Zap, and that should be all!
Now, on the schedule specified in Zap #2, each of your teammates in the QA process will see an internal discussion thread automatically created between themself and their manager to review how they did on the selected conversation.