
Upload accounts with a CSV
Overview
You can quickly import up to 3000 accounts at a time into Front using a comma delimited CSV file. Accounts represent the clients or organizations that your team works with. Once you’ve imported your accounts, you’ll be able to use those accounts in rules, analytics, and more.
You can also use one of our CRM accounts sync features to automatically sync accounts into Front:
If you'd like to upload contacts rather than accounts, see this guide.
Prepare your CSV file
Important to know
The order of columns in your CSV does not matter.
Empty rows and columns in your CSV will be ignored.
Unrecognized column headers will trigger an error; they will not result in the creation of a new account custom field. For example, if you have a Revenue column in your CSV but have not created an account custom field called Revenue, you’ll encounter an error.
All rows should have a value in the the domains column for every import. Otherwise, if the domains value is empty in your latest file AND if that account previously had a value in the domains field, the old value in Front will be removed.
If a property column for a custom field is not provided in your CSV, that account property will not be updated.
If a row does not contain a value in the name column, that row is skipped and the account will not be imported.
Template
You can download a CSV template from the bottom of this article.
File formatting
Column headings and naming conventions are critical for a successful import. The file may only contain the exact fields listed below, in any order:
Column header (not case-sensitive) | Account field | Example value | Description |
name | Name | Front | [Required] The name of this account |
description | Description | Front is the leading Customer Communications Hub | A description of this account |
domains | Domains | front.com, frontapp.com | A comma-separated list of one or more email domains. Contacts with a matching email domain will be automatically associated with this account. Domains are unique and can belong to at most one account. |
externalId | External ID | abcd1234 | A unique identifier for this account, usually from another data source like a CRM. |
name of your custom account field, e.g. Revenue | Custom fields | Depending on the type of custom field, this could be a string, number, boolean, date time, or teammate email | You can add columns for any of the custom account fields you’ve set up. |
Here are the valid values that can be supplied for each type of custom field column:
Custom field type | Valid CSV values |
Date and time | Most common date time formats are accepted like:
Note that if a time is not provided, the time will default to midnight in UTC on the provided day. |
Inbox | Provide the inbox ID (e.g. inb_12345), not the inbox name (e.g. Marketing Team Inbox). The inbox ID can be obtained via the API. |
Number | A number |
Teammate | The login email address of a user within your company in Front (user names are not accepted) |
Text | Any text |
Dropdown | Text must match one of the dropdown values listed in the custom field |
Yes or no | Valid values include “True”, “False”, “Yes”, or “No” (case insensitive) |
Instructions
Step 0 (optional)
If you are migrating contacts from a CRM into Front, you will first need to export your contacts from your CRM into a CSV file, then follow the instructions in the Prepare your CSV file section to re-format your file for Front. Below are some popular CRMs' help articles on how to export contacts:
Step 1
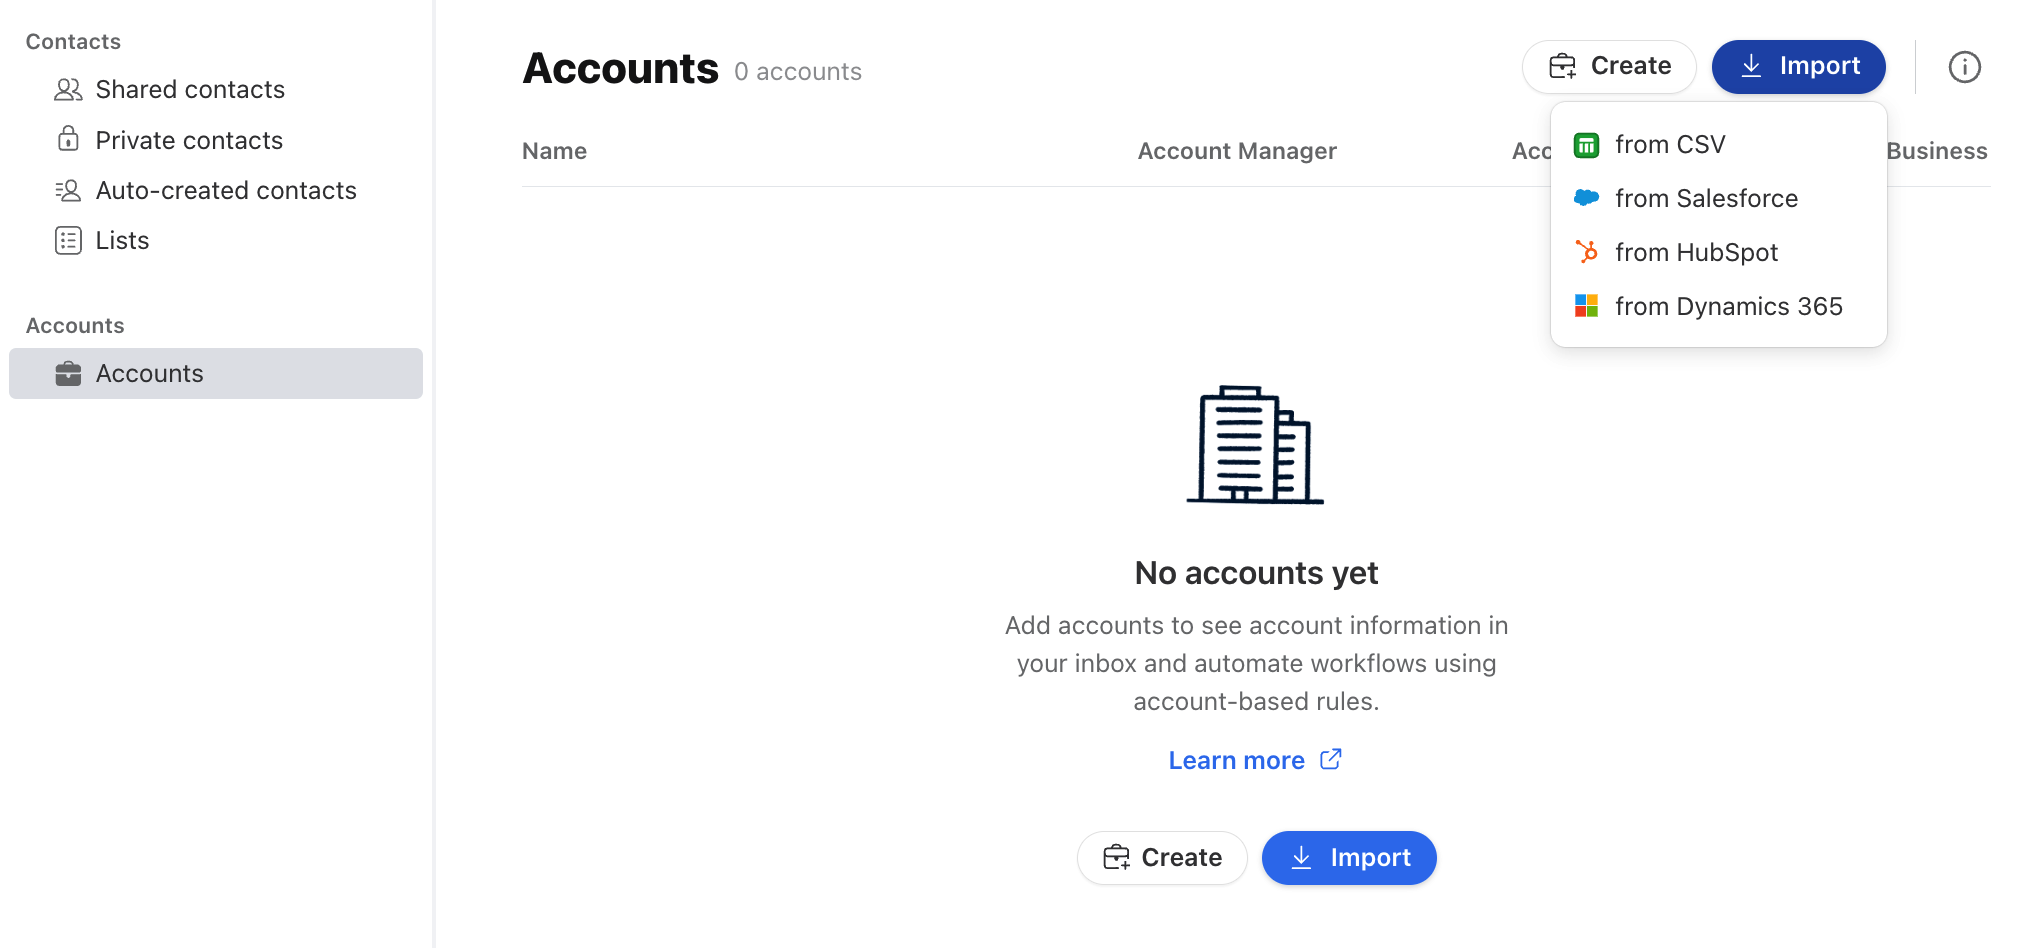
In the navigation menu, select Contacts. Select Accounts in the left sidebar to access the Accounts Manager in Front.
Step 2
Click the Import button at the top right, then click from CSV.
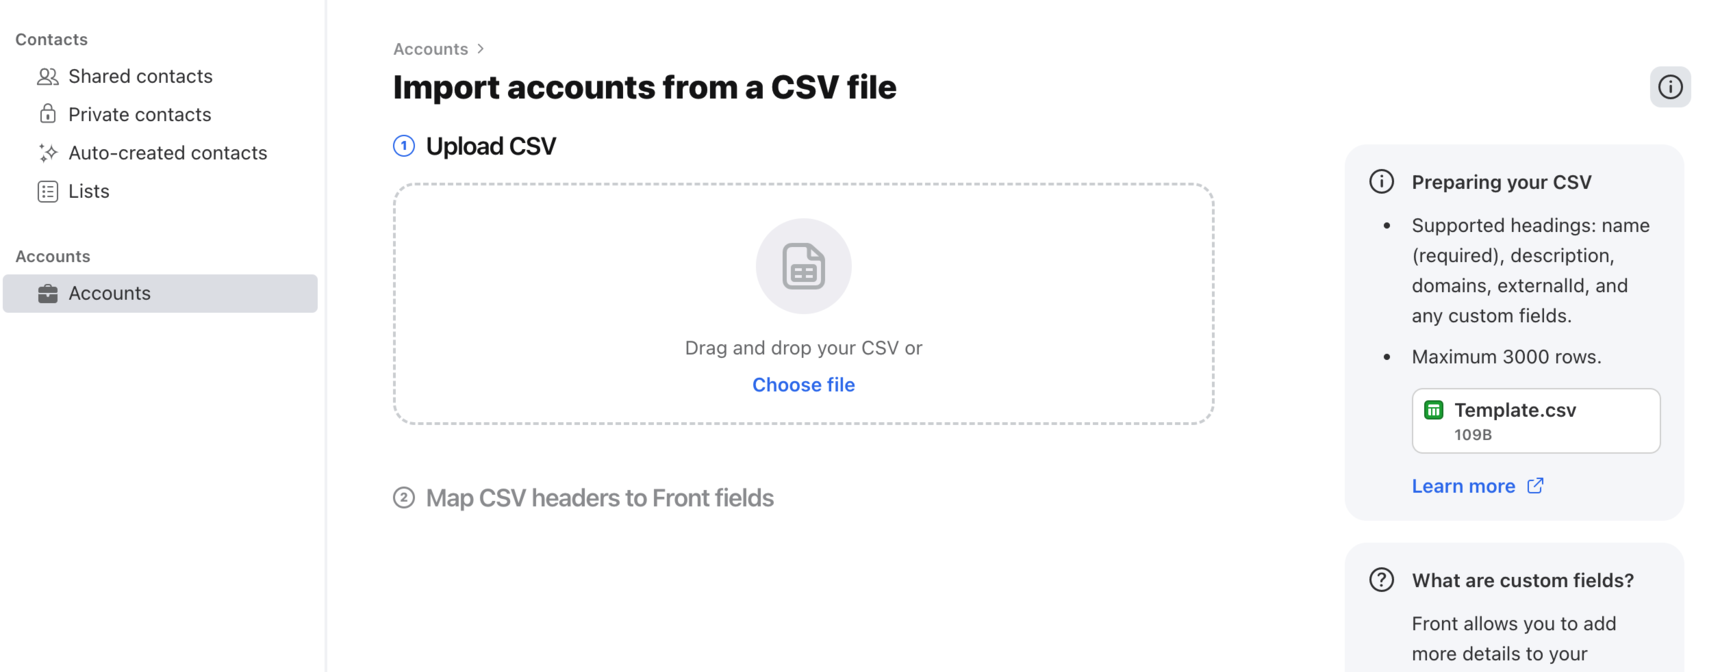
Step 3
Drag and drop your CSV file into the page, or click Choose file and select the file from your computer.
Step 4
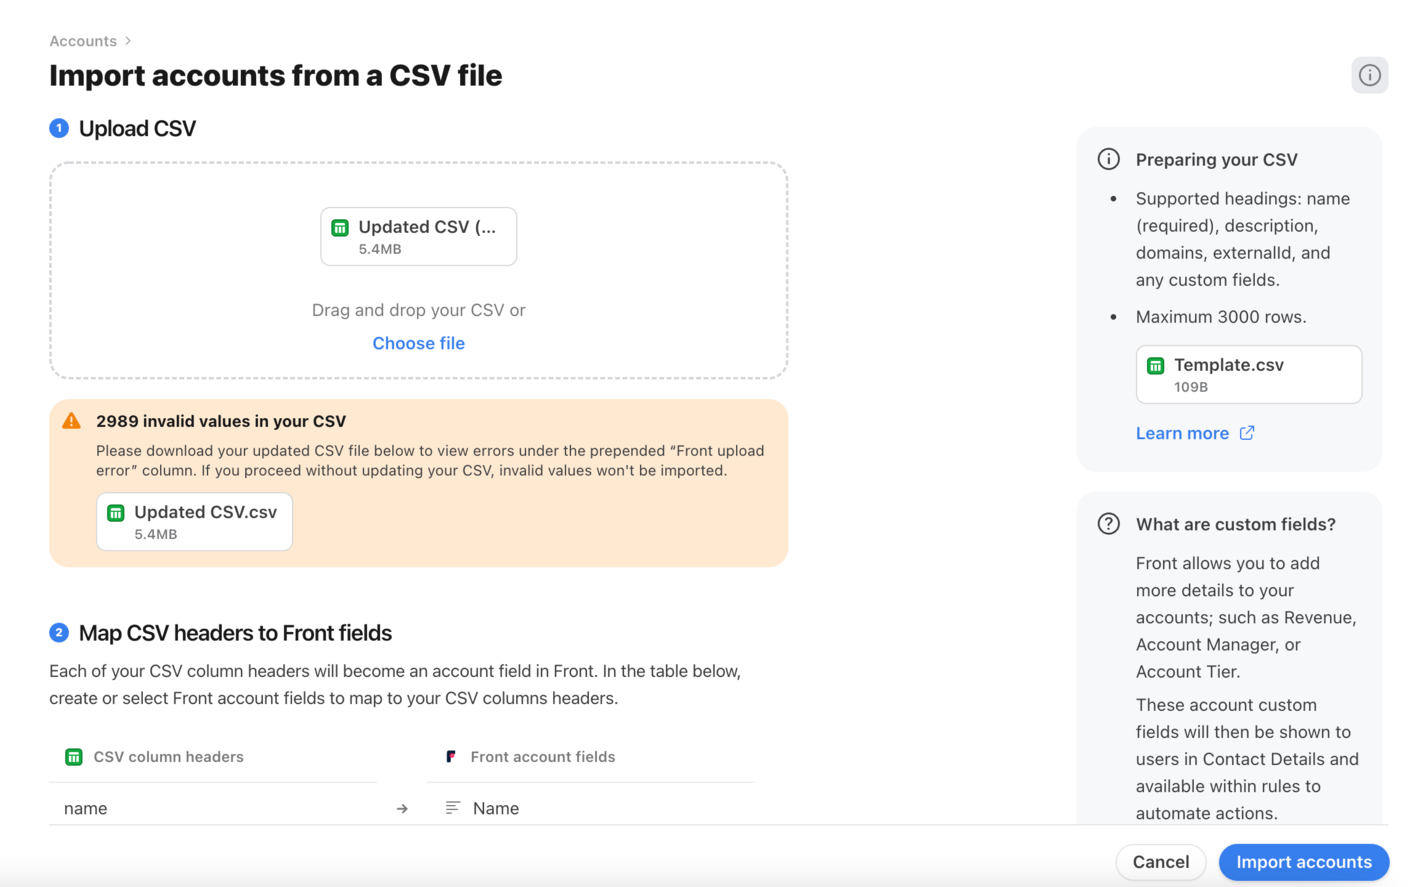
If there are any errors, you will see a red (critical error) or orange (warning error) box with instructions on how to resolve the errors. See below for a full list of errors and resolution steps.
Resolve any errors and re-upload your CSV file if needed (steps 2-3).
Step 5
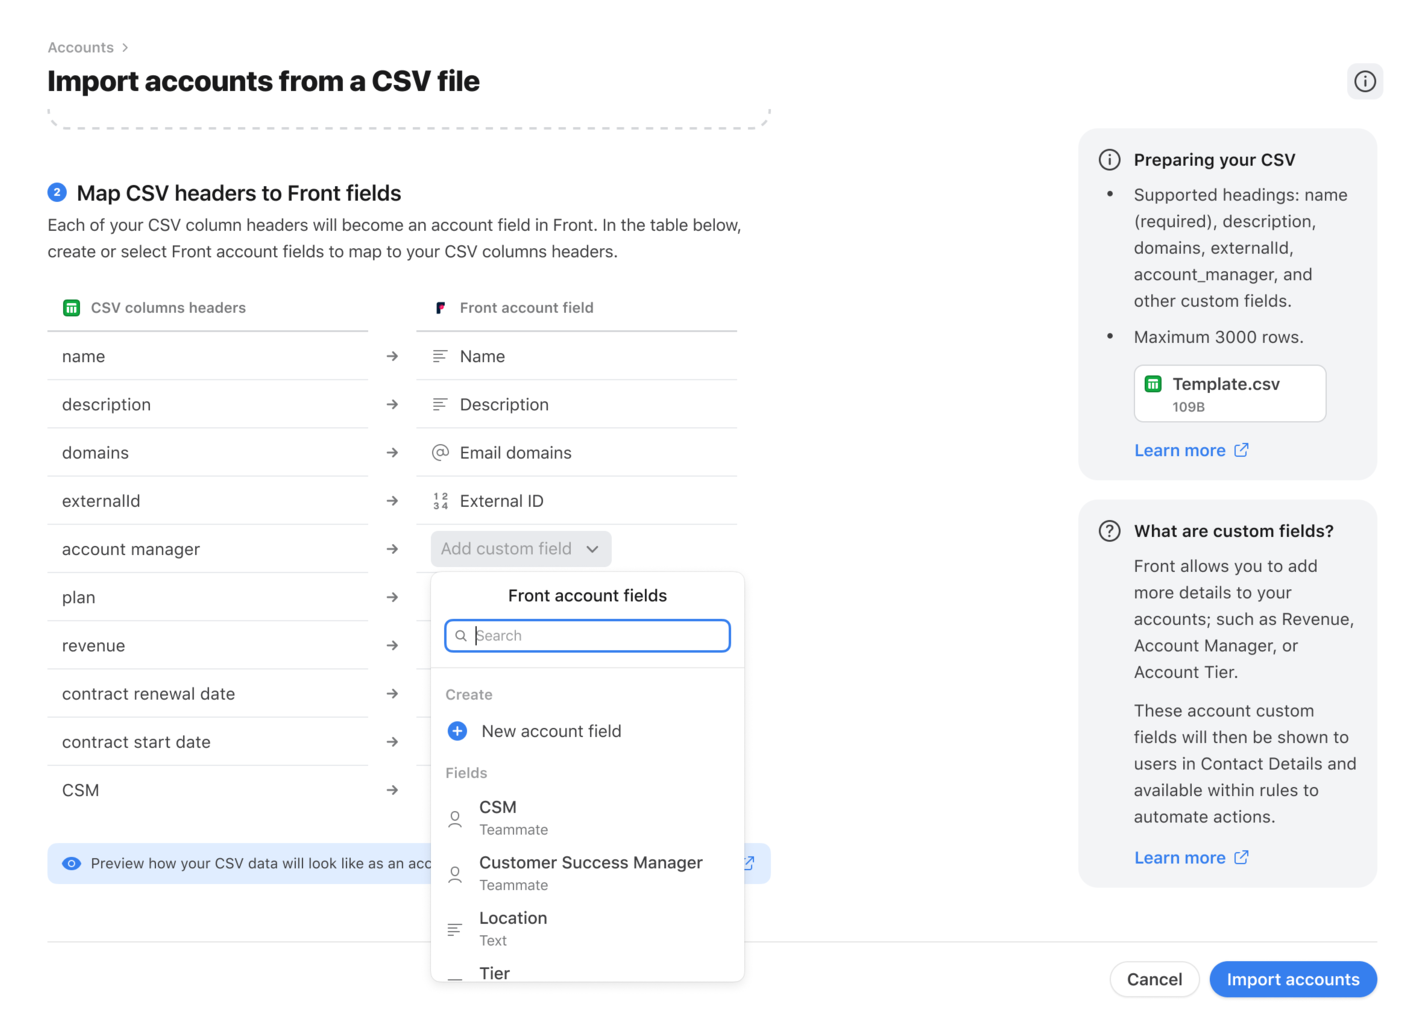
Map your CSV column headers to account fields in Front.
If an existing account field name matches the CSV column name, we will automatically map those account fields.
To manually map an account field, click the Add custom field dropdown, and select a field you’d like to map to from the dropdown.
If the account field does not exist, a company admin can create a new custom field by clicking New custom field, or in the Custom fields section of your company settings. See instructions here.
Step 6
Click Import accounts to start importing your account data. It may take a moment for account data to appear within Front.
If you import accounts without fixing any warning errors, invalid values won’t be imported. If you import accounts without mapping all account fields, unmapped fields won’t be imported.
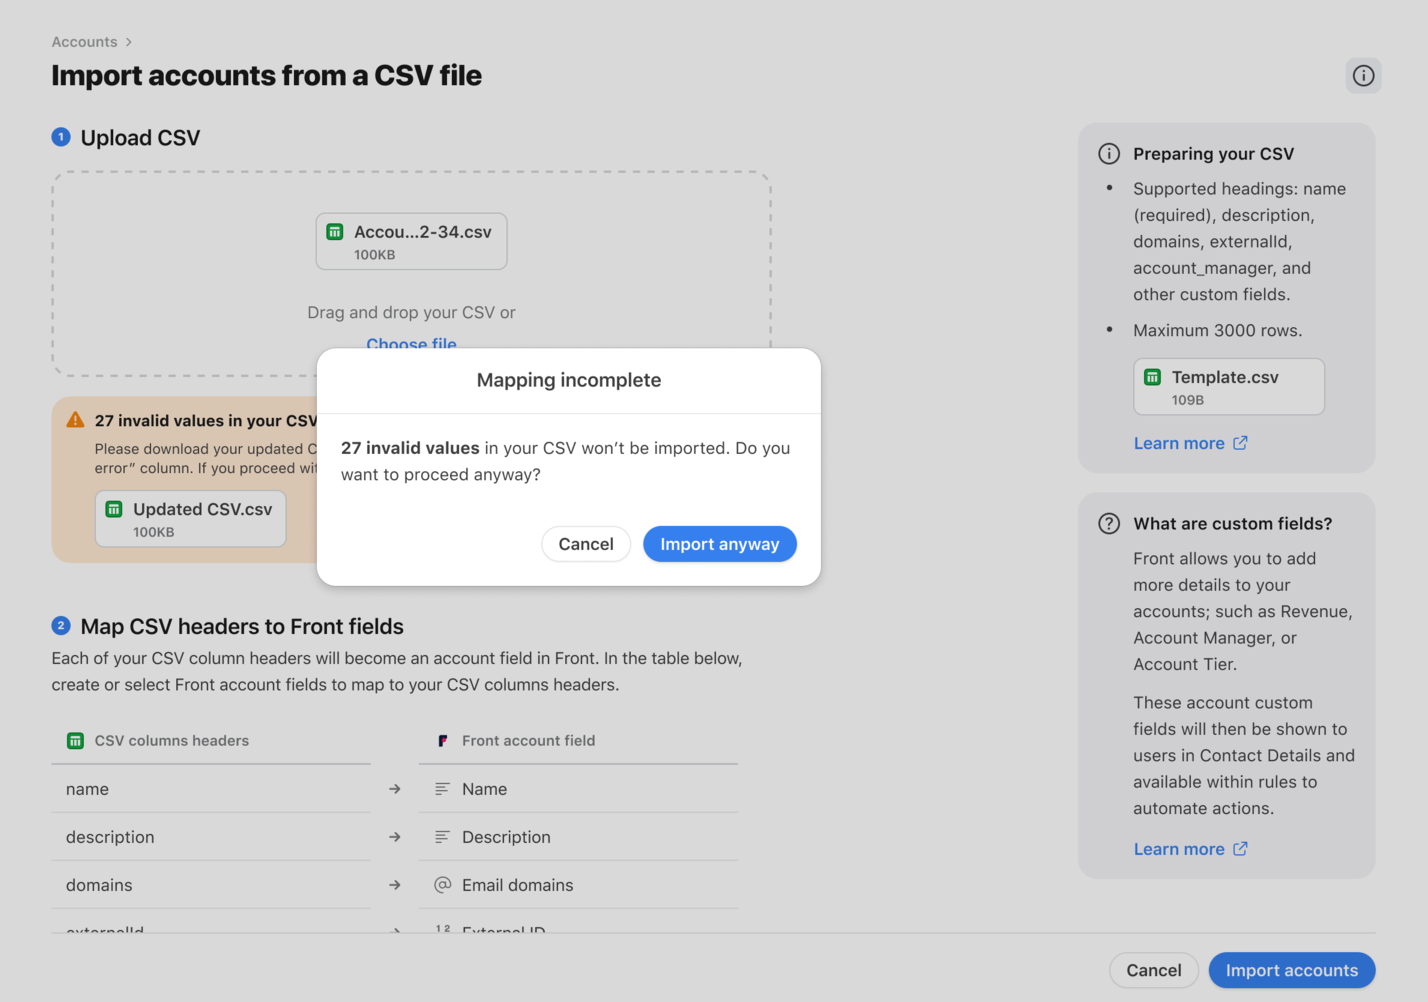
Once the import completes, a green success banner will appear at the bottom left corner of the screen.
CSV validation errors
Error types
Red: Critical errors. You will need to fix any errors in your accounts file and re-upload it to continue.

Orange: Warning errors. You can continue with the accounts import process without re-uploading your file. However, the import will skip all invalid values with errors.

CSV file issues
Error type | Resolution |
No header row found | Add a header row to your CSV. A header row with at least a name column is required. Download the CSV template. |
A name column was not found | Add name column to your CSV. Download the CSV template. |
Unrecognized column name | Remove the unrecognized column from your CSV, or create an account custom field with a matching name. |
Uploaded file is not a csv file | Ensure that the file you’re uploading is a CSV file. |
Duplicate columns for the same property | Check your CSV header and remove any duplicate columns. |
Uploaded file exceeds 3000 rows | Split your CSV into smaller files that do not exceed 3000 rows |
Row-specific issues
When a row-specific error is encountered, Front will supply an updated CSV for you to download — the CSV will contain your original data along with an error column that describes the error for each row.
Error type | Resolution |
A name is required for an account | Add a name to this row — the name field is required |
The domain is already taken by another account | A domain can only belong to one account. Remove the domain from an existing account in Front, or the remove the taken domain from your CSV. |
Invalid domain provided | Fix the domain to be a valid email domain, such as example.com (no http, @, etc.) |
Common domain cannot be used with accounts | Common email domains like gmail.com or outlook.com cannot be used with accounts. To fix this error, remove the common email domain from your CSV. |
The value in a custom field column doesn’t match the field type | Update the row’s value in the custom field column to match the custom field type. For example, if the custom field is of type number, the value must be a valid number. |
Update accounts with new upload
If you upload a new CSV that contains accounts that already exist in Front, here is how Front will update those records:
If a row contains an externalId, that row will be matched to an existing account with the same externalId.
If a row does not include an externalId but includes domains, that row will be matched to existing account(s) with the same domain.
If a row does not include an externalId or domains, that row will be matched to an existing account with the same non-case-sensitive name. If that account previously had a value in the domains field, the old value in Front will be removed.
If no existing accounts are found with the above, we’ll attempt to create a new account.
If you’re trying to upload different accounts with the same name, you’ll need to include a domain or externalId to distinguish those accounts.
If a row does not include description: If there was an old value before and the value provided for that field in the CSV is blank, the old value in Front will be retained.
If a row does not include custom field value: If there was an old value before and the value provided for that field in the CSV is blank, the old value in Front will be removed.
Upload specific contacts for an account
After uploading accounts into Front, you can also upload a list of specific contacts that should be associated to those accounts.
Note that you can also add an email domain to an account and Front will automatically associate all existing contacts with matching email domains to that account. This is the recommended approach if email domains are a reliable indicator for the account that a contact should belong to.
Follow the steps in this article to upload contacts via CSV. In addition to the steps there, you can also include an optional accountName column to associate the contacts with an account:
The accountName column associates the contact to the oldest account with the same case-insensitive name.
If a value specified in the accountName column doesn’t match any existing account, you’ll encounter an error.
If the contact being updated is already associated with a different account, it will get updated to be associated with the account specified in the accountName column.
The account specified in the accountName column supersedes any automatic email domain association that may have occurred because of the contact’s email addresses.
If accountName is left blank, no change is made to the contact’s account.